Directions for Foldables
Discover innovative paper folding techniques to create various unique book structures including shutter folds, accordion books, and pyramid folds. This guide provides step-by-step instructions for each design, making it easy to craft bound books, layered look books, and more. Perfect for teachers, students, or anyone interested in hands-on arts and crafts projects. Enhance your creativity and engage with paper in new ways while producing functional and aesthetically pleasing paper creations.

Directions for Foldables
E N D
Presentation Transcript
Directions for Foldables By Allana Hodge & Victoria Brickey June 23, 2010
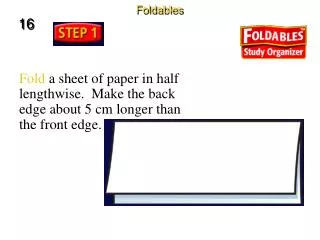
Shutter Fold 1. Begin as if you were going to make a hamburger but instead of creasing the paper, pinch it to show the midpoint. 2. Fold the outer edges of the paper to meet at the pinch, or midpoint, forming a shutter.
Bound Book 1. Take two sheets of paper and separately fold them like a hamburger. 2. Take one of the paper (#1) and mark one inch of the left and right edge. Make a cut to that mark. 3. Do the same with the other sheet of paper (#2), but cut between the two marks on this sheet. 4. Take paper #1 and fold it like a burrito. Place the burrito through paper #2. Open the burrito fold to form an eight-page book.
Three- Quarter Book 1. Take a two-tab book and raise the left hand tab. 2. Cut the tab off at the top fold line. 3. A larger book of information can be made by gluing several three-quarter books side-by-side.
Three- Tab Book 1. Fold a sheet of paper like a hotdog. 2. With the paper horizontal, and the fold of the hot dog up, fold the right side toward center, tryto cover one half of the paper. 3. Fold the left side over the right side to a make a book with three folds. 4. Open the folded book. Place your hands between the two thicknesses of paper and cut up the two valleys on one side only. This will form three tabs.
Pyramid Fold 1. Fold a sheet of paper (8 ½” x 11”)into a taco, forming a square. Cut off the excess rectangular tab formed by the fold. 2. Open the folded taco and refold it the oppossite way forming another taco and an X-folded pattern. 3. Cut one of the folds to the center of the X, or the midpoint, and stop. This forms two triangular-shaped flaps. 4. Glue one of the flaps under the other forming a pyramid. 5. Label front sections and write information, notes, thoughts, and questions inside the pyramid on the back of the appropriate tab.
Four-Door Book 1. Begin as if you were going to make a hamburger but instead of creasing the paper, pinch it to show the midpoint. 2. Fold the outer edges of the paper to meet at the pinch, or mid-point, forming a shutter fold. 3. Make a shutter fold using 11” x 17” or any size paper. 4. Fold the shutter fold in half like a hamburger. Crease well. 5. Open the project and cut along the two inside valley folds. 6. These cuts will form four doors on the inside of the project.
Envelope Fold 1. Fold a sheet of paper into a taco forming a square. Cut off the excess paper strip formed by the square. 2. Open the folded taco and refold it the opposite way forming another taco and X fold pattern. 3. Open the taco fold and fold the corners toward the center point of the X forming a small square. 4. Trace this square on another sheet of paper. Cut and glue it to the inside of the envelope. Pictures can be placed under or on top of the tabs, or can used to teach fractional parts.
Layered –Look Book 1. Stack two sheets of paper so that the back sheet is one inch higher than the front sheet. 2. Bring the bottom of both sheets upward and align the edges so that all of the layers or tabs are the same distance apart. 3. When all tabs are an equal distance apart, fold the papers and crease well. 4. Staple the top of the book.
Accordion Book 1. Fold the selected paper into hamburgers. 2. Cut the paper in half along the fold lines. 3. Fold each section of paper into hamburgers. However, fold one side one half inch shorter than the other side. This will form a tab that is one half inch long. 4. Fold this tab forward over the shorter side and then fold it back away from the shorter piece of paper. 5. Glue together to form an accordion by gluing a straight edge of one section into the valley of another section.
Folded Table or Chart 1. Fold the number of vertical columns needed to make the table or chart. 2. Fold the horizontal rows needed to make the table or chart. 3. Label the rows and columns.