Lenses
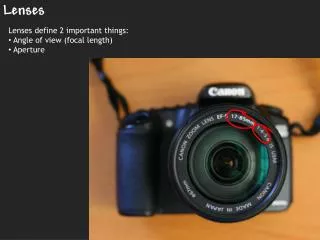
Lenses. Astrophysics Lessons 1. Homework. No homework except to revise for the mock exam next Friday!. Textbooks!. (Astrophysics is not covered in the specification book). Plan for today…. P2: Peer mark the open book exam please ask any questions you wish (~30 mins).

Lenses
E N D
Presentation Transcript
Lenses Astrophysics Lessons 1
Homework • No homework except to revise for the mock exam next Friday!
Textbooks! (Astrophysics is not covered in the specification book)
Plan for today… • P2: Peer mark the open book exam please ask any questions you wish (~30 mins). • Then we start astrophysics! • P4: Draw ray diagrams and play with some lenses.
Today’s Objectives • Explain what is meant by the principal focus and focal length of a converging lens. • Calculate the power of a lens using power = 1/f
Objectives • In the exam you are expected to know about: • Principal focus, focal length of converging lens • power = 1/f • Formation of images by a converging lens • Ray diagrams • Lens formula: 1/f = 1/u + 1/v • Astronomical telescope consisting of two converging lenses • Ray diagram to show the image formation in normal adjustment • Angular magnification in normal adjustment • M = angle subtended by image at eye • angle subtended by object at unaided eye • Focal lengths of the lenses • M = fo/fe
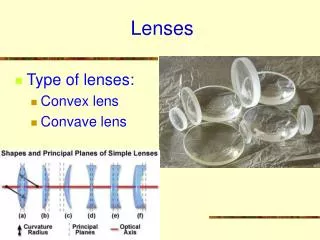
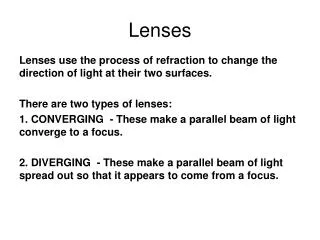
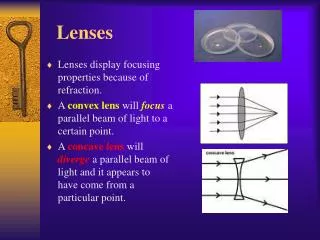
Convex Lens • Lenses work by refracting light at a glass-air boundary. Although refraction occurs at the boundary, we will treat all lenses as bending the rays at the lens axis. • The lens in the eye is a convex or converging lens. This means that the lens makes rays of light come together, or converge.
Principal Focus/Focal Length • The rays parallel to the principal axis are converged onto the principal focus. The focal length is the distance between the lens axis and the principal focus (strictly speaking, the focal plane).
The power of a lens • Thicker lenses bend light more, and are therefore described as more powerful. Powerful lenses have short focal lengths. The power of a lens is measured in dioptres (D) and is given by the formula: • Power = 1 • focal length (m)
Quick Question • The power a lens is +0.2 D What is the focal length in metres?
Real • The principal focus of a convex lens is called real. The images made by convex lenses are in most cases real. This means that the image can be projected onto a screen. We will see now how images are made with ray diagrams.
Ray Diagrams • We can determine where an image lies in relation to the objects by using a ray diagram. We can do this by using two simple rules: • Draw a ray from the top of the image parallel to the principal axis. This ray bends at the lens axis and goes through the principal focus. • Draw a ray from the top of the object through the centre of the lens.
Ray Diagrams • Where the two rays meet, that is where the image is found. The following diagrams shows how we do a ray diagram step-by-step:
A Worked Example • Step 1: Draw the ray parallel to the principal axis.
A Worked Example • Step 2: Draw the refracted ray so that it passes through the principal focus.
A Worked Example • Step 3 Draw a ray from the top of the object through the middle of the lens. This ray is undeviated.
A Worked Example • Step 4 Where the rays meet, that is where the image is.
Ray Diagrams • It is a good idea to draw your ray diagrams on graph paper if possible. • Be careful with your drawing; a small change in the angle of the undeviated ray can lead to quite a big change in the final position of the image. • Use a sharp pencil.
Now lets try some…(F = 3cm) • 1) What is the image like if the object is beyond 2F? • 2) What is the image like if the object is at 2F? • 3) What is the image like if the object is between 2F and F, (1.5F)? • 4) What is the image like if the object is at F? • 5) What is the image like if the object is less than F?
Object at > 2F • Image is real, inverted and diminished
Object at 2F • Image is real, inverted, and the same size.
Object between 2F and F Image is real, inverted, and magnified.
Object at F • Image is real, inverted, at infinity.
Object at < F • Image is virtual, right way up, and magnified.
The Lens Formula • Lens diagrams have the main disadvantage that there is uncertainty in precisely where the image is. Therefore the use of the lens formula is better. The lens formula is: • where f is the focal length, u is the object distance and v is the image distance.
Question • An object of height 1.6 cm is placed 50 cm from a converging (convex) lens of focal length 10 cm. • What is the position of the image? • What is the magnification? • What is the size of the image?
Question • An object of height 1.6 cm is placed 50 cm from a converging (convex) lens of focal length 10 cm. What is the position of the image? v = 1/0.08 = 12.5 cm
Question • An object of height 1.6 cm is placed 50 cm from a converging (convex) lens of focal length 10 cm. • M = 12.5 ÷ 50 = 0.25 • Image 1.6 × 0.25 = 0.4 cm = 4 mm • The convention for the equation is that real is positive. For a concave lens, the focal length is negative, because the principal focus is virtual. If the image position gives a negative value, then the image is virtual.
It does not matter if you work in cm, as long as you are consistent. However if you are going to use dioptres you must work in metres.
Magnification • The magnification is worked out using this simple formula: • Since v is in metres, and u is in metres, M has no units.
Question • Find the position and size of a pound coin, 2.2 cm in diameter placed 20 cm from a converging lens of focal length 40 cm
Question Find the position and size of a pound coin, 2.2 cm in diameter placed 20 cm from a converging lens of focal length 40 cm • 1/f = 1/u + 1/v • 1/40 = 1/20 + 1/v • 1/v = 0.025 - 0.05 = -0.025 • v = - 40 cm • magnification = v/u = -40/20 = (-)2 • Therefore the image is 4.4 cm across