Download
1 / 39
390 likes | 593 Vues
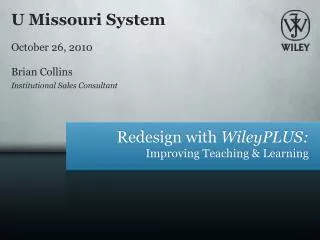
How to use QuickStart with Wiley PLUS !. Contain pre-loaded assignments and presentations Created by subject matter experts who are also experienced WileyPLUS users Simply select the assignments and presentations you want to use Create your entire course in a few simple clicks!.

E N D
Contain pre-loaded assignments and presentations Created by subject matter experts who are also experienced WileyPLUS users Simply select the assignments and presentations you want to use Create your entire course in a few simple clicks! QuickStart with WileyPLUS
Accessing more information… Assigning QuickStart Assignments… Using QuickStart Presentations… Copying and Editing Assignments… Copying and Editing Presentations… Contents
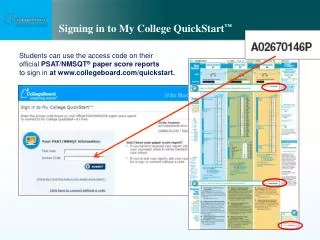
Part One:QuickStart Information about a Specific Title The link under “System Announcements” explains what resources are in your QuickStart course and who authored it.
1. QuickStart Information Click here to find the document.
Part Two:How to Use QuickStart Assignments Every WileyPLUS course with QuickStart contains one assignment, one pre-lecture assignment and one reading assignment per chapter. Some courses may also have additional assignments depending on the title/discipline.
2. Assigning QuickStart Assignments Click on “Assignments.”
2. Assigning QuickStart Assignments Under “Find Assignments,” use the filters to select a chapter or All Chapters, and “QuickStart.” Then click on “GO.”
2. Assigning QuickStart Assignments Click on “Assign” next to the appropriate assignment.
2. Assigning QuickStart Assignments • Highlight the appropriate class section. • Choose graded or ungraded. • Select whether or not to allow printing. • Selecta start date and a due date. • Select student access after the due date. • Click on Submit.
2. Assigning QuickStart Assignments The assignment is now assigned. Follow these steps to assign the rest of the QuickStart assignments.
2. Student View of QuickStart Assignments Every assignment that has been assigned shows up in the student view.
Part Three:How to Use QuickStart Presentations Every WileyPLUS course with QuickStart contains one presentation per chapter. Presentations can include selections from the online text, PowerPoint slides, lecture notes, and more.
3. Using QuickStart Presentations Click on “Prepare & Present.”
3. Using QuickStart Presentations Click on “Presentations.”
3. Using QuickStart Presentations Under “Find Presentations,” use the filters to select a chapter or All Chapters, and “QuickStart.” Then click on “GO.”
3. Using QuickStart Presentations To preview each resource and to make it available to students, click on “Properties.”
3. Using QuickStart Presentations Click on “Preview Presentation” to view the Presentation in its entirety.
3. Using QuickStart Presentations To make this presentation available to students, check off the appropriate boxes under “Class Section Availability.”
3. Student View of QuickStart Presentations Every presentation made available shows up in the “Read, Study and Practice” area by chapter.
Part Four:How to Copy & Edit QuickStart Assignments If you would like to add, reorganize, or change question policies in a QuickStart Assignment, you can do so using the Copy & Edit function.
4. Copy & Edit: Assignments To edit an assignment, click on “Properties.”
4. Copy & Edit: Assignments Click on “Copy & Edit.”
4. Copy & Edit: Assignments Step One: Provide the assignment with a new ID, new name, and new instructions, then click on “Next.”
4. Copy & Edit: Assignments Step Two: To remove or add questions, use the filters to locate the questions to change. If satisfied with the questions, click on “Next.” If not, click on “Go” to find the questions.
4. Copy & Edit: Assignments Step Two: Uncheck the unwanted questions, and check off those that will be added. Click on “Next.”
4. Copy & Edit: Assignments Step Three: Use the columns on the right to edit the Score or change the order of questions.
4. Copy & Edit: Assignments Step Four: To edit the policies, select the preferred options, including number of question attempts, Point Potential, and Question Assistance. Then, click on “Next.”
4. Copy & Edit: Assignments Step Five: On the Confirmation page, click on either “Assign Later” or “Assign to Class Sections.”
4. Copy & Edit: Assignments Step Six: The edited assignment can now be assigned as outlined in Part Two, but instead of selecting “QuickStart” in the filters, select “Me” (since this is YOUR version of the assignment.
Part Five:How to Copy & Edit QuickStart Presentations If you would like to add, reorganize, or change resources in a QuickStart Presentation, you can do so using the Copy & Edit function.
5. Copy & Edit: Presentations To edit a presentation, click on “Properties.”
5. Copy & Edit: Presentations Click on “Copy & Edit.”
5. Copy & Edit: Presentations Step One: Provide the presentation with a new name and new instructions, then click on “Next.”
5. Copy & Edit: Presentations Step Two: To remove or add resources, use the filters to locate the resources that will be changed. If satisfied with the resources, click on “Next.” If not, click on “Go” to find the resources.
5. Copy & Edit: Presentations Step Two: Uncheck the unwanted resources, and check off those that will be added. Click on “Next.”
5. Copy & Edit: Presentations Step Three: Use the columns on the right to change the order of resources.
5. Copy & Edit: Presentations Step Four: To make this presentation available to students, select the appropriate boxes, and then click on “Next.”
5. Copy & Edit: Presentations Step Five: Click on “Finish” on the Confirmation page to complete the process. The edited presentation is now complete.