Vitiligo Protocol
Vitiligo Protocol. Dr Aisha Sohail Dr Babar Vaqas. Vitiligo Protocol. Add patient details to database. Date of birth (DOB), patient number (or other unique patient identifier). (pt list.doc)


Vitiligo Protocol
E N D
Presentation Transcript
Vitiligo Protocol Dr Aisha Sohail Dr Babar Vaqas
Vitiligo Protocol • Add patient details to database. Date of birth (DOB), patient number (or other unique patient identifier). (pt list.doc) • Fill out patient questionnaire (questionnaire template.doc) edit body diagrams by copying and pasting into windows paint. Paste diagrams back into the document • Take standardised photos of body areas affected by vitiligo (protocol for study.doc) document in patient photo details.doc • Draw out control and test vitiligo lesions for area calculation • Upload Questionnaire, photographs and scanned control and test patches of skin • Repeat every 3, 6, 9 and 12 month intervals for all patients with Vitiligo.
Add patient details to database. Patient name, date of birth (DOB), patient number. (pt list.doc)
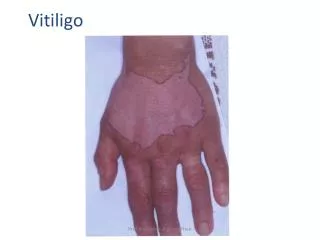
Take standardised photos of body areas affected by vitiligo (protocol for study.doc) • Prepare patient: ensure no makeup; jewelry off, gown on. • Camera settings: Flash on Red eye on Remote on - usage Automatic mode No zoom, macro mode ON • Camera angle: Camera should always be at right angles to the skin area being photographed. Ensure camera is horizontal, and NOT angled at the body but pointing straight ahead. • Distance: Should always be 30cm unless otherwise recorded as different on grid (Chest, abdomen, legs and feet) • Labeling: Right and left should be clearly labeled on patient • Centimetre scale: Each image should have a cm scale • Background: Blue background always • Body regions: Front, back and side views of the area of the body with the patch of vitiligo must be taken for every patch, even if some views do not include the patch.
Patient Photo Details All photographs must be recorded in the document patient photo details.doc as below: Patient Code: Date:
Body Regions • Head: Distance 30cm Forehead Bottom of chin Right Front Top Back Left Ears bent forward
Body Regions • Neck: Distance 30cm Bottom of jaw Collar bone Front Left Back Right
Body Regions • Chest, Shoulder & Armpit: Distance – whatever is required for the field Front Right Left Back Collar bone Bottom of ribs Bottom of ribs
Body Regions • Upper Arm: Distance 30cm shoulder Elbow crease Right Front Right Back Left Front Left Back
Body Regions • Elbow: Distance 30cm Right Front Right Back Left Front Left Back
Body Regions • Forearm: Distance 30cm Right Front Right Back Left Front Left Back
Body Regions • Hand: Distance 30cm Right Front Right Back Left Front Left Back
Body Regions • Abdomen and groin: Distance – whatever is required for the field
Body Regions • Upper leg (thigh): Distance – whatever is required for the field
Body Regions • Lower leg: Distance – whatever is required for the field Front Back Right outside Right inside Left inside Left outside
Body Regions • Feet & ankles: Distance whatever is required for the field Top Right outside Right inside Left outside Left inside Back Right sole Left sole
Control and Test Patches • Select 2 patches of vitiligo: 1 where treatment has been applied (TEST) 1 where treatment has not (CONTROL). Document where these patches are on the body to aid future re-assessment of the same patch. • Draw around these patches on top of transparent paper. Label with patient code, date, body region. • Place the transparent paper on a sheet with a grid printed on it and photograph this. Test Lesion: right face Test Lesion outline
Control and Test Patches • Tricky ones: only outline pure areas of white. Islands of darker skin can be outlined and shaded.
Emailing • Naming Photos: patient code-bodyregion(including side)-date e.g. 23Routsidelowerleg29-09-06 • Naming control and test outlines: patient code-body region- control/test lesion- date e.g. 23LbackhandTEST29-09-06 • Questionnaire: should be named by patient code and date e.g. 23-29-09-06.doc • All photographs and outlines of control and test patches of skin together with questionnaire forms with SF-12 score can be emailed to: contact@healthyskinforall.com