Universal Access on Mac OSX
410 likes | 442 Vues
Learn how to enable Universal Access options on your Mac computer to improve accessibility for individuals with visual impairments.

Universal Access on Mac OSX
E N D
Presentation Transcript
Universal Access on Mac OSX Computer Access for Individuals with Visual Impairments
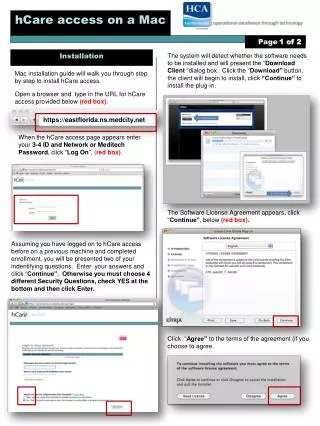
First, click here Then, click here • To find the Universal Access options on a Mac, click the apple in the upper left corner of the screen, and select “System Preferences” from the menu.
In the System Preferences window, select “Universal Access”. This option is pointed out above. Click here
Universal Access for individuals with visual impairments Seeing tab
VoiceOver: This screen reading technology can be turned on for users who wish to have the contents of the screen read to them. It has many different options and settings, as will be described on later slides. Zoom: This full-screen magnifier can magnify the items on the screen up to 40 times. Turn this feature on for users who require larger text and images. Click as shown above to access zoom options, which are described on the next slide. Display: Here, choose between text showing as black on white (the default setting) and text showing as white on black, which may be easier for some users to read. Users may also like to use grayscale, to eliminate colors from the display. Finally, the contrast can be adjusted. Increasing contrast will make text and images easier to identify. Click here for zoom options
Zoom Options Set range for rapid zooming in and out: This feature allows the user to specify a maximum and minimum magnification value for instant zooming to a particular magnification. This prevents the magnification from going too high or low. Show preview rectangle when zoomed in: Check this to make a rectangle appear on the screen to indicate the center point of the zoom. The user can, then, choose the area to zoom in on by moving the rectangle. Smooth images: Check this to keep images from becoming distorted when zoom is used. Zoom follows the keyboard focus: Check this so that, when you zoom the screen in and type, the zoomed screen will to allow you to see what you are typing without having to move the screen. When zoomed in, the screen image moves (choose only one): Continuously with pointer: Moves the image to the right as you move your cursor to the right. Only when the pointer reaches an edge: moves the image to the right when your cursor is on the right edge of the screen. So the pointer is at or near the center of the image: This option is helpful for users who have a limited field of vision. Use scroll wheel with modifier keys to zoom: Set the modifier keys you want to hold down to access this feature. When this box is checked, the user need only hold the specified keys while scrolling the mouse wheel to adjust zoom.
Users may create a VoiceOver portable preferences file on a USB flash drive using VoiceOver Utility. When the drive is plugged into another computer running Mac OS X, VoiceOver automatically detects the user’s saved preferences. This allows VoiceOver to work on any Mac the same way it does on the user’s home Mac, using the user’s custom keystrokes, pronunciations, and more. Additionally, changes the user makes to VoiceOver settings are continually saved to the portable preferences file, so any changes made on the road sync back to the user’s home Mac when the flash drive is plugged in. • VoiceOver gives users the options to have the computer: • Use portable preferences when they are detected • ask before using portable preferences when they are detected • do nothing when portable preferences are detected
Adjusting verbosity levels in VoiceOver allows the user to customize how much information he/she hears. VoiceOver begins with high verbosity to provide new users with as much information as possible. When the user is more comfortable with the computer, he/she may prefer to use a lower setting.
Announcements help to prevent unintentional actions on the keyboard and to update the user concerning changes in status messages. • They can also be useful in reading charts and tables.
Here, the voice and the rate, pitch and volume of that voice can be specified to make it most appealing to the user.
Here, the user can define his/her preferred pronunciations of various symbols that may need to be read from the screen.
For individuals with low vision, the cursor can be used in a magnified form. • If the user’s vision is such that a cursor would not be useful, the cursor can be set to be hidden.
The NumPad Commander allows users to enter the VoiceOver commands they use most often through the numeric keypad on a full-size keyboard. Using modifier keys, the user can access up to six “layers” of key commands. • Five of the six NumPad Commander layers are preprogrammed. These layer control web, tables, size and positioning of objects, general navigation, and search (practically the entire VoiceOver command set). This enables users to operate VoiceOver using fewer keystrokes and just one hand. Users can either use these predefined keys or change them to suit their needs.
For difficulties using the mouse: Mouse Keys: Turn on to control the mouse pointer using keys on a numeric keypad. This feature can be turned on and off with five strikes of the Option key. To control mouse pointer movement: Initial Delay: Adjust the time between the user pressing a key and the cursor moving using the slider. Maximum speed: Adjust the cursor’s maximum speed using the slider. For difficulties seeing the mouse: Adjust the size of the cursor, from normal to large, using the slider.
Universal Access for individuals with visual impairments Mouse tab
For difficulties seeing the mouse: Adjust the size of the cursor, from normal to large, using the slider.
The Apple Mouse features a Scroll Ball for 360-degree scrolling, a touch-sensitive area on each side, and a user-assignable button on each edge. The Scroll Ball can also be used for instant access to screen magnification. Users can zoom the entire screen up to 20x by simply pressing the Control key and scrolling.
Universal Access for individuals with visual impairments Dock magnification
First, click here Then, click here • To find the Dock options on a Mac, click the apple in the upper left corner of the screen, and select “System Preferences” from the menu.
Click here • In the System Preferences window, select “Dock”. This option is pointed out above.
Dock Magnification allows users to set the default size of Dock icons so that they are easier to see, and it automatically enlarges the icon the user is pointing to. • Minimize using: • Genie effect: window gets “sucked” down into the dock, like a Genie going into a bottle, when minimized. • Scale effect: window shrinks down as it moves to the bottom of the screen when minimized.
Universal Access for individuals with visual impairments Safari accessibility
First, click here Then, click here • With Safari open, go to the Safari menu in the upper left corner of the screen, and select “Preferences”.
Click here • In Safari’s Advanced Settings, the user can set accessibility options under the heading “Universal Access”. • Never use font sizes smaller than __: Check here to set a minimum font size for webpage text, and select an appropriate font size from the drop-down menu. • Press Tab to highlight each item on a webpage: Check here to make it easier to navigate links and form elements on the web.
Universal Access for individuals with visual impairments Speech recognition
First, click here Then, click here • To find the speech recognition options on a Mac, click the apple in the upper left corner of the screen, and select “System Preferences” from the menu.
In the System Preferences window, select “Speech”. This option is pointed out above. Click here
Speech Recognition allows the user to control the computer using his/her voice instead of the keyboard and/or mouse. With Speech Recognition, the user can use Speakable Items to navigate menus and to open, close, control, and switch between applications, among other functions. • This feature does not perform dictation.
Click here to calibrate the microphone • Select the type of microphone that will be used for input. • A “line in” describes any microphone that must be plugged in to the computer, such as a microphone headset or a desktop microphone. • An “internal microphone” is one that is built-in to the computer. • When the microphone has been selected and connected (if necessary), click the “Calibrate” button to calibrate that microphone.
The user must follow the instructions on the screen to calibrate his/her microphone. • Click done when calibration is complete. When finished, click Done
Listening Key: • Listening Method: • Listen only while key is pressed: If selected, the user must hold down the listening key (Esc in the example above) the entire time he/she is speaking. This is a good option if the computer is being used in a noisy environment, as it helps to control how much the computer is taking in. • Listen continuously with keyword: If selected, the user can set the keyword to be • Keyword is: • Requested before each command: This will also allow for more control of what the computer takes in when the user is in a noisy environment. • Optional before commands: This allows for hands-free use of Speech Recognition, with the downside being that the computer takes in all noises in the environment. • Upon Recognition: • Speak command acknowledgement: Check here to be certain that the computer has acknowledged the user’s command. • Choose a sound for acknowledgement of recognition.
Select from the menu at the left which items are likely to be included in the user’s commands (these may be items that the user cannot access using a mouse or keyboard, but is likely to require access to). Click here
Refer to the tips provided for performing spoken commands in the Speech Recognition feature.
Universal Access for individuals with visual impairments Text to speech
First, click here Then, click here • To find the text to speech options on a Mac, click the apple in the upper left corner of the screen, and select “System Preferences” from the menu.
In the System Preferences window, select “Speech”. This option is pointed out above. Click here
To Open the Text to Speech feature, select the Text to Speech tab, as is highlighted above in blue.
Create a keyboard shortcut that the user can enter to turn the Text to Speech feature on and off, and type it into the space provided. Then, click OK. First, enter keyboard shortcut here Then, click OK
To have the clock announce the time for a user with a visual impairment click the “Open Date & Time Preferences” button in the Text to Speech tab of the Speech window. Click here
First, click here • To have the time announced for a user with a visual impairment, go to the “Clock” tab, and check the “Announce the time” box. • Then, select the frequency of the announcements: • One the hour • On the half hour • On the quarter hour Then, check here
Mac Resource • To read about accessibility options offered for individuals with visual impairment by Mac, including a more detailed description of VoiceOver, go to: • http://www.apple.com/accessibility/macosx/vision.html