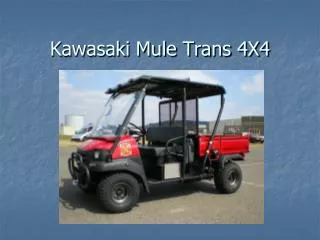
Kawasaki Mule Trans 4X4
340 likes | 520 Vues
Kawasaki Mule Trans 4X4. Kawasaki Mule Trans 4X4 “Trans” = Transform from a 2 passenger configuration to a 4 passenger configuration. Mule Specifications. Engine – Four stroke, liquid cooled, overhead valve, V-twin (617 cc) Brakes – Four-wheel hydraulic drums, sealed

Kawasaki Mule Trans 4X4
E N D
Presentation Transcript
Kawasaki Mule Trans 4X4“Trans” = Transform from a 2 passenger configuration to a 4 passenger configuration
Mule Specifications Engine – Four stroke, liquid cooled, overhead valve, V-twin (617 cc) Brakes – Four-wheel hydraulic drums, sealed Overall length – 10’ 3” Overall Height – 6’5” Overall width – 4’ 9”
Mule Specifications Wheelbase – 7’ Ground clearance – 7” Dry weight – 1,669 pounds Towing capacity – 1,200 pounds Fuel – Diesel (6.4 gallons)
Mule Specifications Top speed – 25 mph, governed Max. Load capacity – 1,632 pounds Including occupants and cargo Max Cargo Bed Load 700 pounds (in short bed mode) 1100 pounds (in long bed mode) Winch – 2500 pound capacity
Mule Features Parking Brake
Mule Features Winch control Differential lock
Power steering warning light Mule Features Glow plug light Gear shift lever
Mule Features 2WD-4WD Shift lever Lights/Siren switch
Mule Features Fuel Fill 6.4 gallons Fuel gauge
Operating procedures Non-ATV Safety Institute (ASI) certified personnel may operate the Mule after completion of this PowerPoint training and driver familiarization course at sta. 35 Non-ASI certified personnel are limited to on-road operations at low speeds. This is to include community events, gravel or dirt roads that do not require 4 wheel drive or exceed the drivers training and/or comfort level. The driver is responsible for using sound judgment to determine when the driving surface requires an ASI certified driver. This is known as “standard driving.”
Operating procedures PPE is not required for standard driving Seat belts must be worn at all times
Glow Plug light Starting procedures Shift lever to “Neutral” Parking brake set Ignition switch “on” Glow plug light turns off (Takes up to 5 sec.) Start engine
Operating procedures Shifting Depress brake pedal Shift to high (“H”) or Reverse (“R”) – community events driving Select “H” , “L” , or “R” for ASI personnel (off-road) All shifting (2WD, 4WD, or differential lock) must be done when the Mule is stopped and engine is at idle
Operating procedures If battery runs down The best option is to charge the battery Jump starting is O.K. if necessary
Operating procedures Off-Road Driving Off-road use All operators will have to complete the ATV Safety Institute (ASI) Ridercourse prior to operating the Mule off-road. Community Event Driving
Operating procedures Minimum Required PPE for ASI personnel (Off-road use) Eye Protection Approved “Mule” helmet (No fire helmets) Off-Road Driving Off-road use
Securing the Mule for transport Step #1 - Drive onto trailer until left front tire is lined up with Red paint mark
Securing the Mule for transport Step #2 – Secure chain to front grill, place Mule in Neutral and manually push back until chain is snug, reset parking brake.
Securing the Mule for transport Step #3 – Secure the rear of the Mule utilizing the following steps...
Securing the Mule for transport Attach the load binder to the chain.
Securing the Mule for transport Drop the excess chain through the tie down point on the trailer.
Securing the Mule for transport Wrap the chain around the load binder handle and drop through trailer tie down point again.
Securing the Mule for transport Secure the chain to itself (capturing the load binder handle) using the steel quick link.
Winching operationsFor ATV Safety Institute (ASI) certified personnel
2500 pound rating when cable is fully extended leaving one full wrap on the spooling drum This rating is reduced with each wrap of cable onto the spooling drum
Winching operations Spooling Drum Clutch Wear gloves when handling cable Disengage clutch to “freespool” the drum and pull out the cable
Winching operations Remote Winching Switch Left glove box
Winching operations Always avoid continuous side pulls which can pile up cable at one end of the spool Be sure the cable is winding evenly and tightly around the drum
Winching operations Refer to the Winching Techniques Guide for additional information. This is located in the glove box of the Mule.