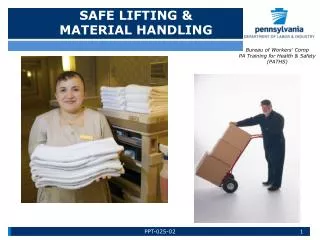
Safe Lifting Training for Workplace Safety
Learn why safe lifting is crucial, back anatomy, injury causes, and personal preparation practices to prevent workplace injuries. Proper techniques, specialized methods, and additional tips are covered in this course outline.


Safe Lifting Training for Workplace Safety
E N D
Presentation Transcript
Course Outline – Safe Lifting • Why Take Safe Lifting Training? • Back Anatomy • Causes of Injury and Discomfort • Your Personal Preparation • Scenarios: Proper Techniques • Specialized Lifting Techniques • What Else Will Help? • Summary
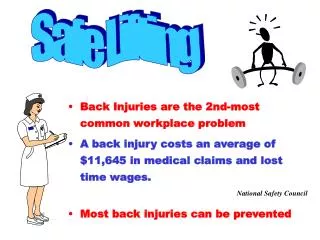
Why Take Safe Lifting Training? Back injuries are the number one workplace safety issue: • Back injuries account for 20% of all injuries and illnesses in the workplace. Only colds and flu account for more time off. • Cumulative trauma injuries which include back injuries account for 31% of all workplace injuries and 43% of the cost of claims. • These injuries result in costs and aggravation for the injured person. • They also create problems for the organization with lost time, productivity impacts and higher insurance costs.
Why Take Safe Lifting Training? Back injuries are the number one workplace safety issue (continued): • Preventive training and awareness is in everyone’s best interests! • The General Duty Clause of the federal workplace safety statute requires employers to provide employees with a workplace that is “free of recognized hazards.” • Employers should have an ergonomics program and back safety is the foundation of an effective ergonomics program.
Back Anatomy How your back works: • The S-curve in your back acts as a giant spring to support weight. • Discs provide cushion between vertebra. • Nerves branch out from spinal cord. Disc Vertebrae
Back Anatomy How your back works (continued): • Ligaments hold the skeletal structure together. • There are relatively few muscles in the back. Support comes from the stomach and spine.
Back Anatomy How your back works (continued): • Neutral posture is the proper alignment of the body between extremes. The ears, shoulders, hips, knees and ankles are aligned. • This is the strongest and most balanced position when stress is most minimal.
Causes of Injury and Discomfort The most common types: • Strains from overused or overstretched muscles. • Sprains from torn ligaments as a result of sudden movement. • Herniated disk from the loss of the spine’s cushioning ability. This is usually caused from strain and aging.
Causes of Injury and Discomfort Contributing factors: • Repetitive work, i.e., bending, twisting, pushing, pulling and lifting. • Slipping, tripping and falling. • Twisting while spine is supporting a heavy load. • Heavy physical work.
Causes of Injury and Discomfort Contributing factors (continued): • Poor physical condition. • Being overweight. • Loss of flexibility. • Body mechanics and work habits. • Stressful living.
Your Personal Preparation Your health: • Maintain good physical health. • Be properly rested. • Eat right. • Reduce stress in your life.
Your Personal Preparation Stretching and strengthening: • Stretching before exposure, both pre-shift and pre-task, will reduce the likelihood of an injury. • Routine strengthening exercises and a physical fitness routine will also reduce the likelihood of an injury.
Your Personal Preparation Shoes and back support: Shoes: • Wear proper shoes for the job. They must include non-slip soles. • Back support recommendations: • Optional use of a lifting belt for additional back support may help if you are experiencing any back issues. • The lifting belt helps by reminding you to use proper body positioning and to not lift more weight. Note: NIOSH studies indicate that back supports do not statistically reduce risk of injury.
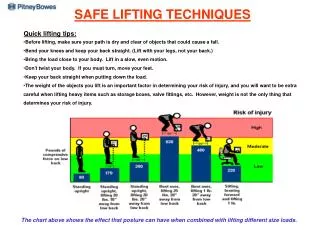
Scenarios: Proper Techniques Awareness and prevention: • Attack the bottom level of the accident triangle. • Reduce overextension, twisting, overloading, and non-neutral posture at work. 1 Disability 10 Lost Time 100Medical 1000 Sore Backs 10,000 times of overextension, twisting, poor posture, overloading MOST IMPACT
Scenarios: Proper Techniques • Over-extension: • Over-extension is reaching out and away from the body which greatly increases injury risk. • The further a weight is from the body, the more force necessary to do the work. • Moving closer to the load or moving the load closer to the lifter prior to lifting is one control.
Scenarios: Proper Techniques • Over-extension (continued): • For standing workstations you must have the work area in the proper range. Neck and arms are out of position. Good neutral position.
Scenarios: Proper Techniques • Over-extension (continued): • Set up the work area to keep weights close to you and at waist level.
Scenarios: Proper Techniques Twisting: • When we twist, our knee, hips and shoulders are not in line. • Twisting wears on the vertebra, disc joints, and "unsprings" the back. • To avoid twisting, a simple control is to move your feet and/or to re-configure your workstation.
Scenarios: Proper Techniques Overloading: • Lifting more cumulative weight than our body can handle. • Overloading is individually-based. Ten pounds is too much for some; others can lift 50.
Scenarios: Proper Techniques Overloading (continued): • Over-extension affects overloading. The further the weight is from your body, the greater the force on your spine. • Weight should be maintained close to waist level centered between the knees and shoulders. • As a general rule, other methods of handling such as two-person lifts or manual material handling aids should be used for weights over 50 lbs.
Scenarios: Proper Techniques Bending and lifting: • Lifting doesn’t have to be dangerous. If you use proper techniques you can protect yourself from injury. • The spine acts as a large spring to help reduce the muscle load. When we “unspring" our spines, we correctly force our muscles to do all the work. Advice: Too much pressure on the back and not enough use of the legs.
Scenarios: Proper Techniques Bending and lifting (continued): • Ensure that the load is a safe weight. • Ensure it is safe and not hazardous. • Keep the feet apart and staggered. • Squat to lift and lower. • Minimize bending at the waist. • Keep the back bowed in while bending. • Get a good grip. • Keep the weight close to the body. • Keep load centered near the waist. • Turn with the feet and not the body. • Do not twist or jerk suddenly.
Scenarios: Proper Techniques Neutral (anatomical) posture: • Remain vertical and balanced. • The farther out-of-neutral a worker is, the greater the likelihood of injury. • For the spine, never be more than one step out-of-neutral. • Being out-of-neutral affects other joints in addition to the back: wrists, shoulders, elbows, and neck.
Specialized Lifting Techniques Heavy weight items: • Stretch at the beginning of the shift and prior to undertaking tasks. • Clear the set point and path of travel!
Specialized Lifting Techniques Higher weight items: • Is it a safe lift? Consider other options like using a two-person lift or lifting equipment. • Use legs, not back. • Get close and cradle the load at the center of the body. • Have good grip surface. • Keep load close to body during handling. Advice: This lift should be centered closer to the waist, using the legs to lift.
Specialized Lifting Techniques Higher weight items (continued): • Use lift assist equipment. • Keep load stable. • Do not over-stack; make two trips, if necessary. Advice: This load is unstable and unsafe.
What Else Will Help? Check your surroundings: • Is a clear path established? Remember the shortest way isn’t always the smartest way. • Is the ground and pathway stable, level and not slick? • Is lighting sufficient? • Is area adjacent and above clear of obstructions? • Is a clear set point established?
What Else Will Help? Use mechanical help: • Use dolly, conveyor, hand-truck, or forklift options as needed. • When using mechanical help, remember that pushing, and not pulling, allows more control and greater leverage. • Secure the load to equipment so sudden stops don’t displace the load.
What Else Will Help? Teamwork: • Identify when and where two-person lifts are required. • When you can’t handle it by yourself get help!
What Else Will Help? • Teamwork (continued): • What poor practices or hazards do you see in your company? • What can be improved upon? • What operational controls could be used to help, i.e., scissor lifts, packaging machines etc. • Report issues to your safety committee and management.
Summary • Back injuries: Are the number one workplace safety issue, resulting in costs to personnel and the organization. • Strains, sprains and herniated disks: Are common injuries that can be prevented with proper techniques when positioning, moving, lifting, and carrying. • Personal preparation: Requires maintaining good physical health, stretching exercises and using proper shoes and equipment. • Proper techniques: Useto reduce overloading, overextension, twisting, unsafe lifting and poor posture.
Summary • Specialized lifting techniques: Theseare required for heavy and higher weight items. • Check your surroundings: In advanceto ensure the work area is hazard free and safe. • Mechanical help: Forklifts, hand-trucks, etc. will make the job easier and safer. • Rely on teamwork: To assist on heavy lifts and to identify areas of improvement and additional equipment that will enhance operations.
Course Outline – Slip, Trip and Fall Prevention • Introduction – Why Take Slip, Trip and Fall Prevention Training? • Good Housekeeping • General Precautions • Slip Resistant Floors • Stairways and Ramps • Health and Age Factors • Ladder, Platforms and Scaffolds • Floor and Wall Openings • Investigate Incidents • Summary
Why Take Slip, Trip, and Fall Prevention Training? Whether you are at work or at home slipping, tripping, and falling are always possibilities, and care should be taken to keep them from turning into a painful reality. • Construction sites, production floors, care facilities, or your own living room. All kinds of environments can have slip, trip, and fall hazards. • There can be many factors involved when a fall happens. These training slides will cover a variety of these causes, including poor housekeeping at the workplace; improper use of ladders, ramps, and stairs; and weakened physical capabilities due to illness or age. • Even though the specific situations vary, by following a few basic guidelines to eliminate the potential contributing factors, you can prevent slips, trips, and falls.
Good Housekeeping Safety awareness: • Slipping on a wet spot on the floor or tripping over an object in the walkway happens more often than we realize. • Falling to the floor, down stairs, or off of a ladder can result in severe injuries. • Keeping our work and home environments clean and free of clutter must always be part of our safety awareness.
Good Housekeeping Requires constant attention: • Good housekeeping is not just a rainy-day task or a once-a-month chore; it is a job that must be done hour by hour. • Everyone should watch for, report and when possible, correct, slip, trip, and fall hazards.
Good Housekeeping Take corrective action: • During the course of the day you might find yourself stepping around or tripping over boxes, cords, or tools in an area that was previously clear. This makes it difficult for you to do your work safely and efficiently. • If you see such a problem, correct it right away because it might cause an injury to the next person who comes along - or to you if you pass that way again.
General Precautions Create awareness level: • Define what is necessary and remove all unnecessary items from the work area. • Define where all necessary items are stored when not in use. • Clearly mark hallways and walkways with paint or railings. • Ensure that walkways are sufficiently wide and well lit. • All work areas should be well lit. • Do not run in the workplace.
General Precautions Pay attention to floor surfaces: • Do not allow carpets or mats to bunch up or fold and create a trip hazard. • All carpets and mats must have anti-trip edges. Their edges must be tapered or fastened down securely. • All walking surfaces must be free of irregularities such as holes and depressions. Repair such floor damage immediately. • Floor surface coatings should not be slick or slippery. Non-skid waxes and gritty coatings should be used. The edges of this mat are not tapered and create a trip hazard.
General Precautions Keep floors clean and dry: • If the work results in wet floors, install adequate drainage and cover floors with one of the many available styles of non-skid surfacing. • Accidentally spilled liquids and other slippery materials must be cleaned up immediately. • Slip-resistant footwear must be worn in continuously damp areas.
Slip Resistant Floor Surfaces Determining the traction of floor surfaces (continued): • Tribometers help calculate a floor’s Traction Index (TI) rating. A walkway with a TI rating equal to or greater than one (1.0) is considered “slip resistant.” • The floors in all walkways and work areas must provide adequate traction for safety. • In wet areas or areas where slippery materials may fall to the floor, slip resistance must be provided, for example: • Applying a textured coating to the floor • Installing anti-slip mats
Stairways and Ramps Use stairs and ramps wisely: • Keep stairways and ramps in good repair and free of obstructions. Install non-skid surfacing on stair treads. • Staircases must meet the specific building codes applicable to their use, e.g. adequate width, consistent riser height, physical strength, guardrails, etc. • Ensure that handrails are properly installed and extend past the top and bottom steps. • Mark the first and last steps clearly, such as with yellow stripes. • Remind everyone to use stairs attentively, use the handrails, and never carry an object that obstructs their view of the stairs ahead.
Health and Age Factors Recognition and remedies: • Sometimes a fall is caused by a physical weakness resulting from illness or age. Several steps can be taken to lessen the effects of these conditions. • If a medical condition appears to be the cause of a fall be sure that a medical professional is consulted in case treatment is required.
Health and Age Factors The risk of falling and fall-related injuries rises as a person gets older, but falls are not inevitable: • Regular exercise keeps bones and muscles strong and improves balance. • Carefully monitoring medication helps control unwanted side-effects such as dizziness. • Regular physical exams can provide early detection of health issues. • Sometimes poor vision is a factor in falls. Regular eye exams can detect problems. • A diet rich in vitamin D and calcium helps prevent bone loss and fractures. • Comfortable and safe footwear is important. Avoid backless and high-heeled shoes, and shoes with smooth leather soles. • Keep task areas and pathways clear of clutter and keep bathroom, kitchen, and laundry room floors clean and dry. • Install grab rails wherever extra balance is required.
Ladders, Platforms, and Scaffolds Climbing ladders and working at high elevations pose additional fall hazards: • Ladders and stools must be designed for the task and must be in good, serviceable condition. • Damaged ladders must be removed from service. • Ladders must be used properly. They must be placed on solid ground and the top rungs must not be used as steps, as per the manufacturer’s instructions. • Ladders must be placed at an angle that is not too steep or too shallow. The proper slope is one foot away from the wall for every four feet in height: a ratio of 1 to 4. Not a step!
Ladders, Platforms, and Scaffolds Climbing ladders and working at high elevations pose additional fall hazards (continued): • When working on a ladder never lean or reach too far to either side - always keep your “belt buckle” between the two side-rails of the ladder. • All scaffolding must be suited for the job and installed by a properly trained and competent person. • Scaffolding must have guardrails, toe-boards, and cross-bracing to prevent swaying. All local, state, and federal scaffolding regulations must be understood and followed.
Floor and Wall Openings Watch for unexpected openings: • Unexpected openings in floors or walls must be clearly marked and barricaded. • Coverings over floor openings must be continuous (no openings), adequately strong, and fastened securely. • You must wear proper fall protection equipment when working near wall openings, ledges that cannot be barricaded or above hazardous processes.
Investigate Incidents In the event of an accident the employer must conduct a complete investigation: • Was there an unsafe behavior? Was there an unsafe condition? • Determine the causes, identify and implement the solutions, and follow-up to ensure that the situation that caused the incident no longer exists. • Document all aspects of the incident and investigation.
Summary • Everyone is responsible for keeping task areas clean and safe. • Good housekeeping is an important part of keeping your environments safe. • Floors should be kept dry and free of slippery materials, clutter, and debris. • Falls are not inevitable as a person ages, but do become more likely. • Stairs and ramps must be used carefully. • All the rules of safe ladder and scaffold use must be understood and followed. • Slip, trip, and fall incidents must be thoroughly investigated and solutions must be implemented to prevent a repeat occurrence.