The Complete Blood Count
The Complete Blood Count. Clinical Pathology K. Canga, RVT. Reading and Assignments. Read pp: 32 – 38 (Start at CBC, end before histograms) You MUST register at IDEXXLearningCenter.com and complete the course titled: “The VetTest Certificate Course” RACE #106-11660


The Complete Blood Count
E N D
Presentation Transcript
The Complete Blood Count Clinical Pathology K. Canga, RVT
Reading and Assignments • Read pp: 32 – 38 (Start at CBC, end before histograms) • You MUST register at IDEXXLearningCenter.com and complete the course titled: “The VetTest Certificate Course” RACE #106-11660 • This is FREE, and will count as 3 hours of CE to use after you become licensed. • The course will take ~ 3 hours and you need to turn in a certificate of completion prior to using the IDEXX machines at school. • Certificates are due by Monday, May 5. PLEASE print a hard copy. No Engrade or e-mail message will be accepted. (Yes, this is for points)
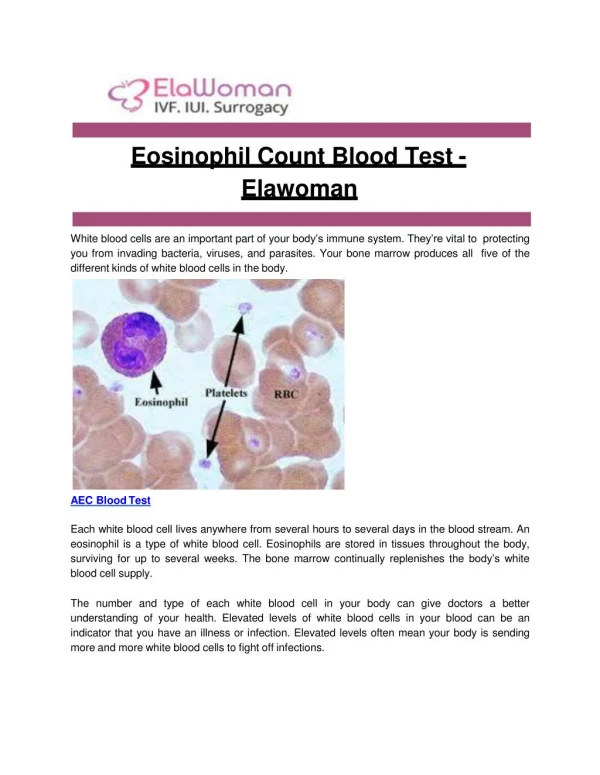
Composition of the CBC • Total RBC count • PCV • Plasma Protein Concentration • Total WBC count • Blood film evaluation (differential WBC count, RBC and WBC morphological evaluation, platelet estimation) • Reticulocyte count • Hb Concentration • Erythrocyte indices (They’re baaack)
RBC Count • Should be in the millions • Usually done by machine • Can be done manually with • Unopette and Hemacytometer • Is outdated and difficult to obtain diluents
PCV • Packed Cell Volume • Indicates the percent of packed red cells in a patient’s blood. • Done with hematocrit tube that has been centrifuged • Takes VERY little time and can be quick diagnostic tool • Normal ranges?
Plasma Protein Concentration • Utilize the already centrifuged PCV tube • Read using a refractometer • Helps to determine abnormal amounts of protein in blood • Protein present may be from fat, or other sources. • Normal Ranges?
Total WBC count • Usually done by machine • Can be done manually with unopette and hemacytometer method. (Again, outdated and difficult to obtain diluents) • Critical in determining absolute number of WBCs. This is the number with diagnostic value.
Blood Film Analysis • Used to calculate the relative WBC percentages • Used to evaluate RBC and WBC morphologies • Used to perform reticulocyte count if patient is anemic • Used to Perform platelet estimation. • REVIEW retic. and platelet calculations. I am not going to re-teach these.
Calculating the Absolute WBC count • You must have done a relative percentage from a blood film. (Written as a %) • You must have a total WBC count • You will then take each relative percentage and multiply each by the total WBC count from your CBC analyzed blood.
Calculating the Absolute WBC values • Your relative percentages were as follows: • Neutrophils: 52% • Lymphocytes: 38% • Monocytes: 7% • Eosinophils: 3% • Basophils: 0% • Take each cell’s percentage and multiply by the total WBC numbers from the machine readout. Let’s say that your total was 38,000.
Your WBC total was 38,000 • 38,000 x 52% = 19,760 total neutrophils • 38,000 x 38% = 14,440 total lymphocytes • 38,000 x 7% = 2,660 total monocytes • 38,000 x 3% = 1,140 total eosinophils • 38,000 x 0% = 0 total basophils • The % is VERY important in your calculation. Simply hit the % key after you punch in the number you are multiplying the total by. • NOTICE that your numbers add up to 38,000!
Hemoglobin concentration • Usually done by machine • Different machines use different techniques to estimate Hb concentration • Lysing solutions • Photometrics • Are only as accurate as machine is. Calibration is important.
Erythrocyte Indices • MCV: Average volume within RBC • MCHC: Average Hb concentration within RBC • MCH: Average weight of Hb within RBC • Review these calculations please!
Performing the CBC and Clinical Chemistry Tests on the IDEXX Machines • Blood MUST be drawn in both Lithium-Heparin micro tube AND large purple top tube. (These are tubes designed for the IDEXX machines) • You can use a serum separator tube in place of the lithium heparin tube. • REMEMBER: • DO NOT remove the stopper from the large purple top tube. • DO NOT fill tube past bottom of label (0.5 – 1.5 cc) • You WILL need to remove the top from the micro-tube.
IDEXX CBC and Chemistry • Centrifuge the microtube or serum separator tube for ~7 minutes. • Transfer plasma or serum off and place in serum cup. (Barbie shot glass) • Place purple top tube and grey top tube obtained from Ms. Kenner in CBC machine. • Bar codes on purple and grey tubes MUST MATCH in order for your tests to be valid. (If purple tubes do not have a bar code, this is OK, as long as they’re the large tubes!)
IDEXX Machines • To run the chemistry portion of the test, you will obtain test slides from Ms. Kenner • On the Monitor of the VetLab Station, use the stylet to enter the following information: • Click “Analyze Sample” • Enter Client: “VTI” • Enter P. Name: Patient id # is fine • Select next and then select reason: “Routine SX/Wellness” • At the bottom of the screen, you will need to tap the test icons desired. (CBC and Chemistry) and THEN • STOP
Running your Tests • If you haven’t already loaded the large purple top and grey top tubes in to the CBC machine, do so now. Then hit RUN • Look at the LED screen on the body of the Vet Test Machine. • Follow prompts on the LED screen. • This is where you will add the slides ONE AT A TIME. (DO NOT OPEN the foil until you are ready to load the slide in to the machine.) • DO NOT touch the center of the slides. You will need to handle the slides by the edges and make sure the bar code is UP
Running your Tests • Once you have placed all the slides in the machine, follow the prompts on the LED screen. • Place pipette tip securely on the pipettor of machine. • Press “E” on LED keyboard to continue the analysis. • lower pipette into plasma and press button. Machine will beep 1 time. (Release button) • 2 beeps: Remove pipette • 3 beeps: wipe pipette tip and replace in machine within 20 seconds. You will hear one more beep after pipette is replaced.
Test is Running • The machine will automatically pipette the appropriate amount of plasma on each slide to run the tests. • Total run time is ~6 minutes • When test is complete, press E • Remove pipette tip, empty used slide drawer • Machine should start printing results. If not, press E and wait. If results are still not printing, try selecting option 2: print results.
Printers • The internal printer on the IDEXX machine is disabled on our machine. • We have an external printer connected to print results. • PAPER MUST BE LOADED before you start running tests.