How to scan from HP printer to computer
30 likes | 47 Vues
Get the connection method between the printer and computer to perform the scanning option. To perform the scanning the scanning functionality should be in perfect mode.<br><br>https://printer-setup.co/

How to scan from HP printer to computer
E N D
Presentation Transcript
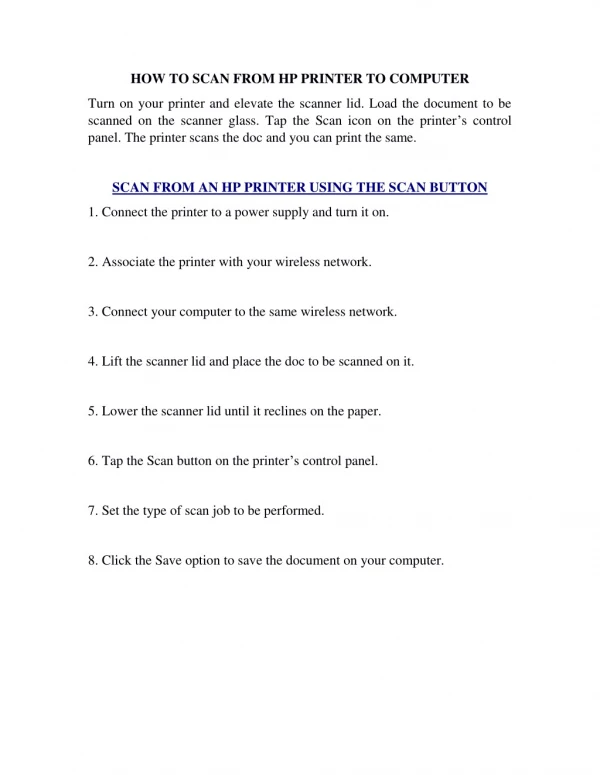
HOW TO SCAN FROM HP PRINTER TO COMPUTER Turn on your printer and elevate the scanner lid. Load the document to be scanned on the scanner glass. Tap the Scan icon on the printer’s control panel. The printer scans the doc and you can print the same. SCAN FROM AN HP PRINTER USING THE SCAN BUTTON 1. Connect the printer to a power supply and turn it on. 2. Associate the printer with your wireless network. 3. Connect your computer to the same wireless network. 4. Lift the scanner lid and place the doc to be scanned on it. 5. Lower the scanner lid until it reclines on the paper. 6. Tap the Scan button on the printer’s control panel. 7. Set the type of scan job to be performed. 8. Click the Save option to save the document on your computer.
SCAN FROM HP PRINTER TO A COMPUTER THROUGH SCAN APPLICATIONS 1. Connect the printer to a power supply using the Power cable. Turn on the printer and enable the Wi-Fi feature in it. Power on your wireless router. 2. Make sure the router is connected to a Wireless Access Point that has an active internet connection. Connect the printer to the wireless router through the Wi-Fi feature. 3. Turn on the computer and connect it to the wireless network to which your printer is connected. You can also connect both the devices using an Ethernet cable. 4. If your are choosing a USB mode of connection, then connect the printer and the computer directly, using a USB cable accompanied by the printer. Lift the Scanner lid up and place the document to be scanned on the scanner glass. 5. Push the scanner lid against the document until it reclines on it. Tap the Scan icon on the printer’s LCD display. The printer displays the list of devices connected to it. 6. Touch on Scan to computer and click OK. If the LED indicators at the edges of the scanner glass start to blink, then the scan job is initiated. 7. After the process is complete, the blinking stops. The document scans and displays on the computer. Click Save to save the document.
8. There are even other applications that allow the user to scan and share the documents and images. They are HP Print Assistant, HP Scan software, Embedded Web Server, and much more. 9. Download any of the above mentioned applications using the link provided on this site. After downloading, right-click the file and select Run from the drop-down menu. Complete the installation process with the on- screen instructions on the computer. 10. Once the installation completes, launch the application and repeat the scanning process. But this time, select the Scan option from the Home menu and proceed with directions on the screen. Get more information regarding the scanning option on the hp printer make a visit at 123.hp.com/setup