Download
1 / 22
220 likes | 344 Vues
This detailed guide explores the intricacies of window assembly in solid masonry and veneer construction. Key factors affecting window installation include architectural design, climate, materials, and window types. It emphasizes standard sizes for masonry, proper weatherproofing, and installation sequences. The guide covers various window materials such as wood, aluminum, and vinyl, along with styles like casement and double-hung. Specific detailing on installation techniques, caulking, and support structures is provided, enhancing understanding of window construction and performance.

E N D
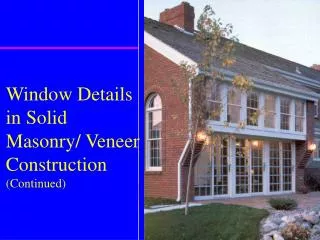
Window Details in Solid Masonry/ Veneer Construction (Continued)
Window Assembly Review • Finished window assembly depends on: • architectural design of structure • region of country/climate • material of structure • type of window • Must be familiar with • installation sequence • proper weatherproofing
Window Types - Materials • Same as in wood construction • wood • steel • aluminum • vinyl/wood covered with vinyl (wood clad) • combination
Window Types - Styles in Masonry Construction • Same as in Wood Construction • casement • horizontal sliding • double-hung • awning • louver/jalousie • fixed sash • combination types • bay, bow, box
Combination Units • max light • large viewing area • good ventilation • very common today • 2 casement with center picture window
Detailing Windows in Masonry Construction • Limited flexibility with masonry construction • stay with standard sizes designed for block • Window action is not important • Weatherproofing & installation are important • Brick and Brick Veneer masonry have some flexible • can adjust for different masonry openings
Pictorial - Window in Masonry Construction • Horizontal sliding window - wood frame attached to concrete block
Masonry Construction Window Details • Metal drip at sill • Caulking used to seal head and jamb
Steel Casement in Masonry Construction • Pre-cast concrete sill with drip slot on underneath side • Sash block (see page 105 of text) used for head and jamb • Window fin fits into the slot of the sash block and grout fixes the window in place
Brick Window Exterior • Head and sill materials can be different than jamb material
Brick Construction - Window Elevation and Nomenclature • Coordinate elevation drawing with drawing notations for each detail
Brick Construction - Head Detailof wood casement • Notation 21 • Notice steel angles supporting the brick • Caulking used to weather seal installation • Space and drywall to finish interior
Brick Construction - Jamb Detailof wood casement window • Notation 22 • Caulking use to seal installation • Metal ground at exposed edge of drywall
Brick Construction - Sill Detail • Notation 23 • Notice handle to open and close casement window • Brick sill is sloped to divert water away from window • Again, caulking and metal trim use to seal and finish installation
Vertical Mullion Detail • Notation 24 • Two casement windows side-by-side, joint covered with trim to finish installation
Head Detail (masonry) • Note use of caulking and wood trim • Wood sliding window
Sill Detail (masonry) • Note use of grout and caulking • Wood sliding window
Brick Veneer Construction Details • Notice sloped brick sill • Notice brick shown in section and elevation • Notice inside finish moldings • Brick at head detail supported by angle
Extra Credit Assignment • Elevate and detail each window type for the Hotel project on Sheet A-8. The End.
Drawing Exercise Window Detail (cont); 3”=1’-0” • Head Detail • Do not place a break line through the header • Header with 1/2” spacer between 2-2x8 headers • 1/2” gypsum board interior wall • 5/8” solid sheathing/remove plaster etc shown • 2 3/4” x 3 1/2” x 3/16” steel angle lintel • double 1/4” glass with 1/2” air space (use proper glass symbol) typical all details
Drawing Exercise Window Detail (cont) 3”=1’-0” • Jamb Detail • show sill lines (brick & wood) in Jamb Detail • finished jamb from 2”x6” • align all details • trimmer note is 2-2x4 studs (no inch marks • Sill Detail • Extend brick sillto overhang 1 1/2” underneath side, show entire brick sill and more below it • Add thin lines for jamb beyond • coordinate and reference all details with elevation