Download
1 / 26
260 likes | 286 Vues
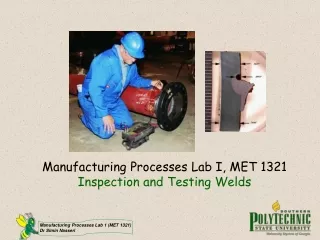
Manufacturing Processes Lab I, MET 1321 Inspection and Testing Welds. Learning Objectives. Describe the difference between a welding flaw and a welding defect . List the most common types of nondestructive and destructive testing done on welds.

E N D
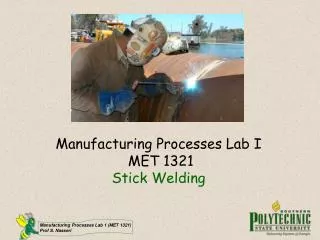
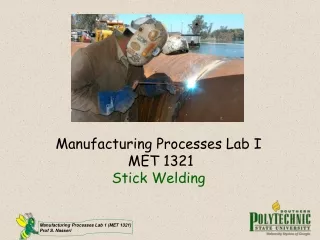
Manufacturing Processes Lab I, MET 1321Inspection and Testing Welds Manufacturing Processes Lab 1 (MET 1321) Dr Simin Nasseri
Learning Objectives • Describe the difference between a welding flaw and a welding defect. • List the most common types of nondestructive and destructive testing done on welds. • Perform several basic types of tests on welds to evaluate weld quality. • Describe the methods used to prepare samples for bend tests. Manufacturing Processes Lab 1 (MET 1321) Dr Simin Nasseri
Reasons for inspecting welds • Most welds have flaws in them • A flaw is a part of a weld that is not perfect. • Some flaws are so small they can be found only under a microscope. • Other ones are easily seen, which include porosity and large cracks. A defect is a flaw that makes a a weld unusable for the job it is intended to perform (eg. Cracks when welding on a gas pipeline) Manufacturing Processes Lab 1 (MET 1321) Dr Simin Nasseri
Inspecting welds Welds must be inspected to detect flaws. Then, the flaws must be evaluated to decide if they are acceptable or if they are defects. Most welding is done to requirements of a code or specification. The code or specification determines how large a flaw can be before it becomes a defect. A visual inspection is useful to determine the size of a weld, to check for undercut, overlap, and other surface flaws, and to check travel speed, arc length, and depth of penetration. Manufacturing Processes Lab 1 (MET 1321) Dr Simin Nasseri
Destructive test results in at least some damage to the weld. NON-destructive Examinations (NDE), does not damage the weld or the base metal. Weld tests Weld tests Nondestructive Destructive Manufacturing Processes Lab 1 (MET 1321) Dr Simin Nasseri
Nondestructive Examinations (NDE) Manufacturing Processes Lab 1 (MET 1321) Dr Simin Nasseri
Nondestructive Examinations (NDE) • Liquid penetrant inspections, • Magnetic particle inspections, • Ultrasonic inspections, • X-ray inspections, • Eddy current inspections and • Air pressure/water pressure leak tests. Manufacturing Processes Lab 1 (MET 1321) Dr Simin Nasseri
Liquid penetrant inspections are useful for detecting surface flaws, but cannot detect flaws inside the weld! Liquid penetrant inspections • In a liquid penetrant inspection, a dye is applied to the weld. After a few minutes, the dye is cleaned from the weld and a developer is applied. Any dye trapped in a flaw is developed, revealing the location of the flaw. Manufacturing Processes Lab 1 (MET 1321) Dr Simin Nasseri
Magnetic particle inspections • To examine a part using magnetic particle inspection, the surface must first be cleaned. Then, fine magnetic particles are applied to the surface. Then a strong magnetic field is applied. The fine magnetic particlesare drawn toward any flaw at the surface or very near the surface of the part. Manufacturing Processes Lab 1 (MET 1321) Dr Simin Nasseri
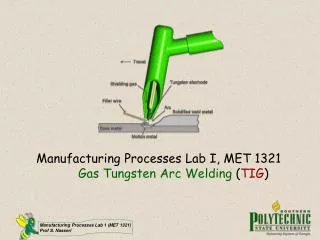
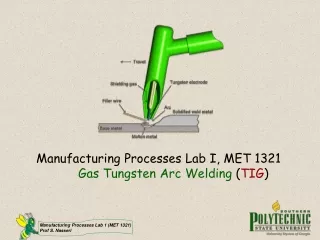
Ultrasonic inspections Ultrasonic inspection can be used on all metals and can locate internal flaws. Sound waves are sent into the part being inspected. The waves travel to the far side of the metal and bounce back. Any flaws within the weld are indicated on an oscilloscope. Manufacturing Processes Lab 1 (MET 1321) Dr Simin Nasseri
X-ray inspections • In an X-ray inspection, film is placed on one side of the part to be inspected. • X rays pass through the part and expose the film. • After the film is developed, any flaw or defect in the weld can be observed. Manufacturing Processes Lab 1 (MET 1321) Dr Simin Nasseri
Eddy current inspections Eddy current inspection detects porosity, cracks, slag inclusions, and lack of fusionat or near the surface of a weld by including eddy currents in the part and monitoring changes in current flow on an oscilloscope. Eddy currents are AC currents, usually of high frequency, which can be induced to flow in any metallic section, their flow pattern being disturbed by the presence of cracks or other discontinuities. Manufacturing Processes Lab 1 (MET 1321) Dr Simin Nasseri
Air pressure leak tests Air-pressure or water pressure leak tests are often used to inspect pipes or tanks that are to contain gases or liquids under pressure. In an air-pressure leak test, a soapy solution is applied to the pipe surface at each weld. When the pipe is under air pressure, flaw will cause bubbles to form. When water pressure is used, water willspray out from the pipe where there is a leak. Manufacturing Processes Lab 1 (MET 1321) Dr Simin Nasseri
Destructive Examinations (DE) • Tensile test, • Bend test, • Fillet test, • Hardness test, • Impact test, • Peel test (for spot welds), • Tensile shear test (for spot welds), • Pressure test. Manufacturing Processes Lab 1 (MET 1321) Dr Simin Nasseri
Tensile test • A tensile test is a destructive test in which a tensile (stretching or pulling) load is applied to a prepared sample until the sample breaks. Manufacturing Processes Lab 1 (MET 1321) Dr Simin Nasseri
Maximum force applied by machine Tensile strength= Cross-sectional area of sample Tensile Strength and Ductility F o Manufacturing Processes Lab 1 (MET 1321) Dr Simin Nasseri
Distance between points after test – distance before test Ductility= x 100 distance before test Ductility Manufacturing Processes Lab 1 (MET 1321) Dr Simin Nasseri
Distance between points after test – distance before test Maximum force applied by machine 48000 Tensile strength= = = 64000 psi Ductility= x 100= x 100= 25% Cross-sectional area of sample ½ x 1 ½ distance before test = 442 MPa (2 ½” -2”) 2” The same value in metric system. Example A 2 inch welded plate is ½” (12.7 m) thick. The reduced section is 1 ½” (38 mm) wide. A maximum force of 48000 pounds (213500 Newtons) is required to break the sample. The distance between the two points after breaking is 2 ½” (63.5 mm). Find the tensile strength and ductility of this sample. Manufacturing Processes Lab 1 (MET 1321) Dr Simin Nasseri
Bend test • Specimen is positioned between two supports, and a load is applied at its center. • Bend tests are used to evaluate the quality and ductility of a completed weld. Manufacturing Processes Lab 1 (MET 1321) Dr Simin Nasseri
Bend test In a guided bend test, the size or radius of the bend is controlled. Click on image to see the video clip Manufacturing Processes Lab 1 (MET 1321) Dr Simin Nasseri
Bend test In a free bend test, the sample is placed into a large, strong vise and struck with a hammer until it bends to a 90˚ angle. It is then hammered in the opposite direction to a 90˚ angle. This back and forth bending continues until the weld sample breaks. Manufacturing Processes Lab 1 (MET 1321) Dr Simin Nasseri
Fillet test In a fillet test, force is applied to the welded joint until it breaks or until the vertical piece is bentflat against the horizontal piece. The weld should break along its centerline. A weld that breaks along the toe may indicate a lack of fusion. Manufacturing Processes Lab 1 (MET 1321) Dr Simin Nasseri
Hardness test Hardness tests are used to measure a material’s resistance to scratching and indentation. To determine the hardness of a metal, an indenter is pressed into the metal by a known force. The depth of indentation indicates the hardness of the metal. Manufacturing Processes Lab 1 (MET 1321) Dr Simin Nasseri
Other destructive tests Impact resistance test Manufacturing Processes Lab 1 (MET 1321) Dr Simin Nasseri
Tensile shear test (for spot welds) Other destructive tests Peel test (for spot welds) Manufacturing Processes Lab 1 (MET 1321) Dr Simin Nasseri
Check this site! • http://64.78.42.182/sweethaven/BldgConst/Welding/lessonmain.asp?lesNum=7&modNum=13 Manufacturing Processes Lab 1 (MET 1321) Dr Simin Nasseri