Download
1 / 29

E N D
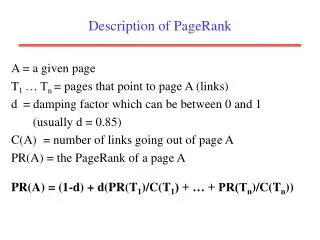
Description of SprutCAM SprutCAM can generate NC code for 2-axis and 3-axis machines, as well as indexed 4th and 5th axis machining. The machining operations included in SprutCAM replace the need for any manual writing of NC code and all of the problems that this normally entails. Instead the user only needs to define what he wants to do, and how he wants to do it. Start by simply importing the model to be machined, define the general requirements for the machining operations such as the type of tool, depth of cut, approach methods etc. And then, based upon the information given, the system calculates an optimum toolpath based on the defined parameters. The all new fourth version of SprutCAM ushers in a new level of NC programming. The logical and well thought-out interface as well as the many automated functions are made available thanks to the powerful SprutCAM kernel. This kernel concentrates the knowledge and skills of many mathematicians, programmers and engineers.
Program interface The program interface gives the user maximum information about the current operations. At the same time the screen is not cluttered with superfluous data.
Operation types Operation groups Toolpath example Because of the wide range of operations and functions available, it is possible to create an optimal job list to machine parts of any complexity. Use the parameters of a previous operation
Tool definition Example tool shape with dimensions Dimensions of the tool being used Tool type Actual tool view Technological parameters Tool library The user can choose from a wide range of tools for any of the machining strategies. It is possible to define a tool using up to seven geometrical parameters.
Machining strategies The strategies parameters for the different operations The ‘job list’ is the sequence of the various operations. Each operation has its own parameters list and creates the corresponding tool path.
Operation parameters The parameters of the different operations Set the stock, step and tolerance of machining The ‘Parameters’ edit window for an operation enables the creation of optimal tool paths for many different parts. Depending on the operation type, the model to be machined and the workpiece, SprutCAM automatically sets the appropriate parameters. The user can alter these if required.
Feedrates definition The picture displays the section of toolpath that uses the corresponding feedrate. Feedrate type Each section of the tool path has a corresponding feedrate. It is possible to set a constant or variable feedrate. The variable feedrate depends on the tool path direction. The use of variable feedrates reduces the machining time and improves the machining quality.
Approaches and retractions Approach/retraction parameters Approach type There are a wide range of tool approach and retraction moves available. The approaches enable cutting to start in a smooth manner. Retraction type
Machining with ‘restrictions’ Restricting area Restricting area The tool path generated with regard for the restriction area(s) It is possible to define ‘restricted’ and ‘allowed’ areas for machining. The restriction can be defined by geometry models (faces and meshes) or by closed curves.
Rotary axis Rotary head Example using a rotary head If a machine has a rotary head and/or a rotary table, it is possible to define the rotary axis in SprutCAM to control it. The axis can be defined as a line parallel to any coordinate axis or by two points. Rotary table
Built-in 2D modeler 3D model The mean to link the definitions with 3D model Two-dimensional drawings can be created by ‘snapping’ to a 3D model. This ensures accuracy is maintained in the drawing.
A contour defined by an equation Source contour Calculated contour The window to define the equation Simulation of the machining
2.5D milling • Import the 2D contours into SprutCAM • The elements height and stock are defined • Visualisation of the defined model • Pocketing • Walls machining The 2.5D model is defined as a set of contours. Every contour has the following parameters: the level, type – a cover or a hole, machining side – inside or outside. Whilst it is being defined, SprutCAM draws the model in the view port.
2.5D milling The strategies available for machining 2.D models are: 2.5D pocketing, 2.5D chamfer machining, 2.5D flat land machining, 2.5D walls machining. Each operation has its own parameters set, that makes the machining sequence creation simple. 2.5D pocketing 2.5D flat land machining chamfer machining 2.5D walls machining
Helical machining Machining parameters The helical tool path The simulation of the calculated helical machining 2D contouring operation allows the creation of helical tool paths. The helical tool path follows the selected curve. The resulting tool path can be ‘vectored’ or output helical moves (arcs) to the NC code. It is possible to create a ‘cleanup’ pass at the bottom level of machining.
Hole machining operations Parameters of the selected cycle Hole machining cycles SprutCAM can generate a variety of cycles for hole machining. Every cycle has its own parameters. It is the possible to automatically recognise holes in the model to be machined. This means there is no need to input the holes centers and diameters manually. The roughing operations can use a pre-drilled hole for it’s plunge move. The parameters of the hole for a plunge move can be copied into the rough operation automatically.
Holes recognizing Holes machining The size range for the holes search It is possible to create the holes list by setting a range of diameters and then choosing the required holes from the list manually. Recognised holes
Rough waterline and plane operations The roughing waterline operation generates the tool path in a series of horizontal passes. The distance between the passes is defined by the ‘Z step’. The tool path that’s created is a pocketing operation that removes the workpiece material. Plane roughing of the workpiece material that is outside of the 3D model. The passes are created in vertical parallel planes. To limit the cutting forces on the tool, machining can be performed at user defined Z depths.
Drive operation Drive operation Waterline operation The drive operation uses drive curves to define the tool path in. A drive curve can be imported or created directly in SprutCAM. It is possible to machine both along and across the drive curves.
Machining with scallop checking Waterline machining Remaining material Waterline with scallop checking It is possible to generate the tool path utilising ‘scallop height’ checking. In this case the distance between the neighboring cutter paths will be reduced if necessary to maintain the defined scallop height.
Optimised plane operation Plane finish machining Optimised plane finish machining When the plane operation is used then the maximum scallop height appears on steep surfaces that are parallel to the tool path. The optimised plane operation generates the tool path so that it is perpendicular to any steep surfaces, this reduces the scallop height and improves the finish quality.
Complex machining Complex finishing operation Waterline finishing operation Plane finishing operation
Remachining after previous operations Complex finishing Automatic recognition of ‘unmachined’ areas The re-machining of rest ‘material’ permits high quality machining while greatly reducing the cutting time. Unmachined areas are calculated automatically, and can be machined using any of the available strategies. Remachining after the previous operations
Engraving A model for the engraving operation is a set of planar (flat) curves. These curves can be imported or created in the built-in 2D modeler. The engraving module allows the creation of a special 3D model from the planar curves.
Engraving 3D tool path in the corners The side angle of the model can be milled using any one of the supported tools. The engraver angle may also differ from the side angle. The “allow 3D toolpath” option produces a tool path to obtain sharp corners. The engraving can be performed using several Z steps if required.
Tools list The list of toolsused The images of how the part is mounted on the machine SprutCAM generates a document which contains a setting sheet required for setting the part up on the machine, also a job list and a list of used tools. The document is produced in html-format and it can be edited with an external editor. Machining time The job list
The Benefits of SprutCAM • Reduced labour costs to create NC-programs • Reduction in machining time • Easy to use • Very short learning curve • Compatibility with most modern CAD -systems • Rapid tuning to any CNC machine • Minimal requirements of computer hardware • Very rapid Return On Investment • Instant online NetViewer support and training • Annual support contract included on Version 4 products
SPRUT Technology, Inc. Address: Office 6, Ave. Autozavodsky, 1, Naberezhnye Chelny, 423815, RUSSIA Or find your nearest dealers in more that 40 countries in the world www.sprutcam.com www.sprutcam.com