Pick and Load
This guide outlines the step-by-step process for scanning pick slips and managing load transfers. Begin by scanning up to 12 different pick slips from the pick list, followed by entering the load number from the load sheet or label. Key functions allow you to manage quantities, skip items, inquire about parts, and display comments. Follow the instructions to scan unit IDs accurately, ensuring inventory is moved to the correct location. This process ensures proper tracking and updating of sales orders, facilitating smooth inventory management.

Pick and Load
E N D
Presentation Transcript
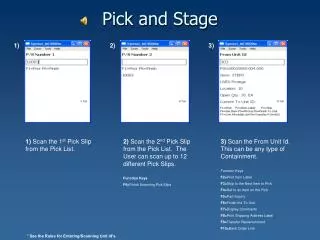
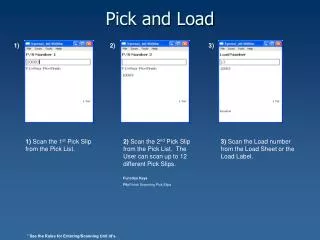
Pick and Load 1) 2) 3) 1) Scan the 1st Pick Slip from the Pick List. 2) Scan the 2nd Pick Slip from the Pick List. The User can scan up to 12 different Pick Slips. Function Keys F6=Finish Scanning Pick Slips 3) Scan the Load number from the Load Sheet or the Load Label. ¹ See the Rules for Entering/Scanning Unit Id’s.
Pick and Load (Continued) 4) 5) 6) 4) Scan the From Unit Id. This can be any type of Containment. Function Keys F2=Display Open Quantities on all Lines. F3=Skip to the Next Item to Pick F4=Set to an Item on the Pick F5=Part Inquiry F7=Display Comments F10=Back Order Line 5) Enter the Quantity to Pick. The Quantity is Defaulted to the lesser of the Open Quantity or Unit Quantity. If the From Unit Id was Loose or Static type or if multiple Items were on the Container then the Item and Lot would have been prompted for. 6) Scan the To Unit Id. This is normally a General Unit Id and must start off empty with no Inventory on the Container. ¹ See the Rules for Entering/Scanning Unit Id’s.
Pick and Load (Continued) 7) 8) 7) Transaction Accepted is displayed and the Inventory is Transferred from the Unit Id in it’s Inventory Location to Location “OUTBOUND” for the To Unit Id. The Sales Order is also Updated with a New Status and is tagged with the To Unit Id. 8) Scan the Unit Id to where the remaining Quantity will be placed upon. Since a Partial Unit Id was Picked for “313” then it wants to know what you are going to do with the remaining Quantities. It will process another “IT” to where you place the remainder or you can leave the reminder on “313” by pressing Enter. ¹ See the Rules for Entering/Scanning Unit Id’s.