Download
1 / 11
110 likes | 274 Vues
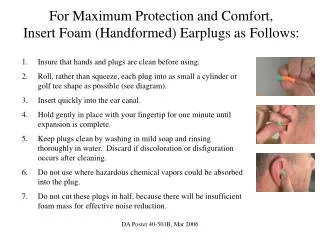
For Maximum Protection and Comfort, Insert Foam (Handformed) Earplugs as Follows:. Insure that hands and plugs are clean before using. Roll, rather than squeeze, each plug into as small a cylinder or golf tee shape as possible (see diagram). Insert quickly into the ear canal.

E N D
For Maximum Protection and Comfort, Insert Foam (Handformed) Earplugs as Follows: • Insure that hands and plugs are clean before using. • Roll, rather than squeeze, each plug into as small a cylinder or golf tee shape as possible (see diagram). • Insert quickly into the ear canal. • Hold gently in place with your fingertip for one minute until expansion is complete. • Keep plugs clean by washing in mild soap and rinsing thoroughly in water. Discard if discoloration or disfiguration occurs after cleaning. • Do not use where hazardous chemical vapors could be absorbed into the plug. • Do not cut these plugs in half, because there will be insufficient foam mass for effective noise reduction. DA Poster 40-501B, Mar 2006
For Maximum Protection and Comfort, Insert Single-Flange Earplugs as Follows: • Use the seating device (top part of carrying case) and insert the pointed, plastic tip into the device’s open-ended stem. • Place the single-flange plug over the tip and insert into the ear canal, with the tab down. • Twist the plug 90 degrees toward the back of the ear until a good seal is achieved. • When a good seal is not obtained, try a different size. Single-flange plugs come in five sizes, but are currently not being manufactured. • Without the seating device, make the ear canal accessible by reaching over the head with the opposite hand and pulling the ear up and out. • Grasp the plug by its tab and insert into the ear canal with the tab down. Twist the plug 90 degrees to the rear of the head until a seal is achieved by the flange. DA Poster 40-501C, Mar 2006
For Maximum Protection and Comfort, Insert Triple-Flange Earplugs as Follows: • Using the seating device (lid of the carrying case), place the stem of the triple-flange earplug into the device’s open end space. • Push and wiggle the plug into the ear canal until a seal is achieved. • The plug is properly fitted when the two flanges are in the canal and the third (last) flange is completely blocking the canal entrance. • When a good seal is not obtained, try a different size. Triple-flange plugs are available in three sizes: large, regular and small. • Without the seating device, make the ear canal accessible by reaching over your head with the opposite hand and pulling the ear up and out. • Grasp the plug by its stem and insert into the ear canal. Push and twist the plug toward the rear-center of your head until a seal is achieved by the third (last) flange. DA Poster 40-501D, Mar 2006
Noise Muffs: General Information • Adjust the headband and strap to insure earcup seals are in complete contact with the head. • Earcup seals must fit well around the temples of eyeglasses, when worn. • The type II noise muff can be worn over the head, behind the head or under the chin. • When noise muffs are properly worn, your own voice should sound muffled to you, as if talking inside a barrel. • Do not bend, alter or modify any part of the headband, otocups (including the lining and the seal). • Replace earcup seals that become hardened, damaged or otherwise unserviceable. • Even a small air leak eliminates the protection provided by noise muffs. DA Poster 40-501F, Mar 2006
Ear Canal Caps: General Information • Ear canal caps can be worn over the head, behind the head or under the chin. • Adjust the headband, where possible, to your approximate head size. • Place the headband in the desired position and readjust it, if necessary, for a snug comfortable fit. Each cap must block the ear canal opening completely. • Push the canal caps against the canal opening until sealed. A slight suction, when caps are removed, indicates a proper fit. • Do not bend the headband, since the tension is preset by the manufacturer. Wash with hand soap or a mild detergent. • Suitable for wear only in steady-state noise levels below 95 dBA. DA Poster 40-501G, Mar 2006
Earplugs: General Information • Use the earplug seating device or make the ear canal accessible by reaching over your head with the opposite hand and pulling the ear up and out. • A proper seal should be accompanied by a vacuum sensation. Your voice should sound muffled, as if talking inside a barrel. • Plugs tend to work loose as a result of talking and chewing, and must be reseated. • Little difficulty understanding speech should be experienced when plugs are being used, if the voice of others is raised slightly above the level of ordinary conversation. • Even a small air leak defeats the purpose of wearing plugs. • Keep plugs clean with soap and water. Return them dry to their case and store until needed. • Earplugs are for your personal use only. DA Poster 40-501H, Mar 2006
For Maximum Protection and Comfort, Insert Quad-Flange Earplugs as Follows: • Grasp the plug by its stem and insert into the ear canal. Push and twist the plug toward the rear-center of your head until a seal is achieved. • The plug is best fitted when the three flanges are well inside the canal and the fourth flange (last) is blocking the canal entrance. However, smaller canals can still benefit with less flanges inserted in the canal when there is a good seal. • When a good seal is not obtained, try a different size or type of earplug. Quad-flange earplugs vary by manufacturer as to size availability. DA Poster 40-501N, Mar 2006
For Maximum Protection and Comfort, Insert the Combat Arms Earplug (Double-Ended) as Follows: • A one-size-only earplug with a doubletree design. • When the solid (olive-colored) tip of the plug is properly inserted into the ear canal, it protects against steady-state noise (e.g., helicopters or armored personnel carriers). • When the open (yellow-colored) tip of the plug is properly inserted into the ear canal, it protects against impulse noise (e.g., weapons fire). • In this latter configuration, the hearing protector allows speech communication and detection, as well as localization of acoustic sources. DA Poster 40-501O, Mar 2006
For Maximum Protection and Comfort, Insert the Combat Arms Earplug (Single-Ended) as Follows: • A one-size-only earplug with a triple-flange design. The plug is best fitted when the first two flanges are in the canal and the third flange (last) is completely blocking the canal entrance. However, those with smaller ear canals can still benefit with less flanges inserted in the canal when a good seal is achieved. • 2. When the open (yellow-colored) tip of the plug is properly inserted into the ear canal, it protects against impulse noise (e.g., weapons fire). • In this configuration, the hearing protector allows speech communication and detection, as well as localization of acoustic sources. • This earplug provides inadequate protection for most steady-state noise conditions! DA Poster 40-501P, Mar 2006
Earplug Seating Device and Carrying Case • Triple and Quad-Flange earplugs (insertion instructions): • A. Insert stem of plug into open end of carrying case lid. • B. Push and wiggle plug toward rear-center of head. • Single-Flange earplugs (insertion instructions): • A. Grasp tab of plug between thumb and forefinger and insert into ear canal. • B. Use pointed end of case lid to improve snug fit. • General Instructions: • A. When not in use, keep plugs in carrying case. • B. Ensure that plugs are kept clean (soap and water) and are dry when returned to the case. • C. Wear your earplug carrying case (with earplugs) as part of your duty uniform. DA Poster 40-501T, Apr 2006
Audiometric InstructionsDOEHRS-HC • 1. This is a hearing check. You will be listening for some tones. • When you hear a tone, press the button once and quickly release the button. • No matter how faint the tone, press the button when you hear the tone and quickly release the button. • Upon completion of your hearing check, please remain seated and quiet until the operator releases you. DA Poster 40-501U, Apr 2006

![Complete Data Protection from [INSERT SOFTWARE NAME]](https://cdn3.slideserve.com/6499401/complete-data-protection-from-insert-software-name-dt.jpg)