Download
1 / 13
160 likes | 457 Vues
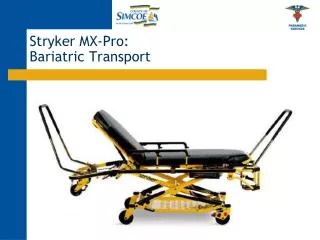
Stryker MX-Pro: Bariatric Transport. Specifications:. 850lb capacity in all height positions 1600lb capacity at lowest position Weighs 111lbs (50kg) Compare to our regular stretchers MX-Pro R3’s which are 81lbs with max weight capacity of 650lbs Width of 29” (Compare to 23”)

E N D
Specifications: • 850lb capacity in all height positions • 1600lb capacity at lowest position • Weighs 111lbs (50kg) • Compare to our regular stretchers MX-Pro R3’s which are 81lbs with max weight capacity of 650lbs • Width of 29” (Compare to 23”) • 4 locations for Bariatric stretchers: Angus, Barrie North, Craighurst, Orillia • Units capable of transporting Bariatric patients are: 3227, 3204, 3203, 3258, 3236, 3210, 3225 and 3213
Transfer Flat • Weight Capacity of 1600lbs. • 60” X 108” when spread out • 21” X 9” when folded up • Weighs 10lbs • 23oz vinyl construction is strong and durable • 12 reinforced handles for multi-person lifts • High Visibility for safe practice on scenes
Transporting • To transport a patient on the bariatric stretcher the antlers in the bariatric unit must be moved to the middle position. • Unscrew the knobs on the antlers • Move antlers to the secondary position (furthest position from cabinet) • Screw in the knobs back in (hand tight) to secure • Note: An EMPTY bariatric stretcher may be transported by any ambulance in the normal antler mount position.
Transporting • As a back-up to the locking bar, quick link straps must be wrapped around the stretcher frame and clipped onto the “D” rings in the ambulance floor (2 at front, 2 at back and 2 on side) • The stretcher sits in only one side of the atler so it must be strapped • Securing the stretcher at these points ensures little to no movement of the stretcher and prevents any risk of the stretcher falling out of the ambulance
Tips • NOTE: Please ensure that the antler mounts are well cleaned and maintained during deep cleans, so as to not have a problem in the event of an emergency!
SAFETY NOTE • NOTE: ALWAYS WATCH TO MAKE SURE THE SAFETY BAR GETS HOOKED ON THE YELLOW HOOK BEFORE REMOVING THE STRETCHER!!