Download
1 / 143
1.88k likes | 2.87k Vues
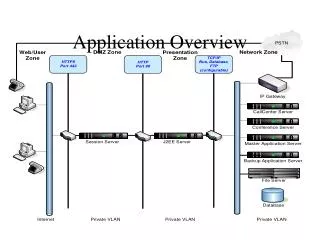
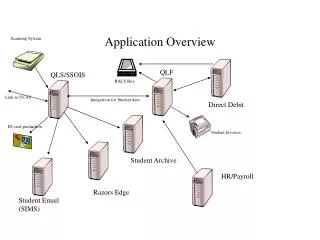
Calypso Training Application Overview. Trade Viewer. To open the Trade Viewer click the Trading button on the Main Entry Panel. Trade Viewer. Trade Viewer Parameters Pricing Env : The default Pricing Environment that will be loaded when your workspace is launched

E N D
Trade Viewer • To open the Trade Viewer click the Trading button on the Main Entry Panel.
Trade Viewer Trade Viewer Parameters • Pricing Env: The default Pricing Environment that will be loaded when your workspace is launched • Pricer Config: The Pricer Config associated with the Pricing Environment • Quote Set: The Quote Set associated with the Pricing Environment • Pricing Params Set: The Pricing Parameters associated with the Pricing Environment • Base Currency: The Base Currency associated with the Pricing Environment • Val Datetime: The value date of the loaded workspace • Real Time Market Data: This is the datetime of the marketdata that will be used when pricing in the launched blotter • Real Time Trades Data: Check this box to refresh blotters with new trades and modified trades
Trade Viewer • Clicking Refresh Domains will refresh information such as available Pricing Environments, Trade Filters, etc. • Clicking Reload will reload the selected Pricing Environment and associated market data. • Clicking Apply will propagate changes to all open blotters and trade worksheets. • In addition to the Trade Viewer default Workspace, other blotter view shortcuts can be added. For instance, a shortcut node loading all trades in a Book can be added by selecting the Book menu option, selecting Add, and then selecting a Book. • The workspaces of other users can be viewed by selecting Add under the Workspace menu. Blotter views corresponding to the contents of a Trade Filter can be loaded by selecting Add under the Portfolio menu.
Trade Viewer • By double clicking on any of the workspace nodes in the Trade Viewer, an instance of the trade Blotter can be launched.
Blotter • The trade Blotter is the primary workspace from which trades can be viewed. Depending on the Blotter workspace configuration specifications, trades will appear and disappear from the Blotter view in real-time. Adding Trades • There are several ways to add or remove trades from your Blotter workspace. • The easiest way to add a trade is to enter a trade Id in the lower right corner text box on the Blotter panel. Below that text box is a count of all trades in the Blotter.
Blotter • To add multiple trades to the Blotter, click the ‘Add Trades …’ button to launch the Trade Selector (Filter Set). This will be covered later, but Filter Sets can be used to load trade batches based on various attributes. For instance, if you wanted to load every trade in book CPG_VAN_TOR, you could select the Book attribute, specify book CPG_VAN_TOR, click Show Trades to view all corresponding trades, and then click Select All to load those trades into the Blotter. Multiple attributes can be selected to create complex filters. • Additionally, it is possible to load Blotter contents based on previously saved Filter Sets. To do so, open the Trade Selector, select attribute ‘Filter Set/IN’, and choose a Filter Set to load.
Blotter • If you are permissioned to do so, a trade will also appear in your workspace after being saved, as long as the original trade panel instance was launched from the Blotter. This is noted because trades launched from outside of the Blotter will not appear in your workspace unless the Blotter is reloaded. Opening Trades • To open a trade, double click on any Blotter row and a corresponding trade panel should open. To open multiple trades, highlight a set of trades, right click, and select Open Selected Trades. • You can also load a trade by launching a blank trade worksheet, entering a trade id, and pressing enter. However, the trade you are trying to load must be of the same type as the opened trade worksheet. Opening Trade Worksheets • To open a blank trade worksheets form the Blotter, select the Trade menu and then the sought product type. Speed Buttons • Trade speed buttons appear by default for several trade types. They facilitate quick launching of blank trade worksheets. • Risk speed buttons facilitate quick launching of risk reports on trades selected in the Blotter. • Both button sets can be configured. Removing Trades • To remove trades, highlight trade rows, right click, and click Remove Selected Trades.
Blotter • Changing and Reloading Pricing Environments • When a Blotter is opened, the Pricing Environment specified in the Trade Viewer is loaded. Risk reports run in the Blotter will use that Pricing Environment’s market data. Additionally, if you open and price a trade via the Blotter, the results will be based on the Pricing Environment’s market data. • To select a Pricing Environment different from the Trade Viewer default, use the Pricing Env combo box. The Pricing Environment text will turn cyan indicating the change. • If the Pricing Environment’s market data has changed (e.g., curves updated), the Pricing Environment text will turn yellow. In order for this to occur, the Real Time Market Data check box must be set to true. • When the Real Time Market Data check box is set to true, the market data associated with the Blotter Pricing Environment should update automatically. You can also forcibly reload market data by selecting the Pricing Env menu and then Reload.
Blotter Running Analysis Reports • Risk analysis reports can be run ‘on-the-fly’ on subsets of trades selected in the Blotter. The Analysis combo box contains the list of all risk analysis reports. The Param Set combo box contains associated report parameters. • To run a risk analysis report, select the appropriate report and param set, highlight a set of trades in the Blotter, and click Run. The results will appear in a new window when the report has finished running.
Blotter Positions Panel • Bond and futures positions can be loaded in the bottom panel of the trade Blotter if the Positions box is checked.
Blotter HELPFUL MENU FEATURES Blotter Menu • Trade Columns: Blotter trade Columns can be configured. Over 300 columns to choose from. • Export Excel Trades: Export Blotter contents to Excel. You can also export the contents of any embedded Calypso table to Excel with CTRL+O shortcut key. Trade • Any trade panel in Calypso can be launched via the Trade menu. Edit • Select All Trades: Will highlight all trades in the Blotter. Can also highlight all trades with the CTRL+a shortcut key.
Calypso Training Trading
From the Blotter, select either menu Trade > Credit Derivatives > CreditDefaultSwap, or click the CDS trade speed button, if one is setup. Trading a CDS
Trading a CDS Trade Templates • After opening the CDS trade panel, select a CDS trade template from the Template combo box. • Trade templates automatically populate standard trade details such as credit events, trade maturity, notional, holidays and settlement types. • Templates are especially useful for CDS trades which require multiple credit event, reference obligation, and settlement fields.
Trading a CDS • Next, choose a Counterparty using the Legal Entity Chooser.
Trading a CDS • Select a book from the Book combo box. • Double click on the blue Buy/Sell Credit Protection label to specify the trade direction. • The Pay/Rec label on the premium side of the trade will change accordingly. • Specify a currency and notional amount (default is 10,000,000.) • The notional amount is automatically propagated to the premium side.
Trading a CDS • To select an issuer, click the Select … button to launch the Issuers dialog. It is possible to search for issuers by either Short Name or Full Name (long name).
Trading a CDS • Select a Reference Obligation by choosing a product through the Product Chooser, or double click the Select Product label and enter an Identification String. • Next, enter trade Start and End dates. If a date text box is highlighted red, that date is a holiday. Calypso will automatically roll cashflow payment and reset dates for holidays. • Next, enter either a fixed premium rate or double click the blue Fix label and enter a Floating rate. • Enter payment details like payment frequency and compounding. To specify a roll date of the 15th, click on the R Day check box and enter 15 in the adjacent text box.
Trading a CDS • Enter any trade fees via the Fees tab. Fee information should include Fee Type, fee direction (Pay/Rec), Amount, fee legal entity, and fee dates. The Fee Date, Start Date, and End Date should generally be identical.
Trading a CDS • In the Details tab, enter additional details such as Trader, Trade Date, Salesperson, and Keywords.
Trading a CDS • Finally, click Price to generate cashflows (see cashflows tab) and price the deal.
Trading a CDS • After building the trade, press F5 or select the Trade menu and then Save.
Trading a CDS • If trade financial details have changed between save attempts, you will be prompted with the following message. If you reprice a trade prior to saving, you should not encounter this message.
Trading a CDS • After saving, the trade will be in Pending status.
Trading a CDS - Bulk CDS Entry • CDS hedges for CDS Swap baskets can are created using the CDS Bulk Entry interface. • To access the CDS Bulk Entry interface, go to Trade>Credit Derivatives>CDSBulkEntry. • To load a reference CDS Basket, go to Configure>Basket Trades and select a basket. • The basket loads with a default notional of 10,000,000. To change this amount, go to Configure>CDS Trade Default Notional and enter a new amount.
Trading a CDS - Bulk CDS Entry • Once the notional is modified, each issue amount will match those in the basket. • By right-clicking, counterparties can be assigned through the GUI.
Trading a CDS - Bulk CDS Entry • To save a CDS hedge, select a counterparty and click Save Selected or Save All. • A unique Trade Id will be assigned to the hedge. The hedge trade can be opened by double clicking.
Trading a Bond • Open the Bond Trade screen. This can be done from the Main Entry GUI (Trade -> Security -> Bond) or through the Trade Blotter. • From the Blotter, select either menu Trade > Security > Bond, or click the Bond trade speed button. A default price is shown (taken from the bond quote). • Enter the required trade details (e.g., price, quantity or trade amt, settle date, counterparty, book). There is a buy/sell toggle as well.
Trading a Bond • Click Price to generate cashflows (see cashflows tab) and price the deal (or press F8 to generate cashflows).
Trading a Bond - Bond Products • To trade a bond, a corresponding Bond product must exist • To load an existing bond, select a Security Code type (e.g., CUSIP) and enter a code in the adjacent text box. Click Load. • Clicking Load at the bottom of the window will open the Product Chooser. • Save: You will be prompted to enter a bond name. A quote name will be automatically generated.
Trading a Bond - Bond Products • The Bond tab contains bond definition specifications including: • Bond Class (e.g., BondAssetBacked, BondBrady) • Bond Type (e.g., Generic, UST, GILT) • Issue/Maturity dates • Issuer and country • Issue price, issue quantity, and face value.
Trading a Bond - Bond Products • The Coupon tab contains : • Coupon rate (Fixed or Floating - double click the label to switch) • Payment details including: • Holidays • Roll Day • Pmt Frequency • The Market and Special tabs contain market conventions, and other special characteristics • The Call Schedule, Credit Events, and ABS tabs store special information for corresponding bond types.
Trading a Bond - Bond Products • CashFlows tab • Specify a Val Date, select a Pricing Env, and click Generate (flows do not regenerate if customized and locked). • Display: Select the cashflows you want to display (interest only, or principal only.) • Forecast flows: Checkbox to forecast floating flows. • Check “Custom Flows” to customize the flows. The CashFlow tab will turn red.
Trading FX • Choose Trade>FX>FX to open a FX trade worksheet. • Enter Trade and Settle Dates. • Double click Buy/Sell to specify the trade direction. • Select Base and Quote currencies and specify the base currency amount. • Enter Spot Rate. The amount of the other currency will be automatically calculated.
Common IRD Trade Parameters The Swap Leg panel consists of 3 distinct sections indicated by colored shading: Swap Trade Worksheet • Trade term, principal, float index or fixed rate, amortization, interest computation • Resets • Payments Note: Refer to Calypso’s ‘Interest Rate Derivatives User Guide’for a description of each field in the panels.
Swap Detail Window Common IRD Trade Parameters: Swap Leg Panel of a Swap worksheet • Double-clicking on selected red text in the trade worksheet will open the ‘Swap Detail’ Window through which financial attributes may be modified. Swap Detail Window
Term, Principal, Rates, Interest Common IRD Trade Parameters: Swap Leg Panel of a Swap worksheet • Term, Principal, Rates, Interest: • Deal term (start, end dates) • Principal, Currency • Principal Amortization • Fixed Rate - or - • Floating Rate Index/Tenor/Source • Spread • Interest Computation • compounding period • compounding start • computation holidays • payout formula
Common IRD Trade Parameters: Resetting Swap Leg Panel of a Swap worksheet • Resetting: • Averaging • Frequency • Weighting/Equal • Custom/Match • 1st Reset • Actual rate input
Common IRD Trade Parameters: Payments Swap Leg Panel of a Swap worksheet • Payments: • Frequency • Payment Date • Roll • roll day • roll lag • Payment Daycount • Payment Holidays
Customizing IRD Cashflows • On most IRD trade worksheets, the cashflow data may be edited. • Checking the ‘Customized’ checkbox permits individual cell values to be modified. Swap Trade Worksheet • To edit any cell, users click the cell to change the existing value. • Changed values can be ‘locked’ so that changes in other trade attributes do now revert the customized values back. • Once customized, the cashflows for the trade will be saved into the database. Cashflows Panel
Trade Worksheets – Option Exercise Tab • ‘Exercise’ related tabs appear for the Cancellable Swap, Extendible Swap, and Swaption trade worksheets. Trade Worksheet – ‘Exercise/Settlement’ Tab • The screen may vary slightly between product type. • Defaults for cash settlement values may be input by product type into the Main>Static Data>Reference Data> Cash Settlement Defaults window. • When the ‘Rate Source’ field is left blank, users may enter multiple reference bank names to serve as the rate source.
Trade Workflow Workflow Overview • Workflows are the framework within with trade lifecycle objects are handled in Calypso. Trades, payments, and messages each have their own workflows within which associated objects are processed from creation to completion. Each lifecycle stage is called a Status. Status examples include PENDING trades, VERIFIED confirmations, and SETTLED transfers. • Users move trades, payments, or messages to different workflow Statuses by executing workflow Actions. For instance, one might Execute a trade or Settle a transfer. • Calypso can also be configured to automatically move objects between Statuses using a feature called straight through processing, or STP. • As organizations evolve, workflows sometimes change. However, for go-live purposes, static trade, transfer, and message workflows will be in place. • The trade workflow is the foundation of the trade lifecycle in Calypso.
Trade Workflow Trade Booking and Review • A trade created and saved by the Front Office (FO) begins in Pending status. When FO executes a trade (by applying the Execute action) the trade status becomes FO_Confirmed. A trade in FO_Confirmed status will be active for the purpose of PL reporting. • The back office (BO) will perform a Verify action on the trade if they agree with the booking after which the trade status will change to Verified. In the event discrepancies exist between the booking and available trade information, the trade will remain in FO_Confirmed status. When trades reach ‘Verified’ status, associated transfers (payments), messages (confirmations and payment messages), and accounting postings will be generated.
Trade Workflow Workflow Rules and Keywords • Validation Rules determine whether an action can be performed. • For instance, in order to Authorize a trade task (move a trade task from PENDING and FO_CONFIRMED in the trade workflow) a trade must “pass” the CheckFOConfirmedKeyword workflow rule. • The CheckFOConfirmedKeyword rule requires that the BookDesk and BookFolder trade keywords (used by FO for P&L reporting) are populated. • Some workflow rules prohibit a trade from moving between transitions while others just give a warning.
Trade Workflow Amendments • When FO amends a Verified trade, the trade status becomes FO_Amended. In this event, the trade will appear in a BO Task Station indicating the trade should be reviewed. Task Station is a tool that allows groups to monitor and perform tasks on different Calypso task objects. • When BO amends a Verified trade, the status becomes BO_Amended and the trade is then automatically moved (straight through processed) back to Verified.
Trade Workflow Terminal Statuses • When a trade reaches a terminal status, its processing lifecycle is over. Terminal statuses include Terminated (indicating a terminated trade), Exercised (exercised option), Matured (trade for which the maturity data has passed), and Rollovered (used to indicate a rollover on a deposit trade).
Trade Workflow Workflow and trade lifecycle • To simulate part of the trade lifecycle, we can book a trade and move it through some of the workflow. • First I’ll go the trade Blotter and create a new trade. Upon saving, the trade will be in Pending status.
Trade Workflow On the trade Details tab, I will select the AUTHORIZE action and resave after which the trade will be in FO_CONFIRMED status.