Download
1 / 6
60 likes | 218 Vues
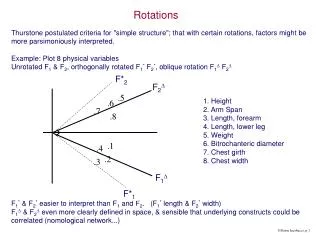
3-2 Rotations. Every rotation has a point that is fixed that is its center and a magnitude, either positive or negative, that is the measure of an arc clockwise (negative) or counterclockwise (positive). 3-2 Rotations. Rotate D PQO 100 o about G . Trace D PQO and point G on paper.

E N D
3-2 Rotations • Every rotation has a point that is fixed that is its center and a magnitude, either positive or negative, that is the measure of an arc clockwise (negative) or counterclockwise (positive).
3-2 Rotations Rotate DPQO 100o about G. • Trace DPQO and point G on paper. • Draw GP. (You may draw this lightly. Extend the ray past point P.) • Measure the length of GP. • Using GP as the base of your angle, mark 100o counterclockwise from GP. • Mark point P’ the same distance from G along the new ray that P was from G.
3-2 Rotations • Repeat Steps 2 through 5 for points Q and O. • Draw DP’Q’O’ by connecting the points P’,Q’ and O’.
3-2 Rotations • DPQO is called the pre-image. • DP’Q’O’ is called the image of DPQO. • The center of the rotation was point G. • The magnitude of the rotation was 100o. Because the rotation was counterclockwise, the magnitude of the rotation is positive. • The notation for the rotation is RG,100(DPQO).
3-2 Rotations Rotating an image using Geogebra. • Open Geogebra. Using the Polygon tool (5th button from left), draw a polygon on the screen. • Using the Point tool (2nd button from left), place a new point somewhere on the screen. • Using the Angle with a Given Size tool (7th button from left), click on a vertex of the polygon, then click on the point created in Step 2.
3-2 Rotations Rotating an image using Geogebra. • In the dialog box, choose the magnitude of the rotation and the direction. Click Apply. • Repeat Steps 3 and 4 for each vertex of the polygon. • Using the Polygon tool, connect the newly created image points to define the new polygon image.