Download
1 / 4
40 likes | 158 Vues
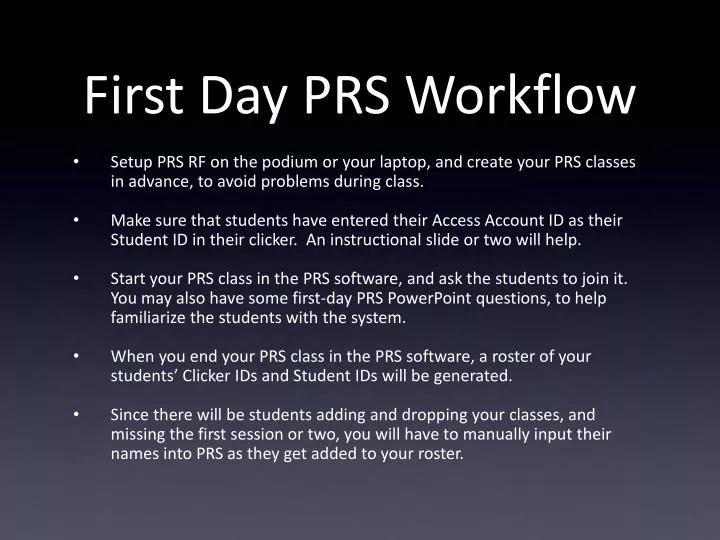
First Day PRS Workflow. Setup PRS RF on the podium or your laptop, and create your PRS classes in advance, to avoid problems during class. Make sure that students have entered their Access Account ID as their Student ID in their clicker. An instructional slide or two will help.

E N D
First Day PRS Workflow • Setup PRS RF on the podium or your laptop, and create your PRS classes in advance, to avoid problems during class. • Make sure that students have entered their Access Account ID as their Student ID in their clicker. An instructional slide or two will help. • Start your PRS class in the PRS software, and ask the students to join it. You may also have some first-day PRS PowerPoint questions, to help familiarize the students with the system. • When you end your PRS class in the PRS software, a roster of your students’ Clicker IDs and Student IDs will be generated. • Since there will be students adding and dropping your classes, and missing the first session or two, you will have to manually input their names into PRS as they get added to your roster.
Entering your ID • Turn your clicker on. When you see “Scanning classes,” press the * button. • Press the * button again to display the Setup Menu. • Press the Up Arrow once. You will see “ID:” - Press the green Enter key. • Enter your Access Account ID (dmt155, for example) NOT YOUR STUDENT NUMBER. For letters, press the button on the clicker that matches or is closest to the letter you want to input. Use the Up and Down Arrow keys to scroll to the correct letter. • To enter the next letter, repeat the previous step. If you make a mistake, press the Backspace button (to the right of the green Enter key). • When you are finished, press the green Enter key. • Please turn your clicker off. Your ID has been saved.
Joining the Class If your clicker is on, please turn it off, then back on. In the orange/yellow section of the PRS Toolbar, you will see the name of the class and the frequency chosen for this class. Press the button on the clicker that corresponds to the class frequency. When the clicker displays the correct class name, press the green Enter key.
For more info: http://clc.its.psu.edu/classrooms/prs/ http://www.personal.psu.edu/dmt155/blogs/clickers/ clickers@psu.edu