Download
1 / 18
180 likes | 267 Vues

E N D
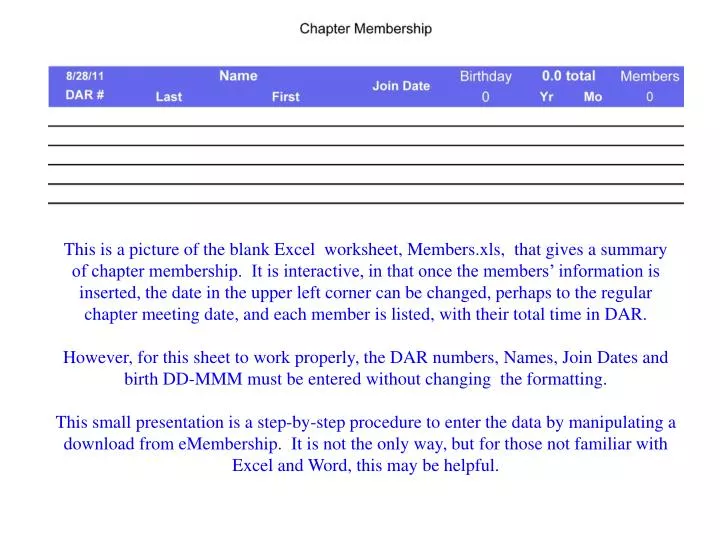
This is a picture of the blank Excel worksheet, Members.xls, that gives a summary of chapter membership. It is interactive, in that once the members’ information is inserted, the date in the upper left corner can be changed, perhaps to the regular chapter meeting date, and each member is listed, with their total time in DAR. However, for this sheet to work properly, the DAR numbers, Names, Join Dates and birth DD-MMM must be entered without changing the formatting. This small presentation is a step-by-step procedure to enter the data by manipulating a download from eMembership. It is not the only way, but for those not familiar with Excel and Word, this may be helpful.
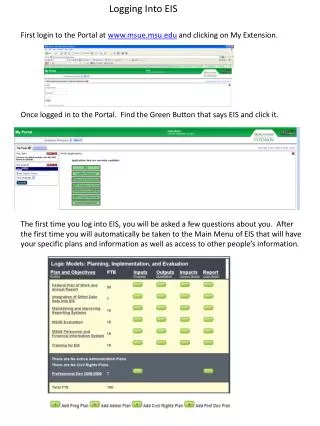
In this procedure, we begin at the Reports Page after logging into eMembership. The Download we want is the Yearbook Export
The downloaded file is in the format of a RTF file, or Rich Text Format,which can be loaded into most word processor programs. Microsoft Word is shown here, as an example. For those using Word, I cannot emphasize too much, I cannot stress too much, PLEASE PLEASE always show the formatting characters. Intermediate and Advanced work in Word cannot be done without showing the formatting. The first thing we will do is delete the top two lines and then adjust the page set-up to Legal Size paper in a Landscape Mode with margins of 0.3” on all sides.
We now have a file in Word where all the text is at the far left of the paper. An important thing to note is that each tab (the small arrows pointing to the right, represents a field in the original download. Using the Replace command, we will replace all paragraph marks with a line feed. The syntax in Word is: Replace ^p ^l for all occurrences. Then, we will replace all occurrences of ^l^l with ^p since we can see from the sample that each record is separated by two consecutive paragraph marks. Finally, we will then Replace ^l with ^t so we will be back with tabs separating each field.
After the first Replace command, all paragraph marks, indicated as ¶ are now line feeds, indicated as .We see tabs as
The second Replace command, to change all double line feeds to paragraph marks, now separates records as individual paragraphs.
The third Replace command has deleted all line feeds and nowall fields are separated by tabs. What may, at first glance, seem to be an unmanageable mess, is actuallya very organized system. One thing that may help will be to change the font size to 8pt and then within the Table commands is one to convert the text to a table.
Things are looking a little better, but there is still a little work to be done. Under the Table commands we can delete the last four columns, number 9 10, 11 and 12.We will also delete columns #4, 5, 6 and 7.
There is only one real problem, the text in column 4 that includes Birthday:ּּ Note the mark, ּ, indicates a space for each mark, which means the space must be included in any replace command. So we will eliminate that text.
We are ready to begin the transfer of information to the Excel file, Members.xls
Since the first column in the Excel file has special formatting, we must paste values only from the Word file. A “regular” paste operation will overwrite the formats. First, select the top cellin the column. Second, holding the Shift key with one hand, scroll to the bottom of the column and click on the last cell. The entire column is selected, so either go to the top and press Copy, or use the keyboard to press theCtrl-C to copy the selection.
After selecting the top cell in the first column, representing the first record of our membership list, we must locate the menu item for“Paste Special…” Depending on the version of Excel, the item will read either “Values only”or “Text” This special paste will preserve formatting present in the original members list and note that the highest DAR #, i.e. the newest member, is highlighted in green.
Back to the Word file with the data table, the first column is deleted. This is important in a later step. In a similar manner to selecting the first column, the top cell of the “Join Date” column is selected, then holding the Shift key, the bottom cell of the Birthday column is selected. As a result, data in the last two columns is selectedAND COPIED.
In a similar manner as that for the first column, the last two columns are pasted using the“Paste Special…”command to paste values, or text only.All birthdays in the month of the date entered in the upper left cell will be shown in red. This is due to special formatting in the birthday column, which was left intact because of pasting values and not formats.
The final column in the Word file consists of: 1. Surname2. A comma and a space3. Given name with/without middle and/or maiden name One way to proceed is to convert the table back to text,as seen to the right. The next step is to Replace the comma and space to a tab.The syntax is Replace ,· with ^t
Results of the replace procedure are on the left, where a tab separates the surname from given and/or maiden names. A conversion from text to table allows easy selection of the two remaining columns as previously done. After the two columns are copied, the values can be pasted as was done for the first columns. After that final paste operation, the Excel file is complete, using downloaded data from each chapter for a listing that is suggested to be printed for most chapter meetings.
After pasting the values copied from the final Word Filethe Excel file,Members.xlsis complete. Any date entered,will change the list to show the total years of service in the DAR by that chapter’s members, as well as for the individuals. Significant service anniversaries are shown in the final column, with the current member count at the top. Also changing will be the birthdays for the month.