Download
1 / 5
50 likes | 207 Vues
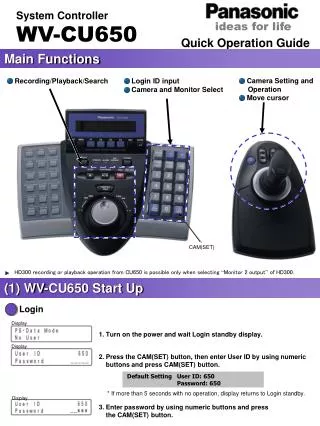
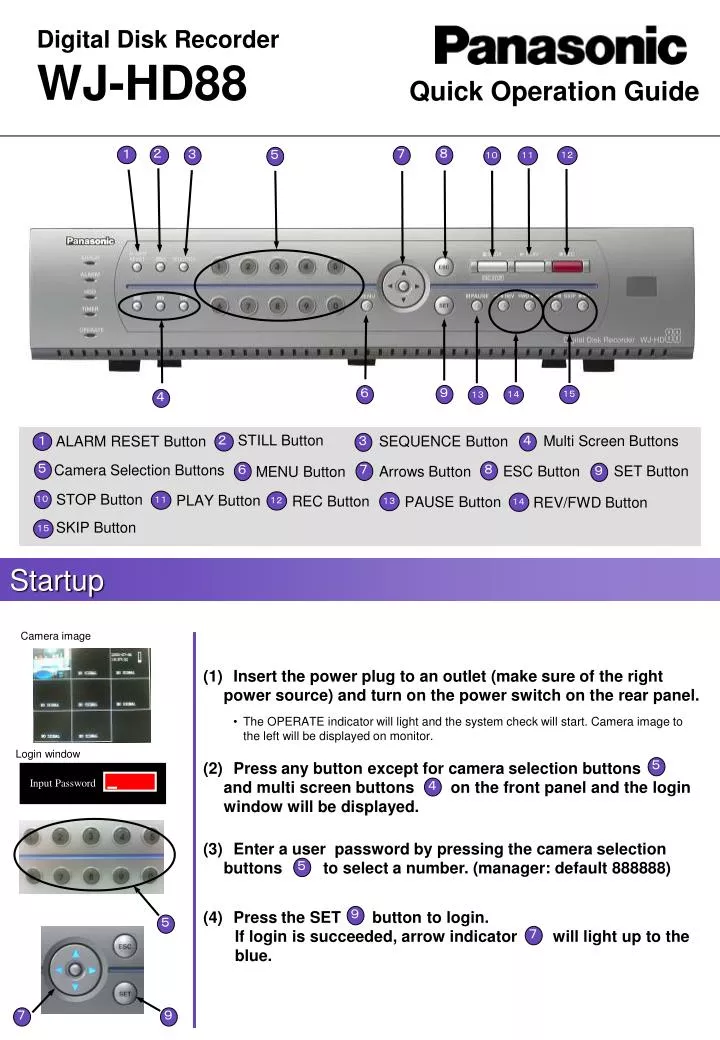
5. 5. 5. 5. 5. 2. 2. 3. 4. 4. 3. 4. 1. 1. SEQUENCE Button. 6. 7. 7. 7. 6. 7. 8. 8. 9. 9. 9. 9. 10. 10. STILL Button. Multi Screen Buttons. ALARM RESET Button. Camera Selection Buttons. SET Button. ESC Button. Arrows Button. MENU Button. STOP Button.

E N D
5 5 5 5 5 2 2 3 4 4 3 4 1 1 SEQUENCE Button 6 7 7 7 6 7 8 8 9 9 9 9 10 10 STILL Button Multi Screen Buttons ALARM RESET Button Camera Selection Buttons SET Button ESC Button Arrows Button MENU Button STOP Button PLAY Button REC Button PAUSE Button REV/FWD Button SKIP Button 14 13 13 15 12 11 14 15 11 12 Input Password Digital Disk Recorder WJ-HD88 Quick Operation Guide Startup Camera image (1)Insert the power plug to an outlet (make sure of the right power source) and turn on the power switch on the rear panel. • The OPERATE indicator will light and the system check will start. Camera image to the left will be displayed on monitor. Login window (2)Press any button except for camera selection buttons and multi screen buttons on the front panel and the login window will be displayed. (3)Enter a user password by pressing the camera selection buttons to select a number. (manager: default 888888) (4)Press the SET button to login. If login is succeeded, arrow indicator will light up to the blue.
Display 5 5 5 5 WJ-HD88 SETUP MENU SEARCH 1 2005-07-02 15:37:45 2005-07-07 15:37:45 No Channel No. Start End Event Only SEARCH RESULT SYSTEM MANAGEMENT SEARCH REC&EVENT SETUP PTZ SETUP CAMERA SETUP COMMUNICATION SETUP REPORT USER INFORMATION DATA MANAGEMENT CH Quality Start End SEARCH 1 SF 2005-07-06 21:38:07 2005-07-07 21:39:00 1 SF 2005-07-06 21:38:07 2005-07-07 21:39:00 1 SF 2005-07-06 21:38:07 2005-07-07 21:39:00 1 SF 2005-07-06 21:38:07 2005-07-07 21:39:00 1 SF 2005-07-06 21:38:07 2005-07-07 21:39:00 1 SF 2005-07-06 21:38:07 2005-07-07 21:39:00 No Record 6 6 7 7 7 7 9 9 9 9 Ok Cancel Page 001/001 Prev Next Return To search all channels, input 00 in Channel No. section. Monitor of live images ● Press one of camera selection buttons Playback Search and Play Setup Menu Window (1)Press the MENU button and display setup menu. (2)Use the arrows button to select SEARCH and press the SET button. (3) Use the camera selection buttons and arrows button to select a searching filter (Channel No., Start, End, Event Only) and press the SET button. (4)Use the arrows button to select the record and press the SET button for playback.
Useful Functions 5 5 4 4 Button : 4screen Button : 6 screen Button : 9 screen 15 14 14 15 3 1 2 Multi Screen (1)Press multi screen buttons to select a desired multi screen (2)To return to a single screen display, press any of the camera selection buttons at 4 or 9 screen display. Fast forward / Fast reverse ●Press the REV/FWD Buttonduring playback. Button : fast forward Button : fast reverse ● Speed of fast forward/fast reverse can be changed by pressing the SEARCH button several times. I frame inter=4 x16 speed normal speed x8 speed x4 speed Fast forward Fast reverse • To return to normal speed, press PLAY button • Playback speed is shown at upper-left of display • >> : x4 fast forward << : x4 fast reverse • >>>> : x8 fast forward <<<< : x8 fast reverse • >>>>>> : x16 fast forward <<<<<< : x16 fast reverse Skip ●Press the SKIP button during playback will skip to the next or previous recorded image and start playback : skip to start time of next recording. : skip to the start time of the previous recording.
View images from PC 1 2 Setup the NetClient software (1)Click the NetClient icon to start the software. NetClient screen (2)Click Local Setup icon and select Host Setup. Local Setup (3)Setup IP address, Name and Port Press Local Setup icon and select Host Setup. IP address : IP address of the recorder Name : name of the recorder Port : 2000 Connect cameras (1)Click(right button) at any window to display camera image. Popup window will open. NetClient screen (2)Select Connect. (3)Input password and click connect. (4) Camera image will be displayed.
3 About the operation window User connection information Channel State information Host Alarm display External Alarm display Disk capacity Information Exit Channel selection buttons Multi screen buttons Menu buttons PTZ control and playback operation buttons