Download
1 / 19
190 likes | 343 Vues
Preparation before placing concrete. Chapter 3. Chapter Topics. Subgrade preparation Compaction around buried pipes and excavations Establishing grades Placement sequence Setting side forms and screed guides Vapor retarders or barriers Reinforcement for shrinkage control

E N D
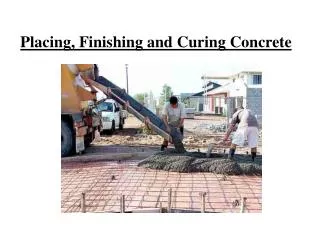
Preparation before placing concrete Chapter 3
Chapter Topics • Subgrade preparation • Compaction around buried pipes and excavations • Establishing grades • Placement sequence • Setting side forms and screed guides • Vapor retarders or barriers • Reinforcement for shrinkage control • Bulkheads and jointing • Checklist of tools and materials
Before Placing Concrete • Prepare the subgrade • Compact the subgrade over utility lines and pipes • Establish grades (elevation control) • Determine the placement sequence • Set side forms, temporary bulkheads, and screed guides • Install vapor retarder or barrier, if required • Install reinforcement, if required • Lay out and mark joint locations on forms • Have tools and materials ready
Subgrade Preparation • Uniform support • No hard or spot spots • Remove organic and foreign materials • Compact subbases and subgrades • Granular: vibratory compactors • Clay or silty clays: sheepfoot rollers • Free of frost • Place on dry subgrade or subbase • Unless severe drying conditions: plastic shrinkage cracking • Sprinkle but no puddles or soft, muddy spots
Compaction: Pipes and Excavations • Cover pipes with at least 2 inch of subbase • Minimize cracking • Compact backfill layers in lifts • Use controlled low-strength material (CLSM)
Establishing Grades • Consider positive drainage for exterior slabs • Follow plans and spec for drainage control • Check for high and low spots in base • 1 inch low: extra cubic yard per 18 x 18 ft section
Setting Side Forms and Screeds • Greatest effect of floor levelness, FL • Elevation Control • Side forms • Screed guides • Grade stakes • Wet screeds • Accurately set edge forms and screed
Vapor Retarders or Barriers • ACI 302 recommends placing concrete directly on vapor retarder or barrier • IF slab will have a floor covering • IF NOT then place directly on granular layer • Vapor retarder/barrier • ACI 302 recommends a 10 mil minimum • Don’t puncture the sheet • Overlap or seal seams • Trade-off: curling and cracking vs moisture
Reinforcement for Shrinkage Control • Purpose of reinforcement • Keep cracks tight • For shrinkage and temperature control • Typically placed above mid-depth • Do not hook or lift WWF • Specs or plans should determine • If no steel runs through joint • If some steel runs through joint
Bulkheads and Jointing • Locate joints ahead of time • Mark on edge forms or bulkheads • Isolation joints • Separate elements with expansion joint material • Construction joints • Check drawings for locations • May be keyed joint • Keys not recommend for slabs less than 6 inches thick • Keys not recommended for slabs subject to heavy wheel loads
Checklist of Tools and Materials • Have tools and materials ready • Make and use checklist • Include emergency items (vibrator quits) • Consider change in weather (rain) • Make someone responsible