Download
1 / 25
260 likes | 388 Vues
SMB* wall sensors Design & Test. * SMB = Student Mouse B. The sensors used on SMB are SFH4503 infra-red emitters with SFH313FA infra-red phototransistors. They come in 5mm packages – which fit nicely into a cheap double LED holder from Rapid Electronics or elsewhere….

E N D
SMB* wall sensors Design & Test * SMB = Student Mouse B Dr. A.J.Wilcox: IR Distance sensors
The sensors used on SMB are SFH4503 infra-red emitters with SFH313FA infra-red phototransistors. They come in 5mm packages – which fit nicely into a cheap double LED holder from Rapid Electronics or elsewhere…. The rim around the base of the SFH4503 and SFH313FA must be snipped off with side-cutters to get the devices into the LED holder. The slot is cut with a junior hacksaw – reason for this later. Dr. A.J.Wilcox: IR Distance sensors
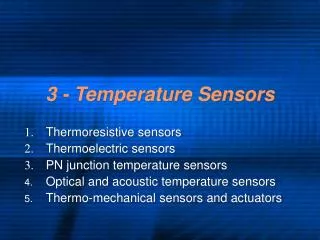
SFH4503 SFH313FA rear view SFH313FA C A E K SFH4503 Short Lead = FLAT = ANODE Long Lead = ROUND = CATHODE SFH313FA Short Lead = FLAT = Collector Long Lead = ROUND = Emitter Snip rim off with cutters Bottom view from SMB PCB layout SFH4503 Dr. A.J.Wilcox: IR Distance sensors
Each IR emitter is driven by one driver in the ULN2803 octal Darlington driver package. The driver inputs are paired to reduce the number of I/O pins required. Each pair of emitters has a 22uf ‘firing capacitor’ that gives a higher current pulse to the emitters than would be possible otherwise. Dr. A.J.Wilcox: IR Distance sensors
The sensor circuit is as simple as it could possibly be. A phototransistor sources current into a resistor, and the resulting voltage is fed to the ADC. Maintaining a high current drive to the IR emitters (see previous page) means the sensitivity of the sensor can be relatively low, reducing ambient effects. In addition, low sensitivity means that the phototransistor emitter resistor (R6 in the diagram) will be low. This is an advantage as the ADC input impedance for the PIC is relatively low, and will therefore significantly affect high impedance sources. If the emitter resistor is low, a buffer will not be required. Dr. A.J.Wilcox: IR Distance sensors
PEAK PULSE at 120us TRANSIENT AREA - Active region for dynamic gain control STEADY STATE at >1ms The signal at the ADC input is shown. The pulse width has been extended to 1ms to show the effect of the firing capacitor. The signal reaches a peak at 120us (unsaturated), and decays to the steady state after about 1ms. The steady-state value is what would be achieved without the firing capacitor. Dr. A.J.Wilcox: IR Distance sensors
The output from the sensor is still significant even with no reflective surfaces nearby. This is due to crosstalk between the emitter and the phototransistor. Dr. A.J.Wilcox: IR Distance sensors
Analysis The signal shows the initial pulse due to the firing capacitor, the decay to a steady-state while the IR LED is ON, followed by decay to zero when the IRLED is turned off. An analysis of the waveform suggests that there are several points at which a measurement may be taken. 1. The Peak value at approximately 120us. 2. The Steady-State value, anytime after 1ms, and before the IR LED is turned off. 3. During the Transient period, as the sensor responds to the reflected IR. Data acquisition A C program, Range03.c, was written to set a range of Tacq delays, using both the built-in Tacq timer (set in TADs) to measure during the transient period, and software delays to extend the acquisition time to enable measurement of the peak and steady-state values. The sideways looking sensor was chosen for this test. Dr. A.J.Wilcox: IR Distance sensors
The output above shows one pass through the main program, reading at the same distance from the wall, at six different points on the waveform : 8us (TAD4), 16us (TAD8), 24us (TAD12), 40us (TAD20), 120us and 1ms, plus the conversion time in each case of 12 bit periods = 24us (divisor = 64) Dr. A.J.Wilcox: IR Distance sensors
The curves below are for the stated Tacq values, from 0-53 cms, RANGE03.C SIDE SENSOR Dr. A.J.Wilcox: IR Distance sensors
The curves below are for the stated Tacq values, from 0-53 cms, RANGE04.C Dr. A.J.Wilcox: IR Distance sensors
The results from range03.c were impressive, but the sensors were saturated at less than 4cm. A new test program, range04.c was used to test the full range of Tacq settings, corresponding to 0,2,4,6,8,12,16 and 20 TADs. The results for this test clearly show that the two lowest Tacq settings can provide useful information at very close range, and that all sensor settings give a monotonic response. It is clear that the responses are very similar in shape, though are shifted relative to each other along the x-axis. The change in sensitivity achieved by measuring at different points on the curve is equivalent to changing the GAIN of the sensor. This is a method for changing the effective gain of the sensing system. All that is required is to change the ADC acquisition time, either by using the in-built Tacq counter of the PIC, or by using delays. Dr. A.J.Wilcox: IR Distance sensors
“Crosstalk” between the emitter and phototransistor produces unwanted signal which reduces the effective range – an unwanted signal = noise! This was initially reduced by applying heatshrink tubing to the emitter. This was quite effective, but there was still significant breakthrough which resulted in reduced measurement range. heatshrink tubing Dr. A.J.Wilcox: IR Distance sensors
SFH4503 SFH313FA Further reducing crosstalk noise to improve the range of the sensor. An initial thought re: the crosstalk noise was that the PVC body might be transmissive to IR light. A possible solution was to insert a blocking plate between the IR emitter and the IR receiver. The sensors perform OK up to 1-2cells range without this modification. Dr. A.J.Wilcox: IR Distance sensors
SFH4503 Forward sensor SFH313FA Side sensor Thin aluminium plate On further investigation it turned out that the body of the LED housing was in fact very good at blocking IR – the crosstalk was due to the tip of the lenses being exposed, and to reflections off the nearby sensor housing. Even with a very narrow-beam IR emitter, there is sufficient wide-angle emission to give a significant noise level. A single plate mounted between the two sensors blocks all unwanted signal crosstalk …. Range increase to > 5 cells !! Dr. A.J.Wilcox: IR Distance sensors
The blocking plate in place. This is a much simpler and far more effective method than heatshrink around the LEDs and phototransistors. The LED holders are cheap double-LED packages from Rapid Electronics, with the original LEDs removed. Dr. A.J.Wilcox: IR Distance sensors
RUN No. 1 Dr. A.J.Wilcox: IR Distance sensors
RUN No. 2 Dr. A.J.Wilcox: IR Distance sensors
RUN No. 3 Dr. A.J.Wilcox: IR Distance sensors
Summary Three measurement areas have been identified: Peak Pulse, Steady State, and Transient. Peak pulse and steady-state are well known, however the use of the transient period with variable acquisition timings would appear to be a novel method of gain control. Transient measurements make it possible to dynamically change the effective gain. If a sensor becomes saturated at the current Tacq, switching to a lower acquisition time will sample the input signal before it reaches saturation levels. This will require factors or alternate calibration tables to be applied, but it will permit a micromouse with simple IR sensors to ‘see’ walls at least 5 cells distant from it’s current position under normal (fluorescent tube) lighting conditions (It should be remembered that filament bulbs emit an enormous amount of IR, which will drastically reduce the range of the sensors). Dr. A.J.Wilcox: IR Distance sensors
/* RANGE04.C AJW 3/5/09 Test program to compare measurements at different points in the pulse cycle. The SFH313FA is a slow device: 120us to saturation. This has some advantages: 1. I can measure the value at a fixed time before the peak value - and I can change Tacq to effectively vary the gain of the sensor. I used this effect on Heretic. 2. I can measure at 120us - the time to peak value doesn't vary(at least not that you'd notice) 3. I can measure after the capacitive pulse has died away, which is at 1ms or greater. This just gives a lower value, allowing the wall to be closer before saturation. 4. The advantages of higher output using the cap pulse seems to be lost due to significant breakthrough at the sensor itself. A blocking plate is needed to solve this. This test program is designed to generate readings at a range of times throughout the pulse cycle. At a number of TADs in (with /64 for the conversion clock at 32MHz, 1 TAD = 2us), measurements taken at 0,2,4, 6, 8, 12, 20 TADS, followed by soft delays to measure at 120us and 1ms. Readings to be taken at 10mm spacings from 0 to 3 cells. */ #include <p18f4520.h> #include <usart.h> #include <pwm.h> #include <adc.h> #include <timers.h> #include <delays.h> #include <portb.h> #include <stdio.h> #pragma config OSC=INTIO67,PWRT=ON,WDT=OFF,BOREN=OFF,MCLRE=ON,PBADEN=OFF #pragma config CCP2MX=PORTC,STVREN=ON,LVP=OFF,XINST=OFF,DEBUG=ON Dr. A.J.Wilcox: IR Distance sensors
// macro definitions #define Fosc 32000000 #define BAUD 115200 #define SPBRGVAL ((Fosc /BAUD/16)-1) #define Fosc 32000000 // clock frequency??? #define TRUE 1 // good practice to define TRUE and #define FALSE 0 // FALSE #define ON 1 #define OFF 0 #define IR16 PORTDbits.RD3 // control for IRLEDs 1,6 #define IR25 PORTDbits.RD2 // control for IRLEDs 2,5 #define IR34 PORTDbits.RD1 // control for IRLEDs 3.4 //prototypes unsigned int RD1TAD (unsigned char, unsigned char); // function to measure distance void Wait4PB(void); // function to read push-button unsigned int light,dark,result; // globals Dr. A.J.Wilcox: IR Distance sensors
void main (void) • { • unsigned int dark,light; • unsigned int i; • OSCCON = 0x70; // 32MHz operation, Internal Oscillator block • /* • The primary oscillators include the External Crystal and Resonator modes, the External RC modes, the External Clock modes and the internal oscillator block. You set the "primary" oscillator with FOSC3:FOSC0 configuration bits - so with • the internal oscillator block set in CONFIG1H, and 8MHz or 4MHz selected in OSCCON, you need System Clock Select bits SCS1:SCS0 set for "primary" for PLL to work. The PLL is available only when it's configured to use the internal oscillator block as its "primary" clock source (FOSC3:FOSC0 = 1001 or 1000). • It's not exactly hit-you-in-the-face clear from looking at the datasheet, but that's the only way to turn on PLL when using the internal oscillator!!! • */ • OSCTUNEbits.PLLEN = 1; // turn PLL ON • DDRA = 0b11111111; // Set DDR using binary mask RA6,7 digital I/O set to INPUT • DDRD = 0b0 • PORTD = 0; • OpenADC( ADC_FOSC_64 & // I bit conv. time = Tosc * 64 = 2us = 1TAD • ADC_RIGHT_JUST & // 10 bit conversion • ADC_0_TAD, // 0 TAD acquisition for initialisation • ADC_CH0 & // select Channel 0 for initialisation • ADC_INT_OFF & // No interrupts • ADC_VREFMINUS_VSS & // Internal Vref • ADC_VREFPLUS_VDD, 8 ); // PORTCONFIG = 8 gives AN0-AN6 Dr. A.J.Wilcox: IR Distance sensors
OpenUSART(USART_TX_INT_OFF & USART_RX_INT_OFF & USART_ASYNCH_MODE & USART_EIGHT_BIT & USART_CONT_RX & USART_BRGH_HIGH,SPBRGVAL); Delay10KTCYx(8); // delay 10ms for PLL clock to settle // test program : fix tad to measure total time to peak val printf("\rSensor read test: AJW 30/04/09\r\n\n"); while (TRUE){ for (i=0; i<1000; i+=10) { printf("%04d ",i); Wait4PB(); printf("%04d ",RD1TAD(0,0)); printf("%04d ",RD1TAD(1,0)); printf("%04d ",RD1TAD(2,0)); printf("%04d ",RD1TAD(3,0)); printf("%04d ",RD1TAD(4,0)); printf("%04d ",RD1TAD(5,0)); printf("%04d ",RD1TAD(6,0)); printf("%04d ",RD1TAD(7,0)); printf("%04d ",RD1TAD(0,1)); printf("%04d ",RD1TAD(0,2)); Delay10KTCYx(80); // wait 100ms printf("\r\n"); } // end for } // end while } // end of main Dr. A.J.Wilcox: IR Distance sensors
unsigned int RD1TAD (unsigned char tad, unsigned char del) { SetChanADC(ADC_CH0); ADCON2 = (ADCON2&0xc7)|(tad<<3); // set tad IR16 = OFF; // dark reading ConvertADC(); // Start conversion while( BusyADC() ); // Wait for completion dark = ReadADC(); IR16 = ON; // light reading if (del == 1) Delay10TCYx(96); //120us delay to reach peak if (del ==2) Delay1KTCYx(8); //1ms delay to let cap pulse die ConvertADC(); // Start conversion while( BusyADC() ); // Wait for completion light = ReadADC(); if (light >= dark) result = light-dark; else result = 0; IR16 = OFF; return result; } void Wait4PB (void) { while(PORTAbits.RA7); // lockout Delay10KTCYx(160); // debounce while(!PORTAbits.RA7); Delay10KTCYx(160); // debounce } Dr. A.J.Wilcox: IR Distance sensors