Download
1 / 47
470 likes | 612 Vues
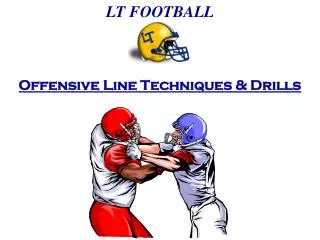
Offensive Line Teaching Progression. Emphasis on skills utilized in the Spread Gun attack. Offensive Line Technique Board. What are we going to teach?. Skills and Non Contact Drill ( Footwork, Posture, and Eye placement). Engagement and Contact Drills.

E N D
Offensive Line Teaching Progression Emphasis on skills utilized in the Spread Gun attack
Offensive LineTechnique Board What are we going to teach?
Skills and Non Contact Drill ( Footwork, Posture, and Eye placement) Engagement and Contact Drills Offensive Line Technique Board Part One
Combo Drills Full Line Drills Offensive Line Technique Board Part Two
Offensive LineNon Contact Drills Pre Practice Activities
Stance Technique • Balance Stance • Toes - toes in heals out. • Knees • Aligned over toes • In line with the feet. • Hips • Hips Flexed. • Slightly sunk. • Back and shoulders • Flat – no angles. • Flat or slight angle. • Arched backed. • Head • Face up. • Look out the eyebrows. • Down Hand • Reach – In front of your helmet. • Inside the heal of the same foot. • Off Hand • Forearm on opposite thigh board. Off Hand. • Drills • Pre snap – hand up and down
Drill Design • Use the Technique Squares. • Each will work from a pre snap. • On the whistle the athlete will snap his hand down. • Correct by rows. • Balance Stance • Toes - toes in heals out. • Knees • Aligned over toes • In line with the feet. • Hips • Hips Flexed and slightly sunk. • Back and shoulders • Flat – no angles. • Flat or slight angle. • Arched backed. • Head • Face up (Look out the eyebrows). • Down Hand • Reach – In front of your helmet. • Inside the heal of the same foot. • Off Hand • Forearm on opposite thigh board. Off Hand. • Drills • Pre snap – hand up and down. • From the huddle. Hand Up / Hand Down
Drill Design • Use the Technique Squares. • Stack Align players by position. • Extend the first row one line. • On call break over left shoulder and hustle to the line. • Align with perfect stance and splits. • Coaching Points • Vertical splits – down hand on circle of the ankle of the center. • Horizontal splits 12- 18 inches. • Hustle and posture. Break and Bust
Lead Step and Technique Squares T G C G T • Drill Design: • 5 yard by 5 yard squares. • Seven Column lines. • Four Rows • Place players on lines by position and groups. • Reinforce stance. • Drill Instructions: • Pop step: Quick step • Up and Down with proper foot and hip angles. • Power Step: Get second step in the ground. • Cross over to mid line of defender. • Divide with power. • Finish in Demonstrative position. • Undress your opponent. • High in the rise. • Weight on your in steps. T G C G T T G C G T
Carpet Spacers • Drill Design: • Using the chutes and spacing rugs • Five Column lines. • Four Rows • Place players on lines by position and groups. • Reinforce stance. • Drill Instructions: • Pop step: Quick step • Up and Down with proper foot and hip angles. • Power Step: Get second step in the ground. • Cross over to mid line of defender. • Divide with power. • Finish in Demonstrative position. • Undress your opponent. • High in the rise. • Weight on your in steps. Chutes and Latter.
General thoughts. When in doubt work to tight three. Power and square to the inside. Balance and position to the edge. Attack undefended edges. Power step – Inside move. Step to make defender a tight three. Step with strength. Strong in the post leg. Work flat on inside. Bump to game. Work kick with the outside move. Kick step – Width and depth. Step to make defender a tight three. Kick with balance. Work flat on inside. Bump to game. Work kick with the outside move. • Use technique squares and a cone. • Off set cones for drill • On whistle Kick or Power step with perfect posture. • Power Step – Inside flat step with outside foot replacing inside foot. • Kick Step – Kick for width with outside foot inside foot replaces kick step. • Body Posture. • Balanced with weight back. • Squat position. • Back arched. • Hips low. • Z in Knee. • Jaw back and hands low. Dome Cones Stance to Set Drills
Power Step Kick Step • Using the side line in five yard increments. • Begin with a kick step. • Kick for width. • Kick until the five yard mark. • Continue with a power step until you get to your original yard line. • Use perfect posture • Power Step – Inside flat step with outside foot replacing inside foot. • Kick Step – Kick for width with outside foot inside foot replaces kick step. • Body Posture. • Balanced with weight back. • Squat position. • Back arched. • Hips low. • Z in Knee. • Jaw back and hands low. • General thoughts. • When in doubt work to tight three. • Power and square to the inside. • Balance and position to the edge. • Attack undefended edges. • Power step – Inside move. • Step to make defender a tight three. • Step with strength. Strong in the post leg. • Work flat on inside. Bump to game. • Work kick with the outside move. • Kick step – Width and depth. • Step to make defender a tight three. • Kick with balance. • Work flat on inside. Bump to game. • Work kick with the outside move. Slide and Power Steps
Contact Fit Progression. • The Contact Fit Drill’s design is to teach the offensive linemen to come off the ball with proper technique. • Hit the defense in the teeth and make the SOB bleed. • Contact Fit Progression: • Six point hit. • Two point hit. • Stance to finish. • Fit and finish. • Dead Spot drill. • Stance to finish.
Drill Design • Each linemen will work with a partner. • Each group will work from the same yard line five yards apart from the next pair. • The servicing bag hold will align one yard from their partner. • The Offensive line will align with his nose one yard from the bag. • Coaching Points • Shoot the hands • Rip his tits off. • Thumbs up and snap. • Hit with hands and chest first. • Up and through. • Elbows tight.. • Throw the hips. • Don’t catch your self. • Finish. • Exaggerate the punch and Finish Six point hit.
Drill Design • Each linemen will work with a partner. • Each group will work from the same yard line five yards apart from the next pair. • The servicing bag hold will align one foot from their partner. • The Offensive line will align with his nose one foot from the bag. • Two point stance. • Drill evolution. • Two point = Knees • Coaching Points • No Step - over teach hips. • Shoot the hands • Rip his tits off. • Thumbs up and snap. • Hit with hands and chest first. • Up and through. • Elbows tight and down. • Throw the hips. • Don’t catch your self. • Finish. • Exaggerate the punch and Finish Two Point Hit.
Drill Design • Each linemen will work with a partner. • Each group will work from the same yard line five yards apart from the next pair. • The servicing bag hold will align one foot from their partner. • The Offensive line will align with his nose one foot from the bag. • Sprinter stance (Down foot = pop step.) • Coaching Points • Force the up knee to drive to the ground. • Throw hips • Shoot the hands • Rip his tits off. • Thumbs up and snap. • Hit with hands and chest first. • Up and through. • Elbows tight an d down. • Throw the hips. • Don’t catch your self. • Finish. • Exaggerate the punch and Finish Sprinter Stance
Drill Design • Each linemen will work with a partner. • Each group will work from the same yard line five yards apart from the next pair. • The servicing bag hold will align on their partner. • The offensive line will align in a lockout position. • Two point stance • Lead step forward. • Elbows locked and thumbs up. • Finish at the end of board.. • Coaching Points • Power step. - Short steps. • Throw the hips. Don’t catch your self. • Up and through. • Eyes up in the arm pit. • Elbows tight and down. • Upper body violence • Throw the hips. • Don’t catch your self. • Finish. • Exaggerate the punch and Finish Fit to Finish
Drill Design • Each linemen will work with a partner. • Each group will work from the same yard line five yards apart from the next pair. • The servicing bag hold will align one yard from their partner. • The offensive line will align with his nose one yard from the bag. • Three point stance. • Finish at the end of bag. • Coaching Points • Lead step - pound the ground open hips. • Power step. - Short steps. • Throw the hips. Don’t catch your self. • Shoot the hands • Rip his tits off. • Thumbs up and snap. • Hit with hands and chest first. • Punch a hole in the chest. • Balance on bag. • Up and through. • Eyes up in the arm pit. • Elbows tight and down. • Upper body violence • Throw the hips. • Don’t catch your self. • Finish. • Exaggerate the punch and Finish Stance to finish.
Chute Drills. Fire to Finish, Zone block, Over block and Gap block.
Drill Design • Each linemen will work with a partner. • Each group will work in the chute. • Three groups per chute. • The servicing bag hold will align one yard from their partner - outside the chute. • The offensive line will align with his nose one yard from the bag. • Three point stance. • Finish at the end of boards. • Coaching Points for all blocks. • Lead step - pound the ground open hips. • Power step. - Short steps. • Throw the hips. Don’t catch your self. • Shoot the hands • Rip his tits off. • Thumbs up and snap. • Hit with hands and chest first. • Punch a hole in the chest. • Balance on bag. • Up and through. • Eyes up in the arm pit. • Elbows tight and down. • Upper body violence • Throw the hips. • Don’t catch your self. • Finish. • Exaggerate the punch and Finish Chute Drills.
Base Block - a vertical block designed to get movement of the ball. • Entry aiming point: Gap side eye and “V” neck. • Lead Step • Up and Down - not much ground gained • Coaching Point: “Pound the ground.” • Power Step • Through the crotch of the defender. • Get step two on the ground as fast as possible. • Coaching Point - “Divide with power and punch. • Technique • Strike with force on step step two. • Roll hips with power step. • Hands in the sternum. • Eyes up and in the arm pit. • Finish • High extension of the arms. • Fast feet. Individual Blocks.- Base Block
Zone Block - A vertical block with a slight horizontal aiming point designed to get vertical movement of the ball. • Entry aiming point: Gap side eye and “V” neck. • Lead Step • Pop Step - Up and Down open hips to appropriate angle. “Big Toe to Big Toe” • Coaching Point: “Pop and set the hips” • Power Step • Through the crotch of the defender. • Get step two on the ground as fast as possible. • Coaching Point - “Divide with power and punch. • Technique • Strike with force on step step two. • Roll hips with power step. • Hands in the sternum. • Eyes up and in the arm pit. • Finish • High extension of the arms. • Fast feet. Power Step Individual Blocks - Zone Block Pop or Lead Step
Over Block - A vertical block with a horizontal aiming point designed to get vertical movement of the ball. • Entry aiming point: Gap side shoulder. • Lead Step • Drop Step - Greater the angle equals greater the depth.. “Big Toe to Little Toe. Toe” • Coaching Point: “Drop Step and cover the man.” • Power Step • Through the crotch of the defender. • Get step two on the ground as fast as possible. • Coaching Point - “Divide with power and punch. • Technique • Strike with force on step step two. • Roll hips with power step. • Hands in the sternum. • Eyes up and in the arm pit. • Maintain outside leverage • Finish • High extension of the arms. • Fast feet. Individual Blocks - Over Block
Gap Block - A horizontal block designed to stop penetration and create lateral movement. • Entry aiming point: Gap side eye and “V” neck. • Lead Step • 45 degree set step Up and Down open hips to appropriate angle. “Big Toe to near shoulder.” • Coaching Point: “Pop and set the hips” 45 degree. • Power Step • Through the angle of release.. • Get step two on the ground as fast as possible. • Coaching Point - Lead step 45 degree - “Power step 45 degree.” • Technique • Strike with force on step step two. • Roll hips with power step. • Hands: • Inside hand on the sternum. • Outside hand - post the near arm. • Eyes up and in the arm pit. • Finish • Helmet adjust on reading defender. • High extension of the arms. • Fast feet. Individual Blocks - Gap Block
Teaching the combination blocks. • Start in the fit position. • Posture. • Hand and body position. • Walk through technique. • Teach reactions to all looks. • Full speed all looks. • Bags. • Live.
General Thoughts on teaching the Inside Zone scheme. • We work on offensive tracks. • Every linemen is gap responsible. • Inside Zone combination is an individual block with possible help. • If your gap is not threatened by alignment you can work a stack technique combination block. • Stack Progression: • ID the stack. • Covered lineman use zone technique. • Uncovered lineman will assist and constrict and get ready for exchange or climb to LB.
Inside Zone Read 12, 13 Read
Coaching Points: #1 Stay on combination blocks as long as possible. Let the LB’s enter heals depth before you climb. #2 The covered linemen must “throw” to create movement. #3 The Uncovered linemen must take away space between himself and the covered linemen. Offensive Line Rules 12, 13 Zone Offensive Line Rules
Each lineman has a gap responsibility. • Keep your hips on track. • If your gap responsibility is not threatened then you will work stack technique with partner. • Mentality • Stay on stacks let the LB’s come to you. • Take away the space, stick them on a post and kick their ass and finish. General thoughts on coaching the offensive line when running the Inside Zone.
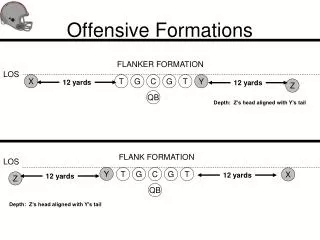
Each Offensive Linemen has gap responsibility. 12 Read – Inside Zone Right B Gap A Gap A Gap B Gap C Gap These are the gaps each lineman is responsible for in IZ Right. The front side tackle is responsible for the “C” gap. The front side guard is responsible for the “B” gap. The center is responsible for the play side “A” gap. The back side guard is responsible for the backside “A” gap. The backside guard is responsible for the backside “B” gap.
Offensive Linemen must keep hips on inside zone track. 12 Read – Inside Zone Right B Gap A Gap A Gap B Gap C Gap This is the vertical angle of the hips in the Zone Block
What is it to be an covered linemen? Your gap is covered! B Gap A Gap C Gap The back side guards “A” gap is not threatened and he will work in combination with the backside guard whose gap is threatened by alignment. The front side guards “B” is not threatened And he will work in combination with the center whose gap is threatened by alignment.
"G" 4/4 43 Reduction / Under / Shade When coaching our offensive line we teach common edges “A” and “C” Edges. “B” and “C” Edges
30 Bubbles 30 Bubbles 30 Defense 30 Stack Common Edges
Inside Zone Right v. “B” and “C” edge PST – “C” gap defensive end PSG and Center combo GAC to the Mike. BSG and BST combo GAT to the Away. Inside Zone Right v. “A” and “C” edge PST – “C” gap defensive end PSG and Center CAG combo to the Mike. BSG and BST combo TAG to the Away. Even front edges and assignments
Odd front edges and assignments Inside Zone Right v. 30 defense PST and PSG – combo TAG to FS stack. Center and BSG - combo CAG to the Mike. BST – Easiest release. Inside Zone Right v. 30 Stack PST and PSG – combo TAG to FS stack. Center and BSG - combo CAG to the Mike. BST – Easiest release.
Zone Block - A vertical block with a slight horizontal aiming point designed to get vertical movement of the ball. • Entry aiming point: Gap side eye and “V” neck. • Lead Step • Pop Step - Up and Down open hips to appropriate angle. “Big Toe to Big Toe” • Coaching Point: “Pop and set the hips” • Power Step • Through the crotch of the defender. • Get step two on the ground as fast as possible. • Coaching Point - “Divide with power and punch. • Technique • Strike with force on step step two. • Roll hips with power step. • Hands in the sternum. • Eyes up and in the arm pit. • Finish • High extension of the arms. • Fast feet. Power Step Individual Blocks - Zone Block Pop or Lead Step
Start in the fit position. Posture. Hand and body position. Walk through technique. Teach reactions to all looks. Full speed all looks. Bags. Live. Teaching the combination blocks.
Covered Linemen: • Pop Step and set hips. Big toe to big toe to down linemen. • Deliver on second step. • Create movement and explode. • Shoot hands to sternum. • If the defender remains gap responsible continue with zone block. • If the defender gap exchanges inside continue pass the the linemen with your inside hand to your partner. • Stay square and be patient on the block. • As you deliver your man “Eyes on the LB”. • Do not leave if meats showing. • Climb when backer enters with heals depth. • Uncovered Linemen: • Pop Step and set hips. Big toe to big toe to down stack backer. • Cross over and deliver and punch down linemen. • Feel the down linemen and eye the LB. • Close out the gap. • If the defender remains gap responsible continue with zone block. • Continue on combination with shoulder square. • Eyes on backer • Climb when backer enters with heals depth. • If the defender gap exchanges inside continue pass the the linemen with your inside hand to your partner. • Stay square and deliver on step #2. • Shoot your hands and continue your zone block. Zone block – Outside stack
Covered Linemen: • Pop Step and set hips. Big toe to big toe to down linemen. • Deliver on second step. • Create movement and explode. • Shoot hands to sternum. • If the defender remains gap responsible continue with zone block. • If the defender gap exchanges outside continue pass the the linemen with your outside hand to your partner. • Stay square and be patient on the block. • As you deliver your man “Eyes on the LB”. • Do not leave if meats showing. • Climb when backer enters with heals depth. • Uncovered Linemen: • Pop Step and set hips. Big toe to big toe to down stack backer. • Cross over and deliver and punch down linemen. • Feel the down linemen and eye the LB. • Close out the gap. • If the defender remains gap responsible continue with zone block. • Continue on combination with shoulder square. • Eyes on backer • Climb when backer enters with heals depth. • If the defender gap exchanges inside continue pass the the linemen with your inside hand to your partner. • Stay square and deliver on step #2. • Shoot your hands and continue your zone block. Zone block – Inside stack
Poor Example Hips are open and there is air in the zone combo Great Example No air in an outside G/T stack. Shoulders square with eyes on the LB.
RECON - ½ Line Stack (Front side). • Front side – “B” and “C’’ • No Movement. • Defensive Line Spark. • Spark and Plug. • Spark and Edge. Front side “A” and “C”. No Movement. Defensive Line Spark. Spark and . Plug. Spark and Edge Front side “30” – Include backside guard. No Movement. Defensive Line Spark. S/W. Spark and . Plug. Spark and Edge
RECON - ½ Line Stack (Backside) • Back side – “A” and “C’’ • BIG BUBBLE – Man it • No Movement. • Defensive Line Spark. • Spark and Plug. • Spark and Edge. • Back side – “B” and “C’’ • BIG Butt – Gap it • No Movement. • Defensive Line Spark. • Spark and Plug. • Spark and Edge.
Drill Design • Each linemen will work with a partner. • Each group will work from the same yard line five yards apart from the next pair. • The servicing bag hold will align two yard from their partner. • You may have to back up further down the board. • On the strike let your partner take you. • Limited resistance • The offensive line will align with his nose two yard from the bag. • Three point stance. • Finish at the end of bag. • Coaching Points • Lead step - pound the ground open hips. • Power step. - Short steps. • Throw the hips. Don’t catch your self. • Shoot the hands • Rip his tits off. • Thumbs up and snap. • Hit with hands and chest first. • Punch a hole in the chest. • Balance on bag. • Up and through. • Eyes up in the arm pit. • Elbows tight and down. • Upper body violence • Throw the hips. • Don’t catch your self. • Finish. • Exaggerate the punch and Finish Dead Spot Drill