Download
1 / 147
1.6k likes | 2.04k Vues
CLASS I and CLASS II Tooth Preparation for SILVER AMALGAM. Contents. Introduction Terminologies Classification Stages in tooth preparation Class I tooth preparation Conventional class I preparation Extensive class I preparation

E N D
Contents • Introduction • Terminologies • Classification • Stages in tooth preparation • Class I tooth preparation • Conventional class I preparation • Extensive class I preparation • Class I occluso lingual preparation • Class I occluso facial preparation • Class II tooth preparation • Class II preparation involving only one proximal surface • Modification in class II tooth preparation • Conclusion • References
Introduction • When demineralisation becomes dominant and remineralisationfails, a cariouslesiondevelops. • Other causes can also create defects on the crown or root surface. • Developmental defects in the enamel surface • Chemically stimulated dissolution or erosion • Physical abrasion
All these problems can lead to sufficient loss of tooth structure which require repair or replacement. • Tooth preparation is the most important fundamental procedure of operative dentistry. • So, it is a must for every clinician to be well aware of all the fundamentals of the tooth preparation.
The term cavity preparation was used earlier. • Now many indications for treatment for teeth are not due to caries and, therefore, the preparation of the tooth is no longer referred to as cavity preparation but as tooth preparation.
Definition • According to Sturdevant: “It is defined as the mechanical alterationof a defective, injured, or diseased tooth to best receive a restorative material that will re-establish a healthy state for the tooth, including aesthetic correctionswhere indicated, along with normal form and function”
According to M. A. Marzouk: “It is defined as the mechanical preparation and / or the chemical treatment of remaining tooth structure which enables it to accommodate a restorative material without incurring mechanical or biological failure”
Need for restorations • To repair a tooth after destruction from a carious lesion. • The replacement or repair of restorations with serious defects. • To restore proper form and function of fractured teeth. • To restore form or function absent as a result of congenital malformation
Objectives of tooth preparation • Remove all defects and provide necessary protection to the pulp, • Extend the restoration as conservatively as possible, • Form the tooth preparation so that under the force of mastication the tooth or the restoration or both will not fracture and the restoration will not be displaced • Allow for the esthetic and functional placement of a restorative material
Terminologies Internal Wall • Prepared surface that does not extend to the external tooth surface
Axial wall. • An internal wall parallel with the long axis of the tooth
Pulpalwall. • An internal wall that is perpendicular to the long axis of the tooth and occlusal of the pulp
External Wall. • A prepared surface that extends to the external tooth surface. • The wall takes the name of the tooth surface that the wall is toward
Floor (or Seat). • A prepared wall that is reasonably flat and perpendicular to those occlusalforces that are directed occlusogingivally. • Ex: pulpaland gingival walls
Enamel Wall. • The enamel wall is that portion of a prepared external wall consisting of enamel
Dentinal Wall. • That portion of a prepared external wall consisting of dentin, in which mechanical retention features may be located
Line Angle. • The junction of two planal surfaces of different orientation along a line • An internal line angle is a line angle whose apex points into the tooth • An external line angle is a line angle whose apex points away from the tooth Point Angle. • The junction of three planal surfaces of different orientation df
Cavosurface Angle and Cavosurface Margin. • The cavosurfaceangle is the angle of tooth structure formed by the junction of a prepared wall and the external surface of the tooth • The actual junction is referred to as the cavosurfacemargin
Classification Of Tooth Preparations Greene VardimanBlackin 1908 • According to the: • anatomic areas involved • associated type of treatment
Class I • Class II • Class III • Class IV • Class V • An additional class has been added, Class VI.
Class I : • All pit-and-fissure restorations • Restorations on Occlusal Surface of Premolars and Molars • Restorations on Occlusal Two Thirds of the Facial and Lingual Surfaces of Molars • Restorations on Lingual Surface of Maxillary Incisors.
Class II • Restorations on the proximal surfaces of posterior teeth
Class III. • Restorations on the proximal surfaces of anterior teeth that do notinvolve the incisal angle
Class IV. • Restorations on the proximal surfaces of anterior teeth whichinvolve the incisalangle
Class V. • Restorations on the gingival third of the facial or lingual surfaces of all teeth • except pit-and-fissure lesions
Class VI. • Restorations on the incisal edge of anterior teeth or the occlusal cusp heights of posterior teeth
Stages of tooth preparation • Initial Tooth Preparation Stage • Final Tooth Preparation Stage
Initial tooth preparation involves the extension of the external walls of the preparation at a specified limited depth so as to provide access to the caries or defect and to reach peripheral sound tooth structure
The placement and orientation of the preparation walls are designed to resist fracture of the tooth or the restorative material from masticatory forces principally directed with the long axis of the tooth and to retain the restorative material in the tooth.
Initial Tooth Preparation Stage • Step 1: Outline form and initial depth • Step 2: Primary resistance form • Step 3: Primary retention form • Step 4: Convenience form
Final Tooth Preparation Stage • Step 5: Removal of any remaining infected dentin and/ or old restorative material, if indicated • Step 6: Pulp protection, if indicated • Step 7: Secondary resistance and retention forms • Step 8: Procedures for finishing external walls • Step 9: Final procedures: cleaning, inspecting, sealing
Step 1: Outline Form and Initial Depth • “Area of tooth surface or enamel margin to be included in the finished cavity” Factors influencing the outline form - extent of the carious lesion - proximity of the carious lesion to the other enamel defects - relationship of adjacent and opposing teeth - esthetic consideration - type of material to be used
. • Placing the preparation margins in the positions they will occupy in the final preparation, except for finishing enamel walls and margins, • Preparing an initial depth of 0.2 to 0.8 mm pulpally of the DEJ position or normal root-surface position
The three general principles: • All friable and/or weakened enamel should be removed • All faults should be included, • All margins should be placed in a position to afford good finishing of the margins of the restoration
Step 2: Primary Resistance Form: • It is defined as that shape and placement of the preparation walls that best enable both the restoration and the tooth to withstand, without fracture, masticatoryforces delivered principally in the long axis of the tooth
Principles: • Flat floor • To restrict the extension of external wall • Slight rounding of internal line angles • Cap weak cusps • To provide enough thickness of restorative material • To bond the material to tooth structure
Step 3: Primary Retention Form. • It is that shape or form of the conventional preparation that resists displacement or removal of the restoration from tipping or lifting forces . • Restoarative material is retained by developing external tooth walls that converge occlusally
Step 4: Convenience Form. • It is that shape or form of the preparation that provides for adequate observation, accessibility, and ease of operation in preparing and restoring the tooth. • Obtaining this form may necessitate extension of distal, mesial, facial, or lingual walls to gain adequate access to the deeper portion of the preparation.
Final tooth preparation stage Step 5: Removal of Any Remaining Enamel Pit or Fissure, Infected Dentin, and/or Old Restorative Material, if Indicated • It is the elimination of any infected carious tooth structure or faulty restoration material left in the tooth after initial tooth preparation.
Step 6: - pulp protection, if indicated • When the thickness of remaining dentin is minimal, heat generated by injudicious cutting can result in pulpal burn lesions, an abscess formation or pulpal necrosis. • Water or Air – water spray coolant must be used with high speed rotary instrument . • Use of liners or base protect the pulp or aid pulpal recovery or both
Step 7:- Secondary resistance and retention form • Many compound and complex preparation requires these features • When a tooth preparation includes occlusal and proximal surfaces, each of those areas should have independent retention and resistance feature.
Mechanical features: • Retention locks • Pins, slots, steps and amalgam pins
Step 8: Procedures for finishing the external walls of tooth preparation • Finishing the preparation wall is the further development, when indicated, of a specific cavo-surface design and degree of smoothness or roughness that produce the maximum effectiveness of restorative materials being used.
Objectives: • Create best marginal seal possible • Afford a smooth marginal junction • Provide maximal strength of the tooth and restorative material at margin
Factors to be considered: • Direction of enamel rods • Supports of enamel rods at DEJ and laterally • The type of restorative material to be placed in preparation. • Location of margin • The degree of smoothness or roughness desired
Step 9: final procedures – cleaning, inspecting and sealing • Final procedure in the tooth preparation. • Remove fine debris remaining on the prepared walls with warm water and then by air syringe.
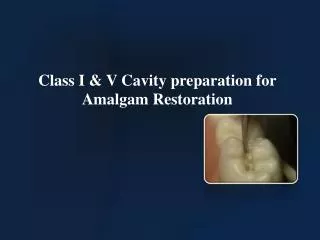
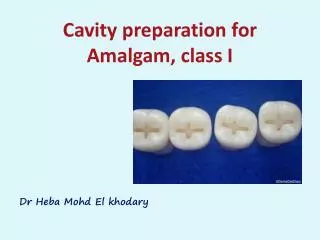
Class I Tooth Preparation
Class I : • All pit-and-fissure restorations • Restorations on Occlusal Surface of Premolars and Molars • Restorations on Occlusal Two Thirds of the Facial and Lingual Surfaces of Molars • Restorations on Lingual Surface of Maxillary Incisors.
Class I tooth preparation has four point angles and eight line angles • Line angles are:- • Faciopulpal • Disto facial • Distopulpal • Disto lingual • Linguopulpal • Mesio lingual • Mesiopulpal • Mesio facial df
Point angles are • Distofaciopulpal • Distolinguopulpal • Mesiolinguopulpal • Mesiofaciopulpal df