Download

1 / 5
80 likes | 196 Vues
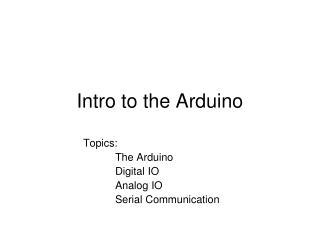
Embedded Systems Intro to the Arduino. Arduino Uno – www.arduino.cc > Learning > Getting started. 1. Digital pins - Use these pins with digitalRead(), digitalWrite(), and analogWrite(). analogWrite() works only on the pins with the PWM symbol.

E N D
Arduino Uno – www.arduino.cc > Learning > Getting started 1. Digital pins - Use these pins with digitalRead(), digitalWrite(), and analogWrite(). analogWrite() works only on the pins with the PWM symbol. 2. Pin 13 LED - The only actuator built-in to your board. Besides being a handy target for your first blink sketch, this LED is very useful for debugging. 3. Power LED - Indicates that your Genuino is receiving power. Useful for debugging. 4. ATmega microcontroller] - The heart of your board. 5. Analog in - Use these pins with analogRead(). 6. GND and 5V pins - Use these pins to provide +5V power and ground to your circuits. 7. Power connector - This is how you power your Genuino when it’s not plugged into a USB port for power. Can accept voltages between 7-12V. 8. TX and RX LEDs - These LEDs indicate communication between your Genuino and your computer. Expect them to flicker rapidly during sketch upload as well as during serial communication. Useful for debugging. 9. USB port - Used for powering your Genuino Uno, uploading your sketches to your Genuino, and for communicating with your Genuino sketch (via Serial.println() etc.). 10. Reset button - Resets the microcontroller.
Arduino Uno – www.arduino.cc > Learning > Getting started • Arduino programming language • (https://www.arduino.cc/en/Reference/HomePage) • structure, variables, functions • Arduino Software IDE • (https://www.arduino.cc/en/Main/Software) • Libraries - New Cores - Foundations • (https://www.arduino.cc/en/Tutorial/Foundations)
Uploading Code • Connect the USB cable from your computer to the Arduino. • Choose Tools>Board>Arduino Uno to find your board in the Arduino menu. You can also find all boards through this menu, such as the Arduino MEGA 2560 and Arduino Leonardo. • Choose Tools>Port to select the correct serial port for your board. You find a list of all the available serial ports by choosing Tools>Serial Port> comX or /dev/tty.usbmodemXXXXX. X marks a sequentially or randomly assigned number. In Windows, if you have just connected your Arduino, the COM port will normally be the highest number, such as com 3 or com 15. Many devices can be listed on the COM port list, and if you plug in multiple Arduinos, each one will be assigned a new number. On Mac OS X, the • /dev/tty.usbmodem number will be randomly assigned and can vary in length, such as /dev/tty.usbmodem1421 or /dev/tty.usbmodem262471. Unless you have another Arduino connected, it should be the only one visible. • Click the Upload button. This is the button that points to the right in the Arduino environment.
Pololu Dual MC33926 Motor Driver Shield https://www.pololu.com/product/2503 under the “Resources” tab it lists the Arduino library for the Pololu Dual MC33926 Motor Shield Driver https://github.com/pololu/dual-mc33926-motor-shield It includes a demo program that ramps both motors