Download

1 / 17
190 likes | 390 Vues
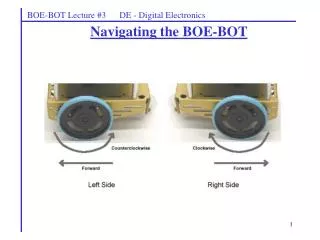
BOE-BOT Lecture #4 EGR 120 – Introduction to Engineering. Navigating the BOE-BOT with whiskers Reference : For more complete documentation, the following items are available from www.parallax.com or www.tcc.edu/faculty/webpages/PGordy Robotics with the BOEBOT Version 2.2

E N D
BOE-BOT Lecture #4 EGR 120 – Introduction to Engineering • Navigating the BOE-BOT with whiskers • Reference: • For more complete documentation, the following items are available from www.parallax.com or www.tcc.edu/faculty/webpages/PGordy • Robotics with the BOEBOT Version 2.2 • BASIC Stamp Syntax and Reference Manual Version 2.1
BOE-BOT Lecture #4 EGR 120 – Introduction to Engineering Tactile Navigation with the BOE-BOT (Wall following using whiskers) The following is an excerpt from Robotics, Version 2.2: “Many types of robotic machinery rely on a variety of tactile switches. For example, a tactile switch may detect when a robotic arm has encountered an object. The robot can be programmed to pick up the object and place it elsewhere. Factories use tactile switches to count objects on a production line, and also for aligning objects during industrial processes. In this chapter, you will build tactile switches, called whiskers, onto your BOE-BOT and test them. You will then program the BOE-BOT to monitor the state of these switches, and to decide what to do when it encounters an obstacle. The end result will be autonomous navigation by touch. The whiskers are so named because that is what these bumper switches look like, though some argue they look more like antennae. Whiskers give the BOE-BOT the ability to sense the world around it through touch, much like the antennae on an ant or the whiskers on a cat.
Whiskers BOE-BOT Lecture #4 EGR 120 – Introduction to Engineering
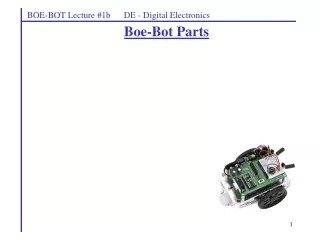
Header BOE-BOT Lecture #4 EGR 120 – Introduction to Engineering Adding whiskers to the BOE-BOT If your BOE-BOT is not already equipped with whiskers, following the instructions shown from Robotics, Version 2.2 to add the whiskers. If your BOE-BOT is equipped with whiskers, skip to the next page.
BOE-BOT Lecture #4 EGR 120 – Introduction to Engineering Adding a whisker circuit to the BOE-BOT Shown below is a circuit to read the status of each whisker. It works as follows: The whiskers are connected to standoffs on the BOE which are connected to ground (Vss). When the BOE-BOT runs into a wall, the whisker touches a “header” on the breadboard which will make a connection to a point in the circuit below (see next page). A whisker hitting a wall is equivalent to closing a switch in the circuit below. In the circuit, if the right whisker hits a wall, it makes a connection to Vss making P7 LOW. If the whiskers is not pressed, P7 remains HIGH. In this way we can tell when each whiskers hits a wall by monitoring the states of P5 and P7.
Header When the left whisker hits a wall, it is pushed into the header, essentially connecting the header to ground (Vss). The whisker is connected to the corner of the BOE, which is connected to ground (Vss) BOE-BOT Lecture #4 EGR 120 – Introduction to Engineering Adding a whisker circuit to the BOE-BOT Shown below is a circuit to read the status of each whisker. It works as follows: The
BOE-BOT Lecture #4 EGR 120 – Introduction to Engineering Whisker test circuit It is nice to have a test circuit, so that we can tell if the whiskers are working properly. An easy solution if to add two LED (with series resistors) so that one LED lights when the left whisker hits a wall and the other LED lights when the right whisker hits a wall.
Note: Ignore the round, black buzzer and the wire connecting it to P4. We will not be using the buzzer. BOE-BOT Lecture #4 EGR 120 – Introduction to Engineering Final result: Whisker control circuit with LED test circuit. Shown below is the BOE-BOT with the whisker control circuit (see Figure 5-4) and the LED whisker test circuit (see Figure 5-7). You will need to add this circuit to your BOE-BOT.
BOE-BOT Lecture #4 EGR 120 – Introduction to Engineering Additional PBASIC Instructions Before testing the whiskers, a few new PBASIC instructions need to be introduced. Inputs to the Basic Stamp The BASIC Stamp can easily determine whether an input connected to a pin is HIGH or LOW by checking its value. This is done using: INpin where pin can be 0 through 15 so IN3will have the value 1 if a HIGH (5V) input is connected to P3 IN4will have the value 0 if a LOW (0V) input is connected to P4
Logical Test F T Do this if true Do this if false BOE-BOT Lecture #4 EGR 120 – Introduction to Engineering Decision structures Most programming languages support various types of decision structures which allows the program to branch and perform different tasks based on some sort of logical test. A common type of decision structure is the IF .. THEN structure. IF (Logical Statement) THEN statements so that the program can respond one way when the logical statement is true and another way when it is false. Sometimes this is illustrated with a diagram as shown.
BOE-BOT Lecture #4 EGR 120 – Introduction to Engineering IF .. THEN statement in PBASIC IF (Logical Test) THEN Instructions to perform if the test is true ENDIF Or IF (Logical Test) THEN Instructions to perform if the test is true ELSE Instructions to perform if the test is false ENDIF Examples of Logical Tests: X > 2 IN3 = 0 IN7 <> 0 (not equal) A <= B A+B >= C+D Example: IF (X < 0) THEN DEBUG “X is negative” ENDIF Example: IF (IN8 = 0) THEN DEBUG “P8 is LOW” ELSE DEBUG “P8 is HIGH” ENDIF
BOE-BOT Lecture #4 EGR 120 – Introduction to Engineering Subprograms in PBASIC In order to repeat useful sections of code, subprograms (or subroutines) are often used. Functions are also used for this purpose in other programming languages. For example, suppose that at several points in a program you wanted to cause an LED connected to P3 to blink on and off ten times. Instead of repeating the instructions several times, they could be placed in a subprogram as shown below. ‘ Main program N VAR BYTE GOSUB Blink ‘Call subroutine Blink Other instructions …. GOSUB Blink ‘Call subroutine Blink Other instructions …. GOSUB Blink ‘Call subroutine Blink Other instructions Other instructions …. END ‘End of main program ‘-----Subroutine Blink is listed below--------- Blink: FOR N = 1 TO 10 HIGH 3 PAUSE 500 LOW 3 PAUSE 500 NEXT RETURN Note that three new PBASIC commands were introduced in this example. Discuss each. GOSUB Label Label: RETURN
BOE-BOT Lecture #4 EGR 120 – Introduction to Engineering Testing the whiskers The program below can be used to test the whiskers. Each time a whiskers is pressed, the input will be detected and an LED will light. It is important to use this test program to be sure that the whiskers are functioning properly before navigation on a track is attempted. This program will be used in Team Assignment #5. DO IF (IN7 = 0) THEN ‘IN7 = 0 when right whisker hits wall HIGH 1 ‘Turn on LED connected to P1 when IN7 = 0 ELSE LOW 1 ‘Turn off LED connected to P1 when IN7 0 ENDIF IF (IN5 = 0) THEN ‘IN5 = 0 when left whisker hits wall HIGH 10 ‘Turn on LED connected to P10 when IN5 = 0 ELSE LOW 10 ‘Turn off LED connected to P10 when IN5 0 ENDIF PAUSE 50 ‘Test whiskers about every 50 ms LOOP
BOE-BOT Lecture #4 EGR 120 – Introduction to Engineering • Sample whisker navigation program • A whisker navigation program is provided in the BOE-BOT manual that could possibly be used to try to navigate any general maze. If a specific track is to be used, modifications to the program might be made so that it will more efficiently navigate that specific track. • The program works as follows: • If neither whisker is pressed, go straight • If the left whisker runs into an obstacle, back up a little bit and turn right 90º • If the right whisker runs into an obstacle, back up a little bit and turn left 90º • If both whiskers run into obstacles, back up a little bit and turn 180º (U-turn) • Video – a video of a BOE-BOT navigating using whiskers based on the sample program described above is available at the following URL: • http://www.parallax.com/dl/mm/video/boebot/whisker.mpg
BOE-BOT Lecture #4 EGR 120 – Introduction to Engineering Sample whisker navigation program The whisker navigation program from the BOE-BOT manual described on the previous slide is shown below. ' {$STAMP BS2} ' {$PBASIC 2.5} ' {$PORT COM1} 'Sample program to navigate with whiskers from Robotics, Version 2.2, pp. 179-180 pulseCount VAR Byte 'Loop counter for FOR .. NEXT loops DO IF (IN5 = 0) AND (IN7 = 0)THEN 'Both whiskers detect obstacle GOSUB Back_Up 'Back up and do U-turn GOSUB Turn_Left GOSUB Turn_Left ELSEIF (IN5 = 0) THEN 'Left whisker detects obstacle GOSUB Back_Up 'Back up and turn right GOSUB Turn_Right ELSEIF (IN7 = 0) THEN 'Right whisker detects obstacle GOSUB Back_Up 'Back up and turn left GOSUB Turn_Left ELSE 'No contact with whiskers GOSUB Forward_Pulse 'Go straight forward ENDIF 'and check again LOOP ' ----- Subroutines ------------------------------------------------- Forward_Pulse: 'Go straight ahead PULSOUT 13, 850 'Left wheel full speed CCW PULSOUT 12, 650 'Right wheel full speed CW PAUSE 20 RETURN Turn_Left: 'Turn left about 90 degrees FOR pulseCount = 0 TO 20 PULSOUT 13, 650 'Right wheel full speed CW PULSOUT 12, 650 'Right wheel full speed CW PAUSE 20 NEXT RETURN Turn_Right: 'Turn right about 90 degrees FOR pulseCount = 0 TO 20 PULSOUT 13, 850 'Right wheel full speed CCW PULSOUT 12, 850 'Right wheel full speed CCW PAUSE 20 NEXT RETURN Back_Up: 'Back up a little bit FOR pulseCount = 0 TO 40 PULSOUT 13, 650 'Left wheel full speed CW PULSOUT 12, 850 'Right wheel full speed CCW PAUSE 20 NEXT RETURN
BOE-BOT Lecture #4 EGR 120 – Introduction to Engineering Modifying the whisker navigation program There are many possible approaches to navigation by whiskers. Some approaches might include: • Program the BOE-BOT to follow the outside (right) wall. Do this by giving the BOE-BOT a slight bias (drift) to the right. When the right whisker hits the wall, turn left for a short time and then resume the slight bias to the right. • Same as above except follow the inside (left) wall. This is illustrated on the following slide. • Change the program as the BOE-BOT proceeds through the course. For example: • The first three times that both whiskers hit a wall, turn right • The 4th, 5th, and 6th time that both whiskers hit a wall, turn left • Turn right for additional times. • Note that it may be necessary to use a counter to keep track of the walls. • See the example shown Counter VAR BYTE Counter = 0 ‘Initialize counter to zero DO IF (IN5 = 0) AND (IN7 = 0)THEN 'Both whiskers detect obstacle Counter = Counter + 1 IF (Counter >=4) AND (Counter <=6) THEN GOSUB Back_Up ‘Back up and turn left GOSUB Turn_Left ELSE GOSUB Back_Up 'Back up and turn right GOSUB Turn_Right ENDIF ELSEIF (IN7 = 0) THEN 'Right whisker detects obstacle GOSUB Back_Up 'Back up and turn left GOSUB Turn_Left ELSE 'No contact with whiskers GOSUB Forward_Pulse 'Go straight forward ENDIF 'and check again LOOP ' ----- Subroutines ------------------------------------------------- Forward_Pulse: 'Go straight ahead PULSOUT 13, 850 'Left wheel full speed CCW PULSOUT 12, 650 'Right wheel full speed CW PAUSE 20 RETURN Etc …….
Adding angled barriers to corners may make navigation easier Path of robot Right Whisker Place where left whisker hits the wall Robot naturally drives slightly to the left and then corrects right after left whisker hits the wall Areas of difficulty? BOE-BOT Lecture #4 EGR 120 – Introduction to Engineering Possible whisker navigation program – following the outside wall