Download
1 / 32
500 likes | 1.98k Vues
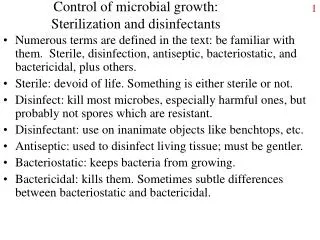
NUR 113: SKILL 8-2: PREPARING A STERILE FIELD. INTRODUCTION. When performing sterile aseptic procedure, you need a sterile work area in which objects can be handled with minimal risk for contamination. A sterile field provides a sterile surface for placement of sterile equipment.

E N D
INTRODUCTION • When performing sterile aseptic procedure, you need a sterile work area in which objects can be handled with minimal risk for contamination. • A sterile field provides a sterile surface for placement of sterile equipment. • It is an area considered free of microorganisms and may consist of the inside of a sterile kit or tray, a work surface draped with a sterile towel or wrapper, or a table covered with a large sterile drape (Iwamoto, 2009). • Sterile drapes establish a sterile field around a treatment site such as a surgical incision, venipuncture site, or site for introduction of an indwelling urinary catheter.
INTRODUCTION – CONT’D • Drapes also provide a work surface for placing sterile supplies and manipulating items with sterile gloves. • They are available in cloth, paper, and plastic. • They may be wrapped in individual sterile packages or included within sterile kits or trays. • These kits or trays contain external and internal sterile (chemical) indicators that indicate that the item has completed a sterilization process.
INTRODUCTION – CONT’D • After the kit is opened, the inside surface of the cover can be used as a sterile field. • Most drapes are fluid resistant. • Drapes come in various styles, shapes and sizes. • For example, bladder catheterization kits and tracheal suction kits contain sterile items that can be moved within the tray and containers into which sterile solutions can be poured. • Once you create a sterile field, you are responsible for performing the procedure without contaminating the field. • The skill of preparing a sterile field includes opening sterile packages, preparing a sterile drape, adding sterile supplies to a field, and pouring sterile solutions.
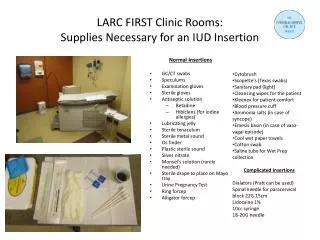
ASSESSMENT • 1. Verify that procedure requires surgical aseptic technique. • Some procedure require medical rather than surgical aseptic technique. • 2. Assess patient’s comfort, oxygen requirements, and elimination needs before preparing for procedure. • Certain procedures that require a sterile field may last a long time. • Anticipates patient’s needs so patient can relax and avoid any unnecessary movement that might disrupt procedure. • 3. Instruct patient not to touch the work surface or equipment during procedure. • Prevents contamination of sterile field.
ASSESSMENT – CONT’D • 4.Assess for latex allergies. • A review may reveal latex allergies and determine use of latex-free supplies. • 5. Check sterile package integrity for punctures, tears, discoloration, moisture, or any other signs of contamination. If using commercially packaged supplies or those prepared by agency, check for sterilization indicator (a marker that changes color when exposed to heat or steam). • The inspection of packaging ensures that only sterile items are presented to sterile field (AORN, 2011). • 6. Anticipate number and variety of supplies needed for procedure. • Not all sterile kits contain sufficient amounts of types of supplies. Failure to have necessary supplies causes you to leave sterile filed, increasing risk for contamination.
PLANNING • 1. Expected outcomes following completion of procedure: • The sterile field is not contaminated. • Patient is not exposed to microorganisms. • Correct surgical aseptic practice is performed. • 2. Complete all other priority tasks (e.g., medication administration, suctioning patient) before beginning procedure. • Prepare sterile fields as close as possible to time of use to reduce potential for contamination (AORN, 2011).
PLANNING – CONT’D • 3. Ask visitors to step out briefly during procedure. Discourage movement by staff assisting with procedure. • Traffic, or movement can increase potential for contamination through spread of microorganisms by air currents. • 4. Prepare equipment at bedside. • Ensures availability before procedure and prevents break in sterile technique (Torch, 2011). {Note: Povidone-iodine and chlorhexidine are not considered sterile solutions and require separate work surfaces for prepping}.
PLANNING – CONT’D • 5. Position patient comfortably for specific procedure to be performed. If a body part is to be examines or treated, position patient so area is accessible. Have NAP assist with positioning as needed. • Patient should be able to lie still in one position comfortably during procedure. Movement can contaminate sterile items. • 6. Explain to patient purpose of procedure and importance of sterile technique. • Ensures patient’s ability to cooperate. Teaching before procedure eliminates need to talk during procedure, which can cause air-droplet contamination of sterile area.
IMPLEMENTATION • 1. Apply PPE as needed (consult agency policy) (see Skills 8-1 and 8-3). • 2. Select a clean, flat, dry work surface above waist level. • 3. Perform hand hygiene (see Chapter 7).
IMPLEMENTATION – CONT’D • 4. Prepare sterile work surface. • A. Using Sterile commercial kit or pack containing sterile items. • 1. Place sterile kit or pack containing sterile items on clean, dry, flat work surface above waist level. • 2. Open outside cover and remove package from dust cover. Place on work surface. • Inner kit remains sterile. • 3. Grasp outer surface of tip of outermost flap. • Outer surface of package is considered unsterile. There is a 2.5 cm (1 inch) border around any sterile drape or wrap that is considered contaminated.
IMPLEMENTATION – CONT’D • 4. Prepare sterile work surface. • A. Using Sterile commercial kit or pack containing sterile items. (Cont’d from previous page) • 4. Open outermost flap away from body, keeping arm out-stretched and away from the sterile field. • Reaching over the sterile field contaminates it. • 5. Grasp outside edge of first side flap. • 6. Open side flap, pulling to side, allowing it to lie flat on table surface. Keep arm to side and not over sterile surface. • 7. Repeat Step (6) for second side flap. Stand away from sterile package and pull flap back, allowing it to fall flat on table. Outer border is considered unsterile Never reach over a sterile field 8. Grasp outside border of last and innermost flap. Stand away from sterile package and pull flap back, allowing it to fall flat on the table.
IMPLEMENTATION – CONT’D • Example of STEP 4 A (6) Open First side flap, pulling to side • Please note, I know the following pictures are not of the best quality, but I took them directly from your book, as I was not able to find any on the internet that matched your skill.
IMPLEMENTATION – CONT’D • STEP 4 A (7) Open second slide flap, pulling to side.
IMPLEMENTATION – CONT’D • Step 4 a (8) Open Last and Inner-most Flap
IMPLEMENTATION – CONT’D • Step 4 b (2) Open Sterile linen-wrapped package.
IMPLEMENTATION – CONT’D • B. Open Sterile Linen-Wrapped Package: • 1. Place package on clean, dry, flat work surface above waist level. • Items placed below waist level are considered contaminated. • 2. Remove sterilization tape seal and unwrap both layers following same steps (see Steps 4a {2} through 4a{8}) as for sterile kit. • Linen-wrapped items have two layers. The first is a dust cover. The second layer must be opened to view chemical indicator. If item is dropped on floor, it is considered contaminated. • 3. Use opened package wrapper as sterile field. • Inner surface of wrapper is considered sterile.
IMPLEMENTATION – CONT’D • C. Prepare Sterile Drape: • 1. Place pack containing sterile drape on flat dry surface and open as described {see Steps 4a (2) through 4a (8)} for sterile packages. • Ensures sterility of packaged drape. • 2. Apply sterile gloves (optional, see agency policy). You may touch outer 2.5 cm (1 inch) border of drape without wearing gloves. • A sterile object remains sterile only when touched by another sterile object. Gloves are not necessary as long as fingers grasp the 2.5 cm (1 inch) unsterile border of the drape.
IMPLEMENTATION – CONT’D • 3. Grasp folded top edge of drape with fingertips of one hand. Gently lift drape up from its wrapper without touching any object. • If sterile object touches any non-sterile object, it becomes contaminated. • 4. Allow drape to unfold keeping it above waist and work surface and away from body. (Carefully discard wrapper with other hand). • Objects held below waist or above chest is contaminated.
IMPLEMENTATION – CONT’D • 5. With other hand grasp adjacent corner of drape. Hold drape straight over work surface. • Drape can now be placed properly with two hands. • 6. Holding drape, position bottom half over top half of intended work surface. • Prevents nurse from reaching over sterile field. • 7. Allow top half of drape to be placed over bottom half of work surface. • Creates flat, sterile work surface for placement of sterile supplies.
IMPLEMENTATION – CONT’D • Step 4 c (5) Hold Corners of sterile drape up and away from body.
IMPLEMENTATION – CONT’D • Step 4 c (6) Position bottom half of sterile drape over top half of work surface
IMPLEMENTATION – CONT’D • Step 4 c (7) Allow top half of drape to be placed over bottom half of work surface.
IMPLEMENTATION – CONT’D • Step 5 c Add Items to Sterile Field
IMPLEMENTATION – CONT’D • Step 6 d Pour Solution into receiving container on a sterile field
IMPLEMENTATION – CONT’D • 5. Add sterile items to sterile field: • A. Open sterile item (following package directions) while holding outside wrapper in non-dominant hand. • B. Carefully peel wrapper over non-dominant hand. • C. Being sure that wrapper does not fall down on sterile field, place item onto field at an angle. Do not hold arm over sterile field. • D. Dispose of outer wrapper. • CLINICAL DECISION POINT: Do not flip or toss objects onto sterile field.
IMPLEMENTATION – CONT’D • 6. Pour Sterile Solutions. • A. Verify contents and expiration date of solution. • B. Be sure that receptacle for solution is located near table/work surface edge. Sterile kits have cups or plastic molded sections into which fluids can be poured. • C. Remove sterile seal and cap from bottle in upward motion. • Prevents contamination of bottle lip.
IMPLEMENTATION – CONT’D • Pour Sterile Solution ( Cont’d from previous page). • D. With solution bottle held away from field and bottle lip 2.5 to 5 cm (1 to 2 inches) above inside of sterile receiving container, slowly p9our needed amount of solution into container. Hold bottle with label facing palm of hand. • Edge and outside of bottle are considered contaminated. Slow pouring prevents splashing. Sterility of contents cannot be ensured if cap is replaced. • Prevents label from becoming wet and illegible. • Clinical Decision Point: When liquids permeate sterile field or barrier, it is called strike through, resulting in contamination.
EVALUATION • 1. Observe for break in sterile technique • Break in sterile field requires you to set up new sterile field.
RECORDING & REPORTING • No recording or reporting is required for this set of skills. • Record sterile procedure performed in nurses’ notes and EHR, and describe patient’s status.
SPECIAL CONSIDERATIONS – HOME CARE • Most care procedures in the home setting involve clean technique. • In the event that a sterile environment is ordered, patient and family need to be aware of the principles that apply to the sterile environment. • For example, teach family how to correctly use package wrapper as a sterile drape/barrier when applying a sterile dressing or teach family the correct procedure for removing sterile item from package. • Assess patient’s and family’s understanding and ability to provide a sterile environment when needed to perform a specific procedure.
END OF SKILL • This is the end of your skill. • Your book has provided a video for this skill, and the link is below: • http://booksite.Elsevier.com/Perry-Potter/ClinicalSkills/video09.php • Elsevier: Perry-Potter: Clinical Nursing Skills and Techniques, 8e-8.2. Preparing a Sterile Field