Download

1 / 54
590 likes | 889 Vues
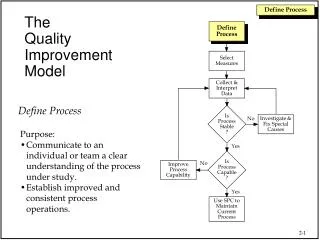
Introduction to the Rapid Improvement Model Plus. Simple Tools for Workflow Redesign. Workshop Objectives. By the end of this module, you will be able to: Discuss the three fundamental questions used in rapid improvement so you can quickly begin work on performance improvement

E N D
Introduction to the Rapid Improvement Model Plus Simple Tools for Workflow Redesign
Workshop Objectives • By the end of this module, you will be able to: • Discuss the three fundamental questions used in rapid improvement so you can quickly begin work on performance improvement • Create a process flow that allows you to understand where you need to start your improvement work • Identify sources of waste in your processes • Create a data collection plan • Apply the Plan-Do-Study-Act (PDSA) cycle so teams know when and how to use it for rapid improvement
Rapid Improvement Model What are we trying to accomplish? How will we know that a change is an improvement? What change can we make that will result in improvement? Act Plan Study Do Model for Improvement developed by Associates in Process Improvement ( http://www.apiweb.org)
Why do rapid improvement? • Engage your team to improve processes affecting patient care experiences and your team’s work experience • Achieve big gains from small rapid tests of change • Eliminate time wasting and dangerous work-arounds • Engage team members in improving work processes • Accomplish your department’s goals • Improve your department’s performance
What could be improved where you work? • Patient Satisfaction • Employee Satisfaction • Safety • Clinical outcomes • Under, over, or misuse of procedures, medications etc. • Attendance • Excessive costs/waste • Inefficiency • Wait times or delays • Unexplained variation • Multiple processes • Errors • Rework • Work-arounds
RIM has a specific scope With RIM you would not attempt to address the following issues as part of your improvement plan … • Staffing and FTE issues exclusively • Performance management issues • Compliance or legal issues • Any agreements addressed in Local Union contracts and the National Agreement
Assess: What is the current process? • Begin with a quick “walk through” of the entire process, to get a sense of the flow and sequence of steps. “Pin yourself to the problem” as if you were the staff or patient. • Go back and gather information at each step (data, stories, etc.) • Follow along the actual pathways of material and information yourself • Collect relevant current-state information while “working through” using a data collection tool • Map the whole process yourself (or as a team), even if several people/departments are involved and multiple hand-offs occur The point of mapping is NOT the map. It is understanding the flow of information and material.
Assess: Where do problems occur? Member identified for screening Member contacted for appointment Appointment for mammogram scheduled Co-pays collected Do not collect co-pay Do not identify people needing screening Mammogram completed Mammogram read Member contacted with results Do the results warrant follow-up care? no Timely turn around in calling member yes Team agrees this is the biggest opportunity Follow-up care scheduled as needed • Focus on one area in a process
Workshop Exercise and Report Out • Draw a process map for an area you want to improve • Use no more than 5 – 6 major steps • Identify where the failures occur • Brainstorm the most critical 1 – 2 failures that need to be improved • Keep a list of all points that need improvement
Identify Your Goal for Improvement What are we trying to accomplish? How will we know that a change is an improvement? What change can we make that will result in improvement? Act Plan Study Do Model for Improvement developed by Associates in Process Improvement ( http://www.apiweb.org)
Question 1: What are we trying to accomplish? What could be improved in your area? Goal statements are S.M.A.R.T. and are the first steps you and your team will take: S Specific including the target population M Measurable A Attainable R Realistic T Time bound
Goal Statement Steps and Examples What could be improved in your area? • Brainstorm what could be improved, review the process map • Review current data if available and departmental goals • Write a Goal statement for one improvement your team wants to try • Good examples of Goal statements: • Inpatient: reduce ventilator-associated infections by 25% in the ICU West within 10 months. • Outpatient: Increase by 25% the annual testing of HgbA1C in diagnosed diabetes in the South City Clinic within 6 months. • Non-clinical: Improve staff satisfaction service scores by 5% in the registration department in the next 6 months.
Exercise and Report Out At your table, using the flip chart: • Work on creating a Goal statement for an improvement project in your area • Make sure it follows the SMART principle
Let’s Assess Your Goal Statement Goal content • Explicit overarching description • Specific actions or focus • Goals Goal characteristics • Time specific • Measurable • Define participants
Creating Measures for Improvement What are we trying to accomplish? How will we know that a We are here change is an improvement? What change can we make that will result in improvement? Act Plan Study Do Model for Improvement developed by Associates in Process Improvement ( http://www.apiweb.org)
Accountability Research Improvement Reporting Purposes Specific data Agencies State/federal regulators Beyond Doubt Lots of data Prove hypotheses Statistical Just Enough to Learn Limited data Small samples/tests of Changes incorporated as needed Three Types of Data
Three Types of Measures Outcome Measures: • Voice of the customer or patient • How is the system performing? What is the result? • Tied directly to goal statements • Can be time, clinical outcome, financial, or satisfaction Process Measures: • Voice of how the process works • Are the parts/steps in the system performing reliably as planned? Balancing Measures: • What happened to the system as we improved outcome and process measures (e.g., high or low volume days)? • Looking at a system from different directions/dimensions
Examples of Non-Clinical Measures Outcome measure • Percent change on Employee Satisfaction Scores for two service-related questions • Q11: Are you trained to give good service? • Q12: Are you supported to give good service? Process measure • How many registration clerks say they used scripted languages in their customer interactions this week? Balance measure(unintended consequences) • Member/patient satisfaction scores
Steps in Identifying Measures • Identify the high priority process you are working on • Develop the process map for workflows and decisions made • Define your outcomes: clinical/operational, service, cost • Review the process map and ask, “what do we need to know to tell how the process is working?”
Steps in Designing a Data Collection Tool • Data collection tool is created and tested by front-line workers • Use paper, and test quickly before formalizing • Avoid collecting unnecessary data – ask for only what is needed • Final form needs to include a definition of measures, what is included and not, and simplifies what needs to be entered
Simple Data Collection Tool Project level information (person, place, time) Outcomes data (by week) Identified barriers, leads to more testing ideas Process data (collected by staff during the day) Example:
During Testing, Measurement is: • Feedback for your team • Information so your team can act rapidly if necessary • For improvement and not for judgment, accountability or research • Useful rather than perfect • Simple, easy data collection while doing your daily work • Consider using existing data sources/sampling • Timely as a key to learning • Tracking data over time using pencil/paper • Used to think about every test and its implications
Motivate Staff:Display Data in Your Department What will tell us whether our changes are improving care and service?
Workshop Exercise: Developing Measures Scenario: A friend has asked you to consult on a personal improvement project. Project Goal:Lose 10 lbs in 6 months • Develop measures that can be reported each week • 1 Outcome measure • 1 Process measure • Develop Summary of Measures on your flip chart
Focus on Planning Rapid TestsUnder Varying Conditions What are we trying to accomplish? How will we know that a change is an improvement? We are here What change can we make that will result in improvement? Act Plan Study Do Model for Improvement developed by Associates in Process Improvement ( http://www.apiweb.org)
Identify Changes Determine what will help: • Brainstorm ideas • Standardize and simplify processes • 6S (see online module) • Reduce waste, wasted steps • Apply best practice or evidence-based practices
Standardize and Simplify • Standardize • Create predictability and consistency. Ways to standardize include: • Common equipment • Standard order sheets • Check lists • Reducing number of steps in a process • Simplify • Eliminate unnecessary complexity • Design single way to perform tasks • Put supplies near where the work is done
StandardizeWhy Standardize? Benefits of standardizing • Builds a reliable system • Supports training and competency testing • Everyone can clearly state what their work consists of • Allows for the use of best practices • Feedback and learning is part of the system for improvement
SimplifyIdentify What is Waste • Searching • Nurse cannot find IV pump • MA cannot find discharge forms • Deciding • Nurse is not sure which patient she should see next • Physician is looking for time to call patients • Travel • EVS has to walk to the store room to get frequently used supplies. • Transporting • Phlebotomist carries a blood sample from the ED to the lab for a common blood test. • Patients are not transported from their rooms to radiology for an MRI by the scheduled test time
Workshop Exercise • Look at the issue you identified on your process map. • Are there ways to simply or reduce waste in this issue? • Brainstorm ideas.
Section V:Develop and Plan for Small Tests of Change and Huddles
Focus on Rapid Tests Under Varying Conditions: Testing Ideas What are we trying to accomplish? How will we know that a change is an improvement? What change can we make that will result in improvement? Act Plan Study Do Model for Improvement developed by Associates in Process Improvement ( http://www.apiweb.org)
Why test before implementing? • Increase degree of belief that it may work • Document expectations and learnings • Build a common understanding of what good looks like • Evaluate costs and side-effects for changes • Explore theories and predictions • Test ideas under different conditions • Learn and adapt in real time
Cycle for Improvement:The PDSA Cycle Act Plan - Objective - Predictions - Plan to carry out the cycle (who, what,where, when) - Plan for data collection - What changesare to be made? - Next cycle? Study Do • - Analyze data • Compare resultsto predictions- Summarize what was learned - Carry out the plan - Documentobservations - Record data How we test for change.
Tips for Successful Testing • Develop a plan for PDSAs • What, who, When, Where, How • Start with small tests – “What can we do Tuesday?” (e.g., 1 MA, 1 MD, 1 patient) • Think big – test small • Failure is ok – it’s an opportunity to learn • Plan multiple PDSA cycles to address “What are we trying to accomplish?” • Use huddles to check: • What worked, what didn’t and what should we change for our next test? • Celebrate success early and often
Test Changes: Non-Clinical What changes can we make that will result in an improvement? • Idea: Train one Registration desk staff to use communication tools or scripts like “Acknowledge, Introduce, Duration, Explanation, Thank you” (AIDET) • Hunch: Using scripted language helps staff feel more comfortable with how to communicate with patients • Test: Tomorrow morning one receptionist will try this with all patients
Let’s Try It! Complete the following for your team: • Idea: • Hunch: • Test:
The cycle: If there is no improvement, try the cycle again! Try another solution/change Collect data based on the change Pause to plan…what’s your prediction for the next test? If there is improvement you can: Test in a different shift, area, group Decide how to make the change part of daily work Select another area in process to improve Rapid Improvement: Multiple Cycles Data Change Change Act Plan Data Study Do
Non-Clinical: Teach 1 regular staff customer service script with video. Use script for greeting every patient for 1 day Teach all regular staff the technique (wk 2) Expand to 2 regular staff for 2 days on different shifts Expand to all regular staff on same shift for 2 days (wk 1) P P P P P A A A A A S S S S S D D D D D
Let’s Try It! Playing the M&M’s Game
M&M’s Game Instructions • Use the PDSA testing cycle concept • Use the worksheet with the triangle & circles on it • Open your candy. Please don’t eat the candy (yet) • Place a candy on 14 of the 15 numbered circles • Testing: • Remove M&M’s by “jumping” one M&M over another and into a blank circle, remove the “jumped” M&M (and don’t eat it) • Record the number of candies left on the worksheet • Objective: one M&M stands alone on the worksheet
Testing Debrief: What did we learn? • Rapidly trying and learning • Documenting tests • Sharing and learning in a group • When solution found – writing steps down • There is no one single way to succeed
The Sequence for Improvement Spread a change to other locations Make part of routine operations Implement a change Test under a variety of conditions Test a change Act Plan Theory & Prediction Develop a change Study Do to here! Don’t go from here …