Download

1 / 57
570 likes | 726 Vues
Day 3 Schedule. Creating the lab flows Level1ProjAuth Get authorization information for orders in real time Level1ProjFulfillment Take processed orders from Ecommerce system and send them to warehouse for fulfillment Level1ProjInventory

E N D
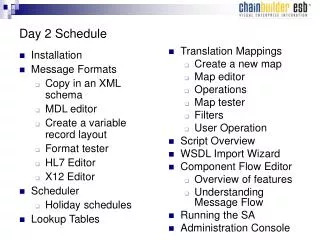
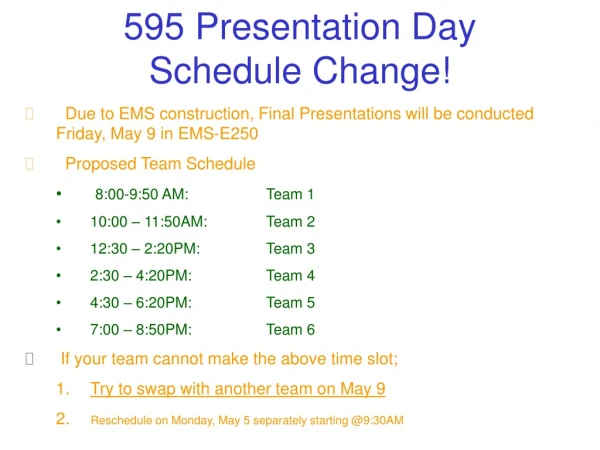
Day 3 Schedule • Creating the lab flows • Level1ProjAuth • Get authorization information for orders in real time • Level1ProjFulfillment • Take processed orders from Ecommerce system and send them to warehouse for fulfillment • Level1ProjInventory • Retrieve inventory information from warehouse and send it back to Ecommerce system • Wrap-up
Level1ProjAuth – CCApproval Map • Create map named CCApproval with both source and target using SingleOrderReportInternational.xsd • Automap the entire format
Level1ProjAuth – CCApproval Map • Add an If and Else operation so that orders less than $100.00 are approved and others are denied
Level1ProjAuth - OrderIn • Add a file BC
Level1ProjAuth - OrderIn • Select in-out MEP • Set up read directories
Level1ProjAuth - OrderIn • Set up reply file output
Level1ProjAuth - ApprovalService • Add HTTP BC
Level1ProjAuth - ApprovalService • Enter URL • Select in-out MEP • Click “Create new WSDL” which will open a new window
Level1ProjAuth - ApprovalService • Add the schema
Level1ProjAuth - ApprovalService • Fill in WSDL Builder page
Level1ProjAuth - CCApproval • Add Transformer SE • Select CCApproval map
Level1ProjAuth - requestApproval • Create client HTTP BC
Level1ProjAuth - requestApproval • Browse to select the generated WSDL file
Level1ProjAuth • Connect components together and add comments to complete the SA
Level1ProjFulfillment – map filter • Copy yyyymmddTommddyyyy.java to the scr/java directory and build the project
Level1ProjFulfillment – Fulfillment.mdl • Create Fulfillment.mdl tagged record format • Add message named Fulfillment • configure ID method, Delimiter, Tag Length
Level1ProjFulfillment – Fulfillment.mdl • Add Header (as child to Fulfillment) • Configure type, Tag
Level1ProjFulfillment – Fulfillment.mdl • Add Detail as sibling to Header • Configure Type, Tag, Max Occurs
Level1ProjFulfillment – Fulfillment.mdl • Add Trailer • Configure Type, Tag
Level1ProjFulfillment – Fulfillment.mdl • Add Leaf nodes with lengths as shown • Date: 8 • Name: 20 • Address1: 30 • Address2: 30 • City: 15 • State: 2 • PostalCode: 10 • Country: 3 • Sku: 10 • Quantity: 5 • ItemName: 30 • LineCount: 5
Level1ProjFulfillment – FulfillmentXML_To_FulfillmentMDN.trn • Create a map from SingleOrderFulfillmentInternational.xsd to Fulfillment.mdl
Level1ProjFulfillment – FulfillmentXML_To_FulfillmentMDN.trn Sample Data <Fulfillment> <OrderID>1002</OrderID> <OrderDate>20070102</OrderDate> <FulfillmentData> <FirstName>Joe</FirstName> <LastName>Tester</LastName> <Address1>2800 Corporate Exchange</Address1> <Address2>Suite 260</Address2> <City>Columbus</City> <State>OH</State> <PostalCode>43231</PostalCode> <Country>USA</Country> </FulfillmentData> <Item> <SKU>1111</SKU> <ProductName>Bostech Fiery Burn Salsa</ProductName> <Quantity>3</Quantity> <ItemPrice>2.99</ItemPrice> </Item> <Item> <SKU>2222</SKU> <ProductName>Bostech Polo Shirt Large</ProductName> <Quantity>1</Quantity> <ItemPrice>27.99</ItemPrice> </Item> <Item> <SKU>3333</SKU> <ProductName>Bostech SuperGrow Fertilizer</ProductName> <Quantity>1</Quantity> <ItemPrice>54.99</ItemPrice> </Item> </Fulfillment>
Level1ProjFulfillment – FulfillmentXML_To_FulfillmentMDN.trn • Create a copy from OrderDate to Date and select the yyyymmddTommddyyyy filter and method
Level1ProjFulfillment – FulfillmentXML_To_FulfillmentMDN.trn • Create a Combine to concatenate together First Name and Last Name (with a space in the middle) to the target field Name • Create Copy statements from individual FulfillmentData fields to individual Header fields
Level1ProjFulfillment – FulfillmentXML_To_FulfillmentMDN.trn • Copy the number 0 into variable lineCount
Level1ProjFulfillment – FulfillmentXML_To_FulfillmentMDN.trn • Drag from repeating element Item to repeating field Detail. This will created the Iterate statements and fill in some of the required COPY statements in the loops. • Add a copy (inside the iterates) from ProductName to ItemName
Level1ProjFulfillment – FulfillmentXML_To_FulfillmentMDN.trn • Create a Math Operation inside the Iterates to increment lineCount • Outside the iterates, copy the variable lineCount to field LineCount
Level1ProjFulfillment – AfterApprovalOrderIn • Create a File BC
Level1ProjFulfillment – AfterApprovalOrderIn • Configure directories
Level1ProjFulfillment – fulfillmentLocation • Create a CBR • Use xpath TrxID
Level1ProjFulfillment – OrderToFulfillmentCAN • Add a Transformer SE • Select FulfillmentXML_To_FulfillmentMDN.trn
Level1ProjFulfillment – FulfillmentOutCan • Add a File BC
Level1ProjFulfillment – FulfillmentOutCan • Set up output directories and file name
Level1ProjFulfillment – OrderToFulfillmentUSA • Add a Transformer SE • Select FulfillmentXML_To_FulfillmentMDN.trn
Level1ProjFulfillment – toFulfillmentUSA • Create a JMS BC
Level1ProjFulfillment – toFulfillmentUSA • Set up Provider information
Level1ProjFulfillment – FulfillmentCenterUSA • Create a JMS BC • Set Role to Consumer
Level1ProjFulfillment – FulfillmentCenterUSA • Configure Consumer properties
Level1ProjFulfillment – FulfillmentFile • Create a File BC
Level1ProjFulfillment – • Configure Directories and File Pattern
Level1ProjFulfillment • Connect components together and add comments to complete the SA
Level1ProjInventory – Inventory.mdl • Create Inventory.mdl • Add inventory message • Set delimiter and repeat delimiter
Level1ProjInventory – Inventory.mdl • Configure Line • Set Delimiter and Max Occurs • Add sku and quantity as children to line
Level1ProjInventory – InventoryUpdate • Create a File BC
Level1ProjInventory – InventoryUpdate • Configure directories
Level1ProjInventory – inventoryFromWarehouse • Create a TCPIP BC • Set Mode to Client and Role to Consumer
Level1ProjInventory – inventoryFromWarehouse • Configure Host and Port