Download
1 / 16
160 likes | 335 Vues
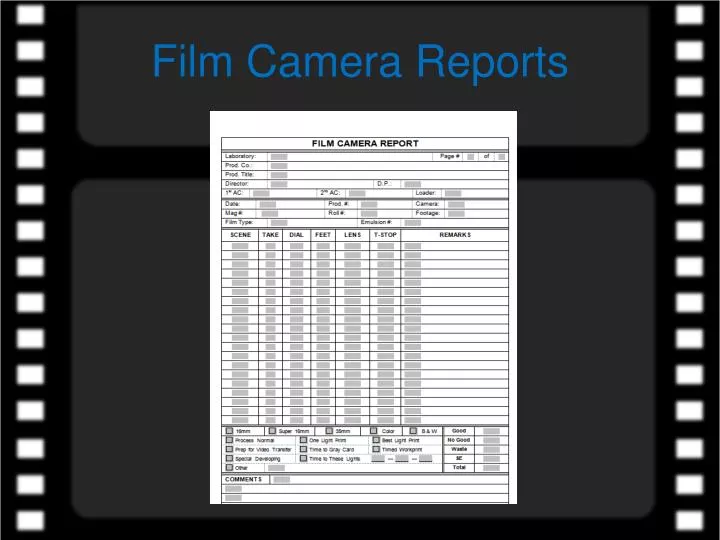
Film Camera Reports. Let’s start by looking at what I call the heading of the report. Laboratory: – The name of the lab that will process the film. Prod. Co: - The name of the company producing the film. Prod. Title: - The title of the film or production.

E N D
Let’s start by looking at what I call the heading of the report. • Laboratory: – The name of the lab that will process the film. • Prod. Co: - The name of the company producing the film. • Prod. Title: - The title of the film or production. • Director: -First Initial and Last Name of Director. • D.P.: - First Initial and Last Name of Cinematographer. • 1st AC: - First Initial and Last Name of First Assistant Cameraman. • 2nd AC: - First Initial and Last Name of Second Assistant Cameraman.
Continuing with the heading part of the report. • Date: - The date that the roll of film is shot. • Prod. #: - The number of the production as assigned by the Production Company. • Camera: - The serial number of the camera being used. • Mag #: - The serial number for the magazine in which the film is loaded. • Roll #: - The number of the roll as it is placed on the camera. • Footage: - The size of the roll loaded into the magazine. • Film Type: - The first four numbers from the film stock ID information – 5203, 5207, 7203, 7219, etc. • Emulsion #: - The last numbers from the film stock ID information - 032-1902, 197-1102, 271-5846, etc.
Now let’s look at what I call the shooting part of the camera report.
Using the camera footage counter numbers that follow let’s see how the camera report would be completed. This information is from Figure 4.7 on page 95 of The Camera Assistant’s Manual, 6th Edition. • Scene: - The number of the scene as it appears in the script. • Take: - The number of the attempt to shoot the scene in order to get one or more useable shots. • Dial: - The footage amount from the camera footage counter, rounded to the nearest ten (10). • Feet: - The total feet for the individual take. It is determined be subtracting the previous Dial number from the current Dial number. • Lens: - The focal length of the lens used to shoot the take. • T-Stop: - The exposure set on the lens for the shot. • Remarks: - Any additional information that the cinematographer or first assistant wants to be included on the camera report. It may include filters used, distance to subject, height of camera lens, MOS, tail slate, just to name a few.
At the end of the first take, (Scene 54,Take 1) the camera footage counter indicated 66 feet. To make the math easier, you should round all camera footage counter amounts to the nearest ten (10). In this case we round 66 to 70 and write 70 in the DIAL column of the report for Scene 54, Take 1. Since it is the first take on the report, the FEET amount would also be 70.
At the end of the second take, (Scene 54,Take 2) the camera footage counter indicated 121 feet. We round 121 to 120 and write 120 in the DIAL column of the report for Scene 54, Take 2. We now subtract the previous DIAL amount from the current DIAL amount to determine the current FEET amount. 120 – 70 = 50
At the end of the next take, (Scene 54,Take 3) the camera footage counter indicated 162 feet. Round 162 to 160 and write 160 in the DIAL column of the report for Scene 54, Take 3. Next do the subtraction, 160 – 120 = 40 to determine the FEET for Scene 54, Take 3.
At the end of the next take, (Scene 54,Take 4) the camera footage counter indicated 205 feet. Round 205 to 210 and write 210 in the DIAL column of the report for Scene 54, Take 4. Next do the subtraction, 210 – 160 = 50 to determine the FEET for Scene 54, Take 4.
At the end of the next take, (Scene 54A,Take 1) the camera footage counter indicated 247 feet. Round 247 to 250 and write 250 in the DIAL column of the report for Scene 54A, Take 1. Next do the subtraction, 250 – 210 = 40 to determine the FEET for Scene 54A, Take 1.
At the end of the next take, (Scene 54A,Take 2) the camera footage counter indicated 279 feet. Round 279 to 280 and write 280 in the DIAL column of the report for Scene 54A, Take 2. Next do the subtraction, 280 – 250 = 30 to determine the FEET for Scene 54A, Take 2.
At the end of the next take, (Scene 82,Take 12) the camera footage counter indicated 364 feet. Round 364 to 360 and write 360 in the DIAL column of the report for Scene 82, Take 1. Next do the subtraction, 360 – 280 = 80 to determine the FEET for Scene 82, Take 1.
Continue shooting until you have finished with that roll of film. Don’t forget to round all camera footage amounts before writing the amount in the DIAL column of the report. Perform the subtractions and write the appropriate amount in the FEET column for each TAKE. The completed camera report is shown below.
Once the amounts for all SCENES and TAKES have been entered and the math has been complete, you need to calculate the amounts for GOOD, NO GOOD, WASTE, SHORT END AND TOTALS. The TAKES that the directors likes , which will be considered for use in the finished film, are called the GOOD TAKES and should be circled. The TAKE number and FEET amount should be circled. All the circled TAKES are added and this total is written in the space labeled GOOD (G).
Next you should add all the FEET amounts that have not been circled and write this total in the space labeled NO GOOD (NG).
Add the amount for GOOD plus the amount for NO GOOD and then subtract this total from the total amount of footage loaded in the magazine. In this case it would be 1000 – 970 = 30. For 35mm if this amount is less than 100 feet it would be considered WASTE, and if it is more than 100 feet it would be considered a SHORT END. Short Ends are saved to be used for shooting at a later date. The cutoff amount for WASTE and SHORT END when shooting16mm film is 40 feet.