Download
1 / 54
580 likes | 603 Vues
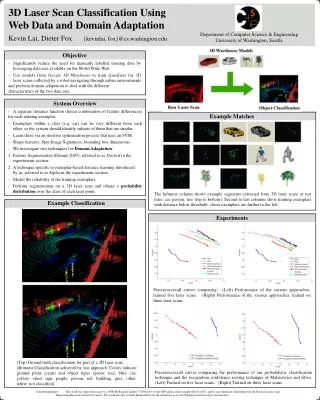
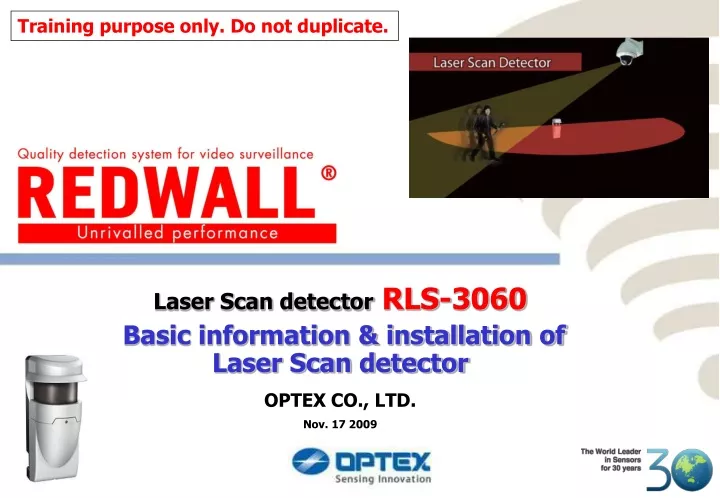
Training purpose only. Do not duplicate. Laser Scan detector RLS-3060 Basic information & installation of Laser Scan detector OPTEX CO., LTD. Nov. 17 2009. Product Overview. Laser Scan detector RLS-3060 utilizes ‘Time of Flight’ technology.

E N D
Training purpose only. Do not duplicate. Laser Scan detectorRLS-3060 Basic information & installation of Laser Scan detector OPTEX CO., LTD. Nov. 17 2009
Product Overview Laser Scan detector RLS-3060 utilizes ‘Time of Flight’ technology. RLS-3060 does not require any PC for operation. It can be connected to PTZ camera, video transmitter or DVR. RLS-3060 has 4 detection area segments and linked outputs. It can match PTZ control applications. RLS-3060 can recognize the size, speed and distance of objects within the 30M range. Processing with our detection algorithm, it recognize human targets and avoids false alarm factors.
Product Features • 30m radius for 190 degrees • Vertical and horizontal detection area • Unique detection algorithm • Four independently adjustable detection areas for PTZ camera control • Four independent N.O. outputs • Form C master alarm output • Automatic area setting function • Environmental disqualification circuit • Trouble output • Tamper output
Why Laser • LASER is an acronym for • Light Amplification by Stimulated Emission of Radiation • Laser is an artificial light that does not exist in nature. It has unique characteristics, that makes it different than “ordinary” light. • Monochromatic • Laser light is extremely pure and consists of a very narrow spectral range. It enables the separation of emitted light from the detector and other sources. • Directional • The laser can be collimated and travels over long distances with little spread. It enables the detector to achieve a very high resolution detection area.
What is Laser There are gas lasers, solid-state lasers, liquid lasers and semiconductor lasers. According to medium to make laser light, the wavelength of light is different. A semiconductor laser is small in size and has very low power consumption. X-Ray Ultraviolet-Ray Visible Light Infrared Microwave TV Wave 10 400K 1000K (nm) GaN(Gallium nitride) 400 nm - Blue-violet laser, in Blu-ray Disc and HD DVD drives AlGalnP 650 nm - DVD drives, Laser pointers AlGaAs 780 nm - Compact Disc 905 nm - Redscan InGaAsP 1310 nm - fiber-optic communication REDSCAN utilize 905nm wavelength Laser (Near Infrared)
What is Laser Why near infrared? Near infrared has a high penetrative characteristic compared to other wavelengths and is invisible. It is preferred for intrusion detection e.g. video surveillance. How affect human health? Redscan’ s laser is Max. 0.015mW It is classified as Class 1 of Laser Safety Standard. (Complies with 21 CFR 1040.10 and 1040.11 except for deviations pursuant to Laser Notice No. 50 & IEC60825-1) It does not affect human health. Not visible to human eye USA Food and Drug Administration Center for Devices and Radiological Health
Construction of Laser Scanning mechanism RX optic TX optic Output Signal processing Avalanche Photo Diode Laser Diode
Scanning mechanism RX optic TX optic Signal processing ADD LD Detection principle Time of Flight (TOF) method By calculating the time during which a emitted beam returns after hitting the object, the distance to the object can be measured. Sensing resolution = 0.25 degree At 100ft. (30m) distance, detection width is only 5 inch. (13cm). Redscan is sampling every 0.25 degree. It means that Redscan protects 180 degree area with 720 beams and 190 degree area with 760 beams.
Detection areas REDSCAN, RLS-3060 can be installed vertically, horizontally or at an angle. Therefore a horizontal or vertical or inclined detection area can be achieved Detection range is 100ft. (30m) radius, 190 degree.
Detection areas REDSCAN, RLS-3060 can be installed vertically, horizontally or at an angle. Therefore a horizontal or vertical or inclined detection area can be achieved Detection range is 100ft. (30m) radius, 190 degree.
Benefits of Redscan REDSCAN detector has 190 degree detection area. Therefore, • No dead spots • Very flexible and Precise detection area setting REDSCAN has the capability to recognize the intrusion location in 4 detection area segments and is linked to 4 outputs. Therefore, • Ideal match for PTZ camera preset control Conventional PIR Laser Scan Sensor Horizontal detection area Horizontal detection area Vertical detection area
Connection (Analog) Analog PTZ Power supply REDSCAN Alarm outputs for each area (A1,A2,B1,B2) ×4 DVR Tamper outputSelf check trouble output Environmental trouble output Peripheral equipment Master Alarm output (N.O./N.C.) PC Ethernet port(RJ-45) * Set up * Update software Power supply24VDC/AC
Connection (IP connection) PTZ preset control IP PTZ camera PC with Video/Alarm management software or NVR TCP/IP Can receive generic event codes REDSCAN Generic Event Code Switch Ethernet port (RJ-45) UDP Alarm information Detected human positionEnvironmental signalTrouble signal Analog Tamper output * Set up * Update software Power supply24VAC/DC
IP connection (Generic event code) • Feature • RLS-3060 generates the generic event codes from its communication port. • PTZ preset control by RLS-3060 via NVR or VMS which has the capability to receive generic event codes through an IP network. Communication methods Send generic codes to assigned port on UDP Code format XXXX_y1 to y9 *“XXXX”: ID number of the RLS-3060 unit (4 –6 bytes). Number is RLS + the host address of the RLS-3060. Default: RLS126 * y: Status code of RLS-3060 (18 bytes) * When no event, “⊔“(space) is generated. (Space is expressed as “⊔”, for convenience.) Example.) When the unit detects in A2 area and also the laser window get dirt, the following event code is generated. “RLS126MOA2⊔⊔⊔⊔⊔⊔⊔⊔⊔⊔⊔⊔SO“. IP address and port number which the RLS-3060 send the event code to can be changed. * Default value IP address: 192.168.0.126 255.255.255.0 Port number: 1234
Redscan Manager Software REDSCAN PC Ethernet port(RJ-45) • Visualized detection area • Easy parameter and detection area setting on PC software
Selection of detection pattern Horizontal detection area It creates a fan like semicircular area. Suitable for open area and field zone protection with cameras. Installation height of detector recommended at 28 inch (70cm). If there is a possibility that people can crawl under the area, set the unit at an angle or use multiple units or consider a back-up detector. Vertical detection area It creates an invisible wall. Suitable for inside / outside of perimeter fence / wall or immediate perimeter of building to control PTZ preset. The minimum interruption time is 100msec. So, need to install unit where people can not run through the detection area otherwise install the unit at an angle. (0 to 45 degree)
Site survey and hints to planning the location of detector What does the system protect? Perimeter line, just around the building, between building and perimeter? Select the detection pattern, vertical or horizontal detection patterns. How big is the site? Calculate the detection distance required, both in length and width. Then, consider how many Laser Scan detectors are required. Are there any potentials of False alarms/Miss alarm? Are there any bushes, trees, vehicles or any objects to obstruct the beam path? Laser beam can not detect beyond the obstructions. Unnecessary areas can be masked. But, as much as possible, the detection area should be set not to see any unnecessary area. Confirm the detection area can be covered by camera Miss alignment of detection area and camera view means that the operator can not see the crucial image on the screen. The detection area should be within camera view. Location of Laser Scan Detector The detection area is approx. 100 ft. (30m ) radius, 190 degree and the thickness of beam is approx. 8 inch (20cm) at 100 ft. (30m) distance. When mounted with a vertical detection pattern, the unit should be installed at a position for the beam to hit the ground squarely. Planning installation
Power cables · As with any electrical wiring, the longer the wire run, the greater the electrical resistance and therefore voltage drop. Use the recommended wire as the per the instructions. Note, increasing the number of detectors powered by the same wire, results in a voltage drop proportional to the number of units added. · Never run wiring overhead, where accidental damage can occur, while passing underneath. · Avoid exposed wiring, protect by running wiring through conduit. Correct installation
Mounting the unit Detection Area setting Sensitivity setting Offset setting. Installation procedures – Vertical detection pattern
Installation should be conducted strictly in accordance to the Installation Instructions supplied with the unit. 1. Mount the unit · The mounting height should be up to 15m (Approx. 50ft.). Recommended height: 7 - 15m (Approx. 23 – 50 ft.) · Mount the unit on a wall or other solid surface. An unstable installation could cause false alarms. · Direct or strong reflected sunlight on the face of the detector can affect the performance of detection. Do not face to sun, long grasses or water surface to prevent false alarms. Installation hints for Vertical detection pattern
. Detection Area setting Installation hints (1)
. Detection angle setting Installation hints (2)
3. Detection Area setting Installation hints (4)
Advantage for Installation ・Auto mode (Auto learning) By using this mode, the unit can determine the contours of the site and set the detection area automatically. (The detection range is within the area which is set by the range selector dial.) Vertical detection area Manual setting The unit follows uneven ground and produce uniform detection coverage. Note: Detector mounting is critical to achieve maximum detection performance. Ground
Advantage for Installation Early detection for fence lines!! REDSCAN can detect a person: Lifting, Climbing or Cutting fences Normally it’s difficult to create detection areas outside of fence lines, however REDSCAN can do that.
REDSCAN Ex. Active photo beam 60m 60m Advantage for Installation The REDSCAN automatically detects and learns the contours of the ground wherever you install!!, even for uneven ground. REDSCAN saves time for design & installation and therefore costs.
Auto Refresh area learning Advantage for Installation REDSCAN can refresh the ground shape automatically every hour for changes in snow or vegetation growth. REDSCAN automatically adjusts for environmental changes. (When the Auto mode switch P2 selected. If P1 position selected, detection area is fixed.)
Advantage for Installation REDSCAN can make an invisible wall, it will provide the optimum solution for building surface protection!! It is not necessary to install several sensors on a building surface. REDSCANbrings a new installation design concept to the market.
B2 B1 A1 A2 Advantage for Installation REDSCAN can be installed at an angle to a wall, reducing installing cost dramatically!! It is not necessity to install sensors with fence line for perimeter security. REDSCAN willbring a new installation design to save time and cost.
Advantage for Installation Perimeter surveillance for Narrow boundary!! REDSCAN can installed in a narrow boundary zone.
Recommended Installation [ Human running ] No risk to run through at high speed Risk to run through at very high speed
Recommended Installation [ Human running ] 0 degree angle Min. 33sec at 100m can be detected Possible to run at this speed RISK of Running Through Video 20 degree angle : Min. 15sec at 100m speed can be detected Impossible to run at this speed * Sensitivity setting : H, Width of Human : 30cm, Human height : 170cm
Recommended Installation RLS-3060 CAN DETECT detect target 35cm height in the following case 0 degree angle • 0 ( zero ) degree angle vertical installation DETECTION 35cm height
Recommended Installation RLS-3060 will NOT detect target 30cm height in the following case 0 degree angle • 0 ( zero ) degree angle vertical installation NO DETECTION 30cm height
Recommended Installation RLS-3060 CAN DETECT target 30cm height in the following case 30 degree angle • Over 30 ( zero ) degree angle vertical installation DETECTION !! 30cm height
Recommended Installation No Angle Vertical Mount But no chance to crawl Right surface on the wall or fence OK Detection NG No Detection 0 degree angle vertical mount Crawling may happen
Recommended Installation Mounting Height (m) Maximum detection distance (m)
Offset Recommended Installation [ Water’s edge] • Installation on Water’s edge • Angle installation with Vertical mode Video Water reflection may cause false alarm
Mounting the unit Wiring Detection Area setting Masking far area Installation procedures - Horizontal Detection Pattern
Installation should be conducted strictly in accordance to the Installation Instructions supplied with the unit. 1. Mount the unit · The mounting height should be around 28 inch. (70cm) in order for the beam to hit waist / hip of people. · Mount the unit on a wall or a solid surface. An unstable installation could be a cause of false alarms. · If there are obstacles in the laser path, it can not detect beyond the obstacles. · Direct or strong reflected sunlight on the face of the detector can affect the performance of detection. Do not face to sun, grasses, water surface to avoid affection. · Do not install the Redscan unit sideways. Installation hints for horizontal detection pattern
. Detection Area setting Installation hints (1)
. Detection Area setting Installation hints (2)
Advantages for Installation Auto mode (Auto learning) By using this mode, the unit can check the shape of the site and set the detection area automatically. (The detection range is within the area which is set by the range selector dial.) Horizontal detection area