Using HTML Tables
Using HTML Tables. Defining a Table Structure. The first step to creating a table is to specify the table structure: the number of rows and columns the location of column headings the placement of a table caption

Using HTML Tables
E N D
Presentation Transcript
Defining a Table Structure • The first step to creating a table is to specify the table structure: • the number of rows and columns • the location of column headings • the placement of a table caption • Once the table structure is in place, you can start entering data into the table.
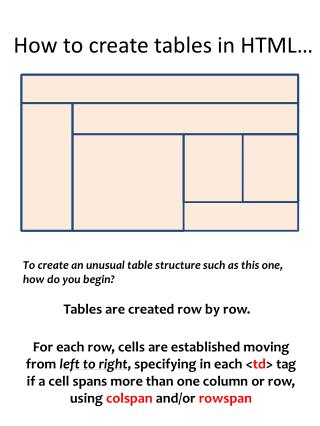
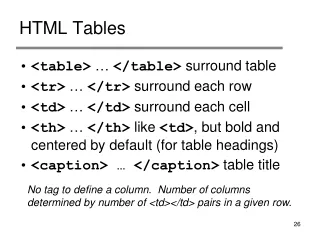
Using the <table>, <tr>, and <td> Tags • Graphical tables are enclosed within a two-sided <table> tag that identifies the start and ending of the table structure. • Each row of the table is indicated using a two-sided <tr> (for table row). • Within each table row, a two-sided <td> (for table data) tag indicates the presence of individual table cells.
two rows The General Table Syntax <table> <tr> <td> First Cell </td> <td> Second Cell </td> </tr> <tr> <td> Third Cell </td> <td> Fourth Cell </td> </tr> </table> two columns
Columns within a Table • HTML does not provide a tag for table columns. • In the original HTML specifications, the number of columns is determined by how many cells are inserted within each row. • for example, if you have four <td> tags in each table row, that table has four columns • Later versions of HTML provide increased support for controlling the appearance of table columns.
beginning of the table structure table cells first row of six in the table end of the table structure HTML Structure of a Table You do not need to indent the <td> tags or place them on separate lines, but you may find it easier to interpret your code if you do so. After the table structure is in place, you’re ready to add the text for each cell.
Creating Headings with the <th> Tag • HTML provides the <th> tag for table headings. • Text formatted with the <th> tag is centered within the cell and displayed in a boldface font. • The <th> tag is most often used for column headings, but you can use it for any cell that you want to contain centered boldfaced text.
table headings Adding Table Headings to the Table Text in cells formatted with the <th> tag is bold and centered above each table column.
Creating a Table Caption • HTML allows you to specify a caption for a table. • The syntax for creating a caption is: <caption align=“alignment”>caption text</caption> • alignmentindicates the caption placement • a value of “bottom” centers the caption below the table • a value of “top” or “center” centers the caption above the table • a value of “left” or “right” place the caption above the table to the left or right
Table Captions • Only Internet Explorer supports all caption values. • Netscape supports only the “top” and “bottom” values. • The <caption> tag works only with tables, the tag must be placed within the table structure. • Captions are shown as normal text without special formatting. • Captions can be formatted by embedding the caption text within other HTML tags. • for example, place the caption text within a pair of <b> and <i> tags causes the caption to display as bold and italic
caption text caption will be centered above the table Result of a Table Caption
Modifying the Appearance of a Table • You can modify the appearance of a table by adding: • gridlines • borders • background color • HTML also provides tags and attributes to control the placement and size of a table.
Adding a Table Border • By default, browsers display tables without table borders. • A table border can be added using the border attribute to the <table> tag. • The syntax for creating a table border is: <table border=“value”> • value is the width of the border in pixels • The size attribute is optional; if you don’t specify a size, the browser creates a table border 1 pixel wide.
Tables with Different Borders Values This figure shows the effect on a table’s border when the border size is varied.
Adding a 5-Pixel Border to a Table Only the outside border is affected by the border attribute; the internal gridlines are not affected.
Controlling Cell Spacing • The cellspacing attribute controls the amount of space inserted between table cells. • The syntax for specifying the cell space is: <table cellspacing=“value”> • value is the width of the interior borders in pixels • the default cell spacing is 2 pixels • Cell spacing refers to the space between the cells.
Defining Cell Padding • To control the space between the table text and the cell borders, add the cellpadding attribute to the table tag. • The syntax for this attribute is: <table cellpadding=“value”> • value is the distance from the table text to the cell border, as measured in pixels • the default cell padding value is 1 pixel • Cell padding refers to the space within the cells.
Tables with Different Cell Spacing Values different cell spacing values different cell padding values
Table Frames and Rules • Two additional table attributes introduced in HTML 4.0 are the frames and rules attributes. • With the frame and rule attributes you can control how borders and gridlines are applied to the table. • The frames attribute allows you to determine which sides of the table will have borders. • The frame attribute syntax is: <table frame=“type”> • type is either “box” (the default), “above”, “below”, “hsides”, “vsides”, “lhs”, “rhs”, or “void”
Effect of Different Frame Values This figure shows the effect of each of the frame values on the table grid.
Creating Frames and Rules Continued • The rules attribute lets you control how the table gridlines are drawn (not supported by Netscape) • The syntax of the rules attribute is: <table rules=“type”> • type is either “all”, “rows”, “cols”, or “none” the effect of each of the rules attribute values on a table
Working with Table and Cell Size • The size of a table is determined by text it contains in its cells. • By default, HTML places text on a single line. • As you add text in a cell, the width of the column and table expands to the edge of the page. • once the page edge is reached, the browser reduces the size of the remaining columns to keep the text to a single line • You can insert line break, paragraph, or other tags within a cell. • When the browser can no longer increase or decrease the size of the column and table it wraps the text to a second line. • As more text is added, the height of the table expands to accommodate the additional text. • But, you can manually define the size of the table and its cells.
Defining the Table Size • The syntax for specifying the table size is: <table width=“size” height=“size”> • size is the width and height of the table as measured in pixels or as a percentage of the display area • To create a table whose height is equal to the entire height of the display area, enter the attribute height=“100%”. • If you specify an absolute size for a table in pixels, its size remains constant, regardless of the browser or monitor settings used. • Remember that some monitors display Web pages at a resolution of 640 by 480 pixels.
Defining Cell and Column Sizes • To set the width of an individual cell, add the width attribute to either the <td> or <th> tags. • The syntax is: width=“value” • value can be expressed in pixels or as a percentage of the table width • width value of 30% displays a cell that is 30% of the total width of table. • The height attribute can also be used in the <td> or <th> tags to set the height of individual cells. • The height attribute is expressed either in pixels or as a percentage of the height of the table. • If you include more text than can be displayed within that height value you specify, the cell expands to display the additional text.
Defining Cell and Column Sizes • Specifying a width for an individual cell does not guarantee that the cell will be that width when displayed in the browser. • the reason for this is that the cell is part of a column containing other cells. • Set the width of all the cells in the column to the same value to ensure that the cells do not change in size.
Aligning a Table on the Web Page • By default, a browser places a table on the left margin of a Web page, with surrounding text placed above and below the table. • To align a table with the surrounding text, use the align attribute as follows: align=“alignment” • alignment equals “left”, “right”, or “center” • left or right alignment places the table on the margin of the Web page and wraps surrounding text to the side • center alignment places the table in the horizontal center of the page, but does not allow text to wrap around it • The align attribute is similar to the align attribute used with the <img> tag.
Aligning the Contents of a Table • By default, cell text is placed in the middle of the cell, aligned with the cell’s left edge. • By using the align and valign attributes, you can specify the text’s horizontal and vertical placement. • To align the text for a single column, you must apply the align attribute to every cell in that column.
Spanning Rows and Columns • To merge several cells into one, you need to create a spanning cell. • A spanning cell is a cell that occupies more than one row or column in a table. • Spanning cells are created by inserting the rowspan and colspan attribute in a <td> or <th> tag. • The syntax for these attributes is: rowspan=“value” colspan=“value” • value is the number of rows or columns that the cell spans in the table
This cell spans two columns and two rows this cell spans three columns Example of Spanning Cells This cell spans three rows
four table cells in the first row only three table cells are required for the second and third rows HTML code resulting table A Table Structure with a Row-Spanning Cell
Applying a Background Color • Table elements support the bgcolor attribute. • To specify a background color for all of the cells in a table, all of the cells in a row, or for individual cells, by adding the bgcolor attribute to either the <table>, <tr>, <td>, or <th> tags as follows: <table bgcolor=“color”> <tr bgcolor=“color”> <td bgcolor=“color”> <th bgcolor=“color”> • color is either a color name or hexadecimal color value
The bordercolor Attribute • By default, table borders are displayed in two shades of gray that create a three-dimensional effect. • The syntax for the bordercolor attribute is: <table bordercolor=“color”> • color is an HTML color name or hexadecimal color value • Internet Explorer and Netscape apply this attribute differently. <table border=“10” bordercolor=“blue”> Internet Explorer Netscape
Applying a Table Background • Add a background image to your tables using the background attribute. • A background can be applied to the entire table or to a cell. parch.jpg <table background=“parch.jpg”> <td background=“parch.jpg”>
Designing a Page Layout with Tables • HTML tables are most often used to define the layout of an entire Web page. • If you want to design a page that displays text in newspaper style columns, or separates the page into distinct sections, you’ll find tables an essential and useful tool.
620 pixels 1) newspaper logo 120 pixels 500 pixels 2) list of links 3) articles 4) address and phone number Table Layout of a Web Page a sample table layout of a Web page.
Using Nested Table • Tables can be created within another table making the Web page easier to manage. a sketch of a web page using nested tables
The Result of the Web Page using Nested Tables a sample web page using nested tables
Sample Template based on Class Web Page http://maya.cs.depaul.edu/~classes/it130/html/index-template.html HTML code