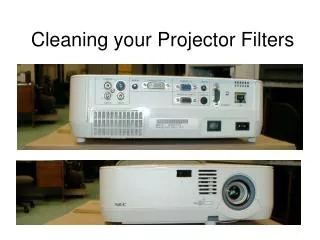

Cleaning your Projector Filters
E N D
Presentation Transcript
There are two main types of projectors in use in the Burke County School System. Mitsubishi projectors such as the XD-206U are commonly used in Patton High School; other schools often use the NEC 400 series such as the NP410 model. Only the NEC projectors have cleanable air filters; the Mitsubishi projectors do not have filters. NO FILTERS HAS FILTERS MITSUBISHI NEC
This Mitsubishi projector has no filters. It generally has to be dismounted for cleaning and is not considered to be teacher- serviceable. Refer requests to your engineer or media coordinator who will relay them to us.
This NEC model NP410 has filters that you can and should clean at regular Intervals. They are located at the side and back of the projector.
Cleaning the filters • To clean the filters, you will need: • The projector should be powered off and allowed to cool at least 10 minutes or to room temperature • A ladder or some safe means to get to the projector • Canned air or equivalent (Compressed air can be used if available and if it can be controlled to prevent too much pressure from damaging the foam rubber filter inserts)
Side view of projector with filter assembly lying on top. Filter is cleaned by removing foam insert and blowing canned air or equivalent through the foam from the inside to the outside. The foam insert is then replaced back into the holder and snapped back onto the projector.
Back view of projector with filter assembly lying on top. This filter is cleaned like the side filter by removing the screen insert and blowing canned air or equivalent through the insert from its inside surface and then replacing it in the filter assembly. The filter assembly is then snapped back onto the projector.
After cleaning the filters, the filter hours count needs to be reset. Power on the projector and press the menu button on the remote.
Press the right arrow button on the remote until you highlight the Reset function; then press the down arrow button until you highlight Clear Filter Hours.
After resetting the filter hours, check them by highlighting the Info Tab on the menu display. It should read “0”; this example reads 119 hours as it has not been reset. NEVER RESET LAMP HOURS UNLESS THE LAMP IS REPLACED!!!!!!!! Allowing the lamp to run past its rated lifetime can cause damage to the projector and possible shattered glass along with the release of mercury into the classroom.