Download
1 / 5
50 likes | 72 Vues
Here’s the solution of Customize receipt in QuickBooks Point of sale. If you need manually help while you are working on QuickBooks you can contact to our Quickbooks Proadvisor at 1800-935-0532. We are PosTechie, provide QuickBooks Point-of-sale Support 24/7.

E N D
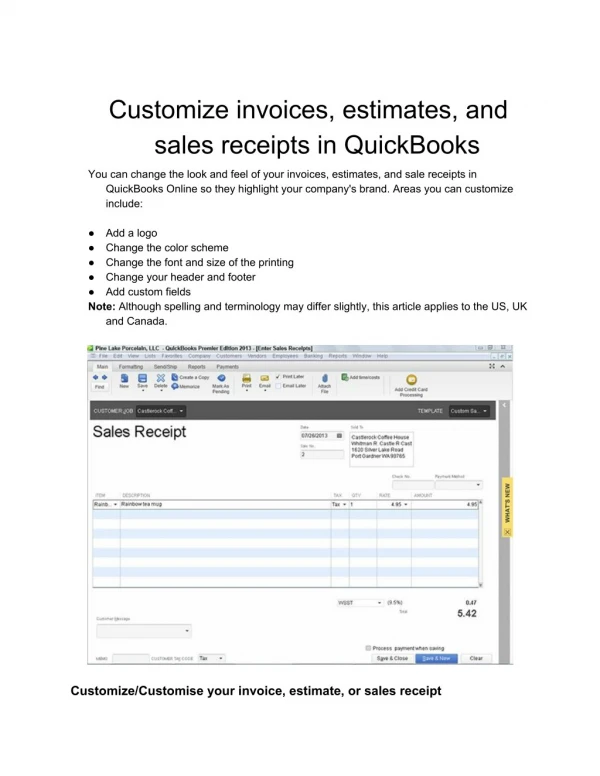
Customize invoices, estimates, and sales receipts in QuickBooks You can change the look and feel of your invoices, estimates, and sale receipts in QuickBooks Online so they highlight your company's brand. Areas you can customize include: ● Add a logo ● Change the color scheme ● Change the font and size of the printing ● Change your header and footer ● Add custom fields Note: Although spelling and terminology may differ slightly, this article applies to the US, UK and Canada. Customize/Customise your invoice, estimate, or sales receipt
Note: QuickBooks Online does not allow you to move or rearrange the fields on the invoice and other forms. 1. Select the Gear icon at the top, then choose Custom Form Styles. 2. From the New style drop-down menu, select the type of transaction you'd like to customize/customise (Invoice, Estimate, or Sales receipt). You can also edit the standard/master form which will apply the changes to all basic sales forms. It will not change any custom form styles you have already created. Note: Statements, purchase orders and packing slips have limited customization and can only be changed by customizing the standard/master form. 3. The Custom Form Styles page is broken down into 4 sections to help edit the form to your liking: Design Content Emails Payments Add a logo, change the font style and size, add colours, and apply pre-desig ned templates. This tab is broken down in to 3 sections. Select each section from the form preview to make changes. Header: Enter your company address and other basic info here. You can add up to 3 custom fields. Learn how to add an editable Invoice no. field to your forms. Table/Middle: Edit sale details like items sold, price, and tax collected. You can add or remove columns, extend their width, and change their labels. If you want to include a description of your sales item, you can either add it as part of your Product/Service or as a separate column by selecting Description. You cannot have both descriptions selected. Footer: Add customized/customised messages for your customers or include payment instructions (e.g. Enter a default message that you can send with your invoice, estimate, or sales receipts. Edit the greeting, and set up email reminders here. Changing the default message on one template updates it on all templates. Have a Payments account? To see how your e-invoices appear to customers when they pay online, select Bank transfer and/or Credit card. Note that these are not preferences and are simply demos of what your customers see when paying online. You can change your customer's online payment options right on their invoices.
"Send funds via e-money transfer"). 4. Once you've completed customizing/customising the form, select Preview PDF or Done. We recommend you print the form as a test to ensure you're satisfied with the printed version. 5. Note: The custom form styles center shows a default image template that doesn't always match the PDF file. 6. The new customized/customised form will now be listed on the Custom Form Styles page. Apply a default custom template Now that you've created a custom template, you can apply it to a new sales form (we call this a Transaction Form in QuickBooks Online) when you're creating it. 1. Select the Gear icon at the top, then choose Custom Form Styles. 2. Select the Edit drop-down next to a custom template, then choose Make default to automatically apply a customized/customised form as the default for all newly created invoices, estimates or sales forms. Note: If you want to select a custom template that's different from your default template, you can do this when you create a new invoice, estimate, or sales receipt by selecting Customize and selecting the template you want to apply. We recommend previewing the invoice before printing or sending to your customer. Understanding Sales Receipts in QuickBooks and When to Use Them How do you let your customers know how much they owe you and for what products or services? In these days of ecommerce and merchant accounts, your customers may provide payment with a credit card number over the phone or via a website. Or perhaps you send invoices after a sale and receive checks or account numbers in the mail. You probably already know that QuickBooks can help you both create invoices and record payments. But did you know there’s another type of sales document that you can use in certain situations: the sales receipt. You’d probably be most likely to use a sales receipt when customers pay you in full for products or services at the same time they receive them. Completing a sales receipt is similar to filling out an invoice or purchase order. However, when you create a sales receipt in QuickBooks, you are recording the payment at the same time.
To create a sales receipt, click Create Sales Receipts on QuickBooks home page or open the Customers menu and select Enter Sales Receipts. A screen like the one below will open. Choose a Customer from the drop-down list and a Class (if applicable). If you have created more than one sales receipt template (more on that later), make sure that the correct one appears in the Template field. Verify that the appropriate Date and Sale No. read as they should. Click on the type of payment you’re receiving, and enter the check or credit card number where necessary (a small window will open for the latter). Note: If you are working with a type of payment that does not appear in the four icons, click on the arrow below More to add it. Now you’re ready to select the products or services you sold by clicking on the arrow in the field under Item to open the available list (if you have not created a record for what you’re selling, select <Add New> and complete the fields in the New Item window that opens). Enter the quantity (Qty.). The Rate, Amount, and Tax fields should fill in automatically, based on the information you entered when you create the item’s record. When you’ve entered all of the items that the customer is paying you for, you can choose which Customer Message will appear on the sales receipt (use the drop-down list found next to the Customer Message field to see your options). Anything you enter in the Memo field will be for your internal use only; it will not appear on the printed or emailed sales receipt. Click Save & Close or Save & New. Customizing Sales Receipts QuickBooks forms contain the fields most often used by small businesses. But you can alter them in numerous ways to meet your company’s needs. To customize a sales receipt, open the Sales Receipt window and click on the Formatting tab at the top of the window. Select Manage Templates. You’ll want to make a copy of the original sales receipt so that the original will always be available. Click the Copy button in the lower left. “Copy of Custom Sales Receipt” appears in the list of templates. In the Preview pane on the right, click in the field next to Template Name and replace the existing name with a new, more descriptive one if you’d like. Click OK. The Basic Customization window opens. Click on Additional Customization at the bottom of the window. The Additional Customization window will open as seen in the image below. Here you can customize information that will appear in the Header, Columns, and Footer of your sales receipt as well as certain Print options.
To customize what will appear in the body of the sales receipt, click the Columns tab. The list on the left displays all of the columns that can be included in the body of your sales receipt. Click in the boxes below Screen and Print to indicate which columns should display on your QuickBooks screen and which should appear on the customer’s copy. The numbers in the Order column can be changed to reflect which column will come first, second, etc. Numerous Options There’s a lot more you can do to customize your QuickBooks. And there are other situations where you might want to issue a sales receipt. We’ve only been able to touch on both topics here, but would be happy to schedule time with you to explore these elements of QuickBooks. Here’s the solution of Customize receipt in QuickBooks Point of sale. If you need manually help while you are working on QuickBooks you can contact to our Quickbooks Proadvisor at +1800-935-0532. We are PosTechie, provide QuickBooks Point-of-sale Support 24/7.


![QuickBooks Point of Sale Errors and Troubleshooting [Quick Steps]](https://cdn4.slideserve.com/8055827/simple-steps-to-fix-the-common-quickbooks-point-dt.jpg)