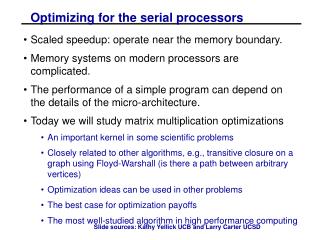
Optimizing Audio for the The Musical Videoconference
Optimizing Audio for the The Musical Videoconference Brian K. Shepard Chair, Department of Music Technology University of Oklahoma School of Music The Three Secrets of Audio Success Location Location Location of musician(s) inside the room

Optimizing Audio for the The Musical Videoconference
E N D
Presentation Transcript
Optimizing Audiofor theThe Musical Videoconference Brian K. Shepard Chair, Department of Music Technology University of Oklahoma School of Music
The Three Secrets ofAudio Success • Location • Location • Location of musician(s) inside the room of proper microphones in relation to the musician(s) of microphones in relation to the loudspeakers
Microphone Types • Dynamic - rugged, warm sounding, requires higher sound levels, good echo rejection • Ribbon - rather fragile, warm sounding, works with fairly low sound levels, moderate echo rejection • Condenser - fairly sturdy, bright and crisp sounding (accurate), will work with extremely low sound levels, poor echo rejection
Omnidirectional Microphone Diaphragm The Omnidirectional Microphone hears in a 360º sphere around the diaphragm.
Figure-8 Microphone The “Figure-8” or Bidirectional Microphone hears in front of and behind the diaphragm.
Cardioid Microphone The Cardioid Pattern Microphone hears predominantly in front of the diaphragm
Supercardioid Microphone The Supercardioid Pattern Microphone hears mostly in front of the diaphragm, a little less to the side, and a small pickup area to the rear.
Hypercardioid Microphone The Hypercardioid Pattern Microphone hears mostly in front of the diaphragm, with very little side pickup and a slightly larger pickup pattern to the rear.
Boundary Microphone The Boundary Microphone is placed on a flat surface. Thus, it hears above and beside the diaphragm in a half-spherical pattern.
Physical Echo Rejection Speakers positioned behind, or off-axis to the Microphones Dynamic, Cardioid Pattern Microphones placed close to the performer Non-Reflective or Diffusive Surface behind the Performer
ElectronicGadgets Only after completing all the Physical Echo Rejection Techniques
Using Compression to “Duck”Local Speaker Levels • Helps reduce the echo at your (local) end • Insert a “Sidechain” Compressor on Speaker Channels • Set Sidechain “Key” input to the signal from the local microphone(s)
Using Compression to “Duck”Local Speaker Levels • Threshold: Set so the local person’s level is above the threshold, while the remote level is below. • Ratio: Try between 10:1 and 15:1 • Attack: Try between 100 to 250 ms • Release: Try between 500 to 1000 ms • Makeup Gain: Set at 0 dB
Compressor Tips • If speakers are constantly “ducked,” raise the threshold. Set the threshold so that when you are speaking or playing, the speakers are “ducked,” but when the remote end is speaking or playing, the speakers are at full level. • Increase the ratio to make the speakers drop lower in level when you speak or play. If they drop too much, lower the ratio. • The attack time should be just shorter than the round trip echo time (generally between 100-250 ms). • Too short of a release time can cause the compressor to “pump.” Keep the release time in the 500-1000 ms range.
Using Gates or Expanders to Silence Microphones • Helps reduce the echo at the remote end • Insert a Gate or Expander on each Microphone Channel • Gates turn off the channel when the input level drops, while Expanders turn down the channel. Thus, Expanders are usually more graceful than Gates.
Using Gates or Expanders to Silence Microphones • Threshold: Set so that the local person’s softest level is above the threshold. • Ratio (Expander): Set below 1:1, Try 0.5:1 • Attack: Try between 1 to 10 ms • Release: Try around 200 ms • Makeup Gain (Expander): Set at 0 dB
Gate and Expander Tips • If the audio from the remote end opens the gate or the expander, raise the threshold. Set the threshold so that the gate or expander opens when you talk or play, but remains closed when the remote person talks or plays. • Set the attack time as fast as possible so that the beginnings of your sounds do not get clipped off. • Set the release (or hold and release) time so that your sounds can taper off naturally before the gate or expander closes (usually 200 ms or so). • If your gate has a “range” value, experiment with settings near the midpoint. This will cause the gate to act more like an expander by dropping the audio level rather than cutting it completely.
General Tips for Best Results • Do physical Echo Rejection first! • Remember, do physical Echo Rejection first! • Do a little compression and gating at each end rather than a lot at just one end. • Did I mention that you should do physical Echo Rejection first?
Mixer and Cabling Tips • Use a mixer that allows Auxiliary Sends to be set to “Pre-Fader,” or has assignable Bus outputs. • Connect your microphones to separate mixer input channels. Assign the microphone channels to either Auxiliary (pre-fader) outputs or to separate Bus outputs, but not to the Master L/R mix. Connect the Auxiliary outputs (or Bus outputs) to the audio inputs of the codec. • Connect your codec’s audio outputs to two additional mixer channel inputs and assign them to the Master L/R mix. • Plug a Gate or Expander into each of the Microphone channels via the “Insert” jack.
Mixer and Cabling Tips • Plug a Compressor into each of your mixer’s Main output channels via the “Master Insert” jack. • Assign your Microphone channels to an additional (separate from the ones connected to the codec) Auxiliary output and connect that output to the Sidechain or “Key” input of the Compressor. • Connect your mixer’s Main outputs to your amplifier and speakers. • If your mixer does not have a “Master Insert” jack, plug the Main output into the Compressor’s input and connect the output of your Compressor to your amplifier and speakers.
For More Information Dr. Brian K. Shepard Chair, Department of Music Technology OU School of Music 500 West Boyd Street, Room 138 Norman, OK 73019 (405) 325-0429 bkshepard@ou.edu music.ou.edu