Download
1 / 1
10 likes | 34 Vues
This is the standard (incandescent) Light Kit for 2009 and newer MTX carriers<br>Have a Look: - https://www.mototote.com/document-library.html<br>

E N D
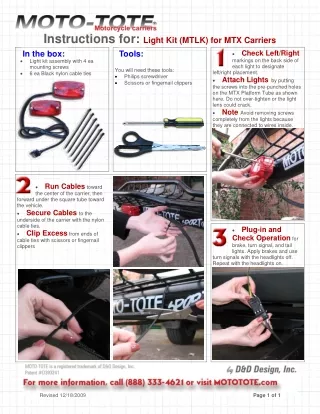
Instructions for: Light Kit (MTLK) for MTX Carriers In the box: Tools: • Check Left/Right markings on the back side of each light to designate left/right placement. • Attach Lights by putting the screws into the pre-punched holes on the MTX Platform Tube as shown here. Do not over-tighten or the light lens could crack. • Note Avoid removing screws completely from the lights because they are connected to wires inside. • Light kit assembly with 4 ea mounting screws 6 ea Black nylon cable ties You will need these tools: • Philips screwdriver • Scissors or fingernail clippers • • Run Cables toward the center of the carrier, then forward under the square tube toward the vehicle. • Secure Cables to the underside of the carrier with the nylon cable ties. • Clip Excess from ends of cable ties with scissors or fingernail clippers • Plug-in and Check Operation for brake, turn signal, and tail lights. Apply brakes and use turn signals with the headlights off. Repeat with the headlights on. Revised 12/18/2009 Page 1 of 1