Pairing RFID Reader in Windows via Bluetooth
40 likes | 62 Vues
RFID4U - TagMatiks Asset Tracking Lite | This article explains how to connect the rfid reader in windows through bluetooth device setting by enabling Bluetooth connection in PC.tRFID4U - TagMatiks Asset Tracking Lite | This article explains how to connect the rfid reader in windows through bluetooth device setting by enabling Bluetooth connection in PC.

Pairing RFID Reader in Windows via Bluetooth
E N D
Presentation Transcript
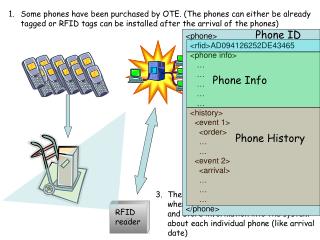
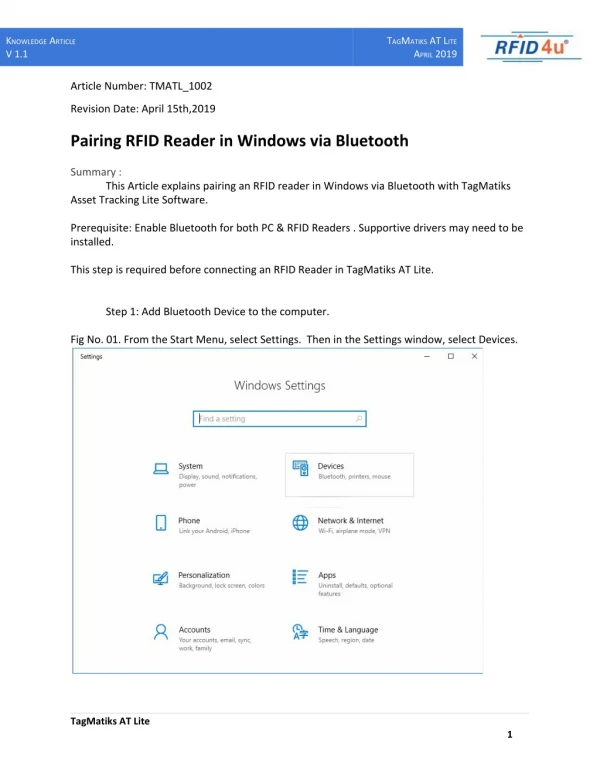
KNOWLEDGE ARTICLE V 1.1 TAGMATIKS AT LITE APRIL 2019 Article Number: TMATL_1002 Revision Date: April 15th,2019 Pairing RFID Reader in Windows via Bluetooth Summary : Asset Tracking Lite Software. Prerequisite: Enable Bluetooth for both PC & RFID Readers . Supportive drivers may need to be installed. This step is required before connecting an RFID Reader in TagMatiks AT Lite. Step 1: Add Bluetooth Device to the computer. Fig No. 01. From the Start Menu, select Settings. Then in the Settings window, select Devices. This Article explains pairing an RFID reader in Windows via Bluetooth with TagMatiks TagMatiks AT Lite 1
KNOWLEDGE ARTICLE V 1.1 TAGMATIKS AT LITE APRIL 2019 From the Devices window, select Bluetooth & other device submenus. Then click on the Add Bluetooth or other device option, as shown in Figure 02. Make sure that Bluetooth is turned ON. Fig No 02. Bluetooth & Other devices Another window will open to add a device. Select Bluetooth from this window. Then all the Bluetooth devices in range will be displayed, similar to Figure 03. Be sure that the RFID reader is turned ON. Fig No 03. Add a Device TagMatiks AT Lite 2
KNOWLEDGE ARTICLE V 1.1 TAGMATIKS AT LITE APRIL 2019 Select your reader on this list. Allow time for the connection and pairing process to complete. When finished, your reader has been paired to the computer and is ready to be used by TagMatiks Asset Tracking Lite. This is typically a one time process, unless you need to repair the Bluetooth device. Fig No 04. Successfully Paired TagMatiks AT Lite 3
KNOWLEDGE ARTICLE V 1.1 TAGMATIKS AT LITE APRIL 2019 Step 2: Determine the Outgoing COM Port for the reader. TagMatiks Asset Tracking Lite needs to know which Outgoing COM Port is used to communicate with the paired reader. This can be found in the Bluetooth Settings. From the Start Menu, select Settings. In the Settings window, select Devices. In Devices window, select Bluetooth & other device submenus. Then find the option called “More Bluetooth Options” as seen in Fig 05 and click on Bluetooth Settings option. Within the Bluetooth Settings window, select the COM Ports tab. Determine the COM port number that matches the paired reader and Outgoing Port direction, as shown in Fig 05. Fig No 05. Bluetooth Settings Remember this COM port number for the following steps! This COM port number should not change for this reader and it can be recorded for future use. At this point, the Settings window can be closed. TagMatiks AT Lite 4