Download
1 / 21

E N D
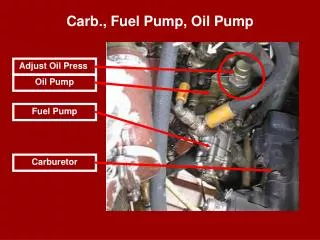
This presentation deals with the rebuild of any of the one or two cylinder oil pumps that were fitted to all Yamaha bikes from 1963 up to the early 1980’s. There was virtually no difference in any of the pumps over the years. The main difference was variations of the pump body and the positioning of the outlets. All flow rates are controlled from within the pump and are non-adjustable. The only pump adjustments that are possible is the pump pulley setting (done by adjusting the pump cable) and also the pump stroke at idle (performed by adjusting the shims under the pump pulley). The pump used in this rebuild is from a 1965 YDS3C Bigbear • First job is to remove the oil pump cover held in place by the 3 No 3 Phillips screws on the clutch cover. • Next, get a suitable container underneath where the pump is as oil always spills out of the pump when removed from the casing. Disconnect and plug the oil supply line from the tank with a 6mm bolt or screw pushed into the pipe. • Remove the 8mm headed bolt that holds the oil line to the left cylinder. Note that there is a spring and a small ball bearing under each of the 2 oil line banjo bolts. I sometime find it easier disconnecting the lines from the bottom of the cylinder barrels as the lines get very brittle with age and are easy to break, it also makes it much easier getting the right hand oil pipe off. • Next, remove the 2 screws that attach the pump to the casing, they are No2 Phillips headed ones. • Gently prise the pump from the casing and slide it out far enough to enable you to remove the back oil line retaining banjo bolt, remember the spring and ball bearing. I screw the banjos bolts back in with the springs so not too lose the ball bearing and springs. • Last job is to remove the pump cable and we’re ready to strip the pump.
The pump I am stripping came off a bike that had only done 3,500 miles and was leaking oil from the seal under the white plastic pulley wheel indicating that the seal had failed. Below are 2 pictures of the removed pump.
First job is to remove the 2 banjo bolts, the 2 springs and the 2 ball bearings. Also remove the pump bleed screw located at the top of the pump in the picture. The balls can be reluctant to come out, so a sharp tap against something can usually loosen them. I also turn the white pump wheel as though you were priming the oil lines, this puts pressure on the ball and releases it, you will see air bubbles being forced past the sticky ball valve. On removing this pump, there was found to be some black sludge in the bottom of the it and also one of the balls of the non return valves was very reluctant to come out of the left hand line side. The engine had shown signs of piston seizure in the past on the left side so this could be a possible cause.
Next step is to remove the 9mm nut that holds the pulley shaft on. Note the wave washer underneath the nut. Remove the adjusting plate (as it is called in the manual) and carefully remove the shims sitting on top of the pulley. Keep these safely together. Gently pull the knock pin holding the pump pulley out with pliers, try not to damage it too much when removing it. The pump pulley will now pull off the top of the shaft followed by the spring.
Next remove the 4 4mm screws holding on the pump case cover. After removing these, remove the split pin holding the white plastic priming gear and remove the gear.
To split the end plate from the pump body, tap the end of the shaft where the white plastic gear sits, the pump should split quite easily. Push the shaft right through the body to split the pump completely. Keep all the parts on the shaft together.
Next is to remove the distributor assembly shaft from the end plate by pushing the shaft through the end casing. Be careful not to disturb the large gear on the shaft as there are 2 very small plungers under the gear.
If the gear does come off the shaft, be sure to catch the small plungers. Replacements are hard to get unless you have a second-hand pump! First remove the return spring and also the seating washer. Next pull the inner pump shaft out of the main shaft and remove the large shim. Note the orientation of the freewheel slots for the plungers, the gear can go on either way! Only do this if the plungers have sprung out, there is no need to strip this if they are still in. Put one of the plungers back in and replace the gear wheel in the correct way! Next, gently lift the other side and put the other plunger in and catch with the gear. Now is the time to remove the small seal in the main pump shaft. Gently prise it out.
The new seal goes back in the same way, gently tap it in to seat it, the scraper lip goes in facing downwards. Apply a small drop of oil to lubricate the seal and then push the inner shaft into the main shaft and seat the stop pin. This assembly is complete. It is now time to replace the other 2 seals.
Gently prise the seal out of the end plate and also the main pump body. Note the orientation of the lip of the seals, the lip of the seal in the end plate faces outwards. The main pump body seal lip faces into the pump body. Now is the time to clean the gasket faces and lush out the pump body. Note the slot in the end of the end casing, this is where the inner pump shaft pin locates into.
Place the washer and spring over the inner pump shaft and then slide the whole assembly into the pump end plate. Make sure that the inner shaft pin locates in the slot in the pump end plate.
Place a new pump face gasket on the face on the end plate and offer up the pump body. Push the assembly into the pump body and join the two halves together with the 4 screws. The screws on this pump are old JIS thread and are near impossible to get hold of replacements. Replace the white plastic priming gear and push the split pin back through and flatten the ends. Test the pump for correct operation by rotating the white plastic gear in a clockwise direction. You should notice the inner pump shaft moving in and out. If this is not the case, the inner pump pin will probably not be located in its cutout seat.
Next locate the spring in its seat and place the pump pulley onto the spring and locate the other end of the spring in its seat. Locate the pump pulley on the body of the pump and turn anti clockwise against the spring pressure until the hole for the knock pin lines up. Press the knock pin in and seat the pump pulley against the pin. Place a spot of 2 stroke oil to lubricate the pulley shaft.
Replace the shims that were removed, then the pump adjusting plate, the wave washer and then the 9mm nut. Slacken the 4 screws to centralise the whole assembly, turn the plastic wheel a few times to rotate the pump inner assembly and re-tighten the screws. Make sure the pump goes over the complete stroke by pulling the pump pulley back against the spring and rotating the plastic priming wheel. Pour some 2 stroke oil into the pump via the drive shaft hole and turn the priming wheel. You should see small air bubbles being blown down either of the oil exit holes where the banjo bolts go, this proves that the pump is working.
The last job to do is to make sure the idle stroke of the pump is the correct length. This is measured between the pump pulley and the adjusting plate. Note there is a slightly raised portion on the pump pulley where the measurement is taken. The pump is rotated until the gap between the 2 surfaces is at its greatest. The gap should be 0.35 mm, this pump was found to be 0.55. To adjust the gap, remove the 9mm nut, spring washer and end plate. Remove or add shims to get the desired clearance. The very small shims are 0.1mm. Most pumps I find are out of stroke, usually greater than they should be.
Last job is to replace the ball bearings in the pump body along with the springs and banjo bolts. Also replace the pump bleed screw as well. Then the pump is ready to mount back onto the engine. Mount the pump back on the clutch casing with the new gasket supplied in the rebuild kit. Refit the 2 supply lines and the pump cable followed by the oil tank supply line. Loosen the bleed screw to let the air out of the pump body and close when no air bubbles flow out of the bleed hole. Push the pulley back against its stop and turn the plastic priming gear until oil flows into the supply lines. Continue until no air bubbles are present. Last thing to do is adjust the pump cable to the settings in the manual.