Building your Home Lab Around Workstation 7
340 likes | 444 Vues
Join Matt Mancini, Phoenix VMUG Leader, for a workshop focused on setting up a home lab with ESX servers and Workstation 7. Discover hardware and software discussions, system setup, and demo walkthroughs. Explore goals, equipment considerations, and installation steps for creating a robust test environment. Learn to configure VMs via iSCSI LUNs and local storage, manage vMotion networks, and optimize performance. Whether you're testing ESX functions or running a home PC, this workshop offers valuable insights for enthusiasts and professionals alike.

Building your Home Lab Around Workstation 7
E N D
Presentation Transcript
Building your Home LabAround Workstation 7 Presented by - Matt Mancini, Phoenix VMUG Leader Assisted by – Luke Gray, Rob Cooley, Charles Braffett, Duke Encinas Sponsored by – MicroAge & IOMega
Agenda Hour 1 Workshop Overview / Goals Hardware discussion Software Installation (Workstation / ESX) 15 Min Break Hour 2 Finalize System Setup and Demo
Assumptions and Pre-Workshop Work • vCenter Server was installed • 500 GB iSCSI LUNS were created • Workstation 7 was installed and configured • ESX4-1 & 3 Servers were pre-installed and configured • Network Settings were adjusted for (Static and DHCP) • Local Host Tables were used for DNS • NUMA was disabled on ESX servers
Goals • Questions and Goals? • What do you want to accomplish by setting up a home lab or work test environment? • Session Responses.. • What are the expectations for uptime and performance? • Session Responses.. • What equipment do I have access to and what would I need to purchase? • Session Responses..
Goals • Questions and Goals – Presenters Responses and Workshop Goals • What do you want to accomplish by setting up a home lab or work test environment? • I wanted to setup a home lab with a couple of ESX servers and shared storage • I wanted to do this so I could testing basic ESX functions and new versions • What are the expectations for uptime and performance? • I’d like the system to perform well as a home PC and a test lab • I’d like to use it to do basic functions and run my lab quickly keeping delays to a minimum • What equipment do I have access to and what do would I need to purchase? • Have - High End PC, Home Network • Purchase - More RAM, Shared Storage, Workstation Software
Goals • I wanted to setup a home lab with a couple of ESX servers and shared storage • Considerations - Space, Time, heat, Noise, Cost vs. Bulky, Really Fast, Noisy, Big Budget • Testing of basic ESX functions and new versions • Do I deploy ESX on white boxes or go with Workstation 7? • High End PC, Home Network • I currently have a high end PC and home network • More RAM, Shared Storage, Workstation Software • I’d need to buy a better CPU, More RAM, WS7, and Shared Storage
Goals • I’d like the system to perform well as a home PC and a test lab • I’d like to use it to do basic functions and run my lab quickly keeping delays to a minimum • Here are my final choices for my home Lab
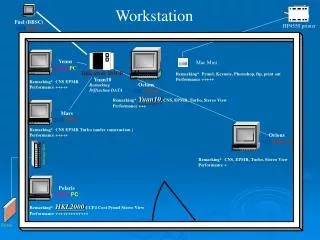
Hardware Layout – Network Layout ESX4 - 1 ESX4 - 2 vCenter Server Management and vMotion Networks (VMNet1 and 2 - Host Only) iSCSI Network (VMNet3 - Bridged) Virtual Machine Network (VMNet8 – NAT) Workstation 7 Layer Windows 7 – 64Bit PC HARDWARE pNIC2 pNIC1
Hardware Layout – VM Locations ESX VM’s on Iomega NAS via iSCSI LUN Workstation 7 VM’s on Local HD vCenter Server Windows Server 1 ESX4 - 1 ESX4 -2
Install VMware Workstation 7 • Download Workstation 7 here.. • http://www.vmware.com/products/workstation/ • Ensure your BIOS Settings are enabled for Intel VT and 64 bit mode • Go to the iomega share and run the workstation install at Admin
Configure VMware Workstation 7 • Launch Workstation 7, 1st Time Choose Yes to the License Agreement • Click on Edit, Choose Virtual Network Editor
Configure VMware Workstation 7 • Setup VMNet1 & 2 for host only, VMNet3 Bridged, & VMNet8 is NAT
Install ESX4-2 Server Note: Screenshots from ESX4-1 Server • In Workstation 7 • - Click on File, New, then Virtual Machine • - Choose Custom and Next • - Choose Next for 6.5 & 7.5 Compatibility • - Choose Installer Disc Image File (.iso), click next • - Choose VMware for guest OS and esx 4.0 for version • - Type in ESX4-2 for Server 2 and click next • - Click Next for default Cores and RAM • - Choose Host-only Networking Click Next • - Click next for Default IO Adapter • - Click next to create a new virtual disk & next to recommend disk type • - Click next for default disk size, Choose the location and click next • - Choose NOT to power on and Click Finish
Install ESX4-2 Server • - Edit the settings of the new VM • - Change the current network adapter to VMnet1, choose Okay • - Power on this VM • - Press Enter to Install in graphical mode • - ALT-N for the welcome, EULA, Keyboard type, Custom driver screens • - Choose Enter Serial Number Later then ALT-N • - ALT-N for default NIC • - Enter Static IP of 192.168.56.12 and ESX4-2 for the hostname • - Choose Standard Setup for ESX on HD or LUN • - ALT-N for default HD, Choose the Phx Time Zone, and Manual NTP • - Set the root password then ALT-N • - Review Settings Press ALT-N to install • - Allow to Finish and reboot
Connect to vCenter Server • - Right Click on the Cluster, Choose Add Host • - Type in the Host Name or IP Address, enter root for the username and its password then click next • - If prompted chose Yes to the pop up Security alert • - Review the Summary and click next if okay • - Choose an appropriate license key, click next • - Choose an appropriate location for this host, click next • - Review the Summary and click Finish if okay • - Your host (and any active VM’s) should now appear in vCenter Server
Configure Network on ESX4-2 Server • - Power down the ESX-VM and edit its settings • - Add the following Network adapters • VMNet2 – vMotion (VMMotion) • VMNet3 – iSCSI (VMiSCSI) • VMNet8 – VM Network (Virtual Machine Network) • - Power on this VM, Allow to boot • - Click on the ESX server, Click on Configuration, • - Click on Properties of vSwitch0, Click on VM Network, Click Remove, choose Yes, and the Close • - In Networking click Add Networking • - Choose Virtual Machine > Next, vmnic3(aka VMNet8) > Next, Leave Label > Next, Click on Finish • TIP – Always check your IP Ranges before assigning Adapters.
Configure Network on ESX4-2 Server • - You should now have two Port Groups • - vMotion NIC - Click on add networking, Choose VMkernel, Choose correct vmnic, Change Network Label to VMMotion, Check Use this port group for Vmotion, set the IP address / subnetmask, Click next then Finish, click No to Default Gateway if asked • - iSCSI NIC - Click on add networking, Choose VMkernel, Choose correct vmnic, Change Network Label to VMiSCSI, set the IP address / subnetmask, Click next then Finish, click No to Default Gateway if asked • - You should now have 4 Port Groups…
Connect to Shared Storage • - Setup an iSCSI LUN (Already done, can take hours to format) • - Click on Security Profile, Properties, ensure ‘Software iSCSI Client’ is checked • - Click on Storage Adapters, iSCSI Software Adapter, Properties, Click on Configure, check enabled, choose okay (Don’t Close) • - Click on Dynamic Discovery Tab, Add, enter the iomega IP address, click okay & close • - Choose Yes to rescan the adapter • - If needed, Click on the correct iSCSI adapter and the LUN should appear • TIP – if this doesn’t work, reboot the ESX Host
Install ESX4-2 Server • - If needed, Click on Storage, Add Storage, Choose Disk/LUN, Click on the EMC iSCSI LUN, Next, Next Again, Enter IOMegaNAS as the datastore name, Change block size t0 512GB, Click Next then Finish • - Click Refresh and you should now see your LUN
vMotion Demo • Now that we have completed our build of Workstation 7 with 2 ESX servers,1 vCenter Server, shared storage, networking, and 1 VM we are now ready to test our vMotion… • - If needed Power on the VM • - Right Click on the VM, choose Migrate • - Choose Change Host, click next • - Choose the destination Host (Wait for Validation), Click next • - Choose Next for Reserve CPU, Review the summary, and click Finish • - Check the status in Recent Tasks