Lesson Nine: Granting Patient List (Proxy) Access
100 likes | 120 Vues
Learn how to grant access to your Patient List to another user for effective task management in a healthcare setting. Set access levels, expiration dates, and more.

Lesson Nine: Granting Patient List (Proxy) Access
E N D
Presentation Transcript
Lesson Nine: Granting Patient List (Proxy) Access In this lesson you will learn how to: Grant Patient List access to another provider Lesson Nine
Granting Patient List (Proxy) Access A user can grant another user access to their Patient List if this security option is enabled for both users. (Otherwise this functionality is not enabled and will be grayed out.) This feature may be helpful when one person is out of the office and another person is assigned to those specific tasks. Lesson Nine
Granting Patient List (Proxy) Access To begin granting proxy access, open the Customize Patient List Properties dialog box selecting Properties from the Patient List Menu. Lesson Nine
Granting Patient List (Proxy) Access The Customize Patient List Properties dialog box will display. Select the Proxy List Tab and click New Lesson Nine
Granting Patient List (Proxy) Access You can select to proxy to a Group or to a Provider. For the Group option, select a Provider Group, such as Chesapeake Pediatrics or Bayview Medical, from the drop-down list. For the Provider option, enter the Provider information into the Provider field. If more than one name matches the entered criteria, Multiple Matches will be displayed. Click on the binoculars icon to display all matching listings. Lesson Nine
Granting Patient List (Proxy) Access After you have determined who you want to access to your Patient List, select the appropriate access level for them within the Access drop-down box. Lesson Nine
Granting Patient List (Proxy) Access If applicable, enter the End date and Time to determine the expiration date for the proxy’s access. If no end date is specified, the user will always have access to your Patient List. Click Apply. Then click OK to save the proxy information and return to the Patient List. Lesson Nine
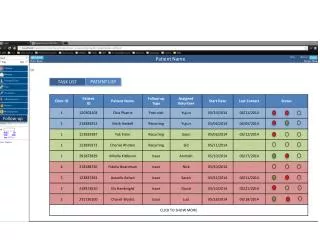
Granting Patient List (Proxy) Access When the proxied Provider accesses List Maintenance, the proxied list will display in the Available Lists window. The name of the person who granted access to the Patient List is also displayed in parentheses. The user must make the list active (by moving it to Active Patient Lists) for it to display in their Patient Lists in the Organizer. Lesson Nine
Granting Patient List (Proxy) Access Once the list is active, it appears in the proxy’s Organizer under Patient Lists. Lesson Nine
When you are ready to proceed to Lesson 10:Troubleshooting Patient Lists, please click on the eKiDs logo below: Lesson Nine