1 / 1
10 likes | 34 Vues
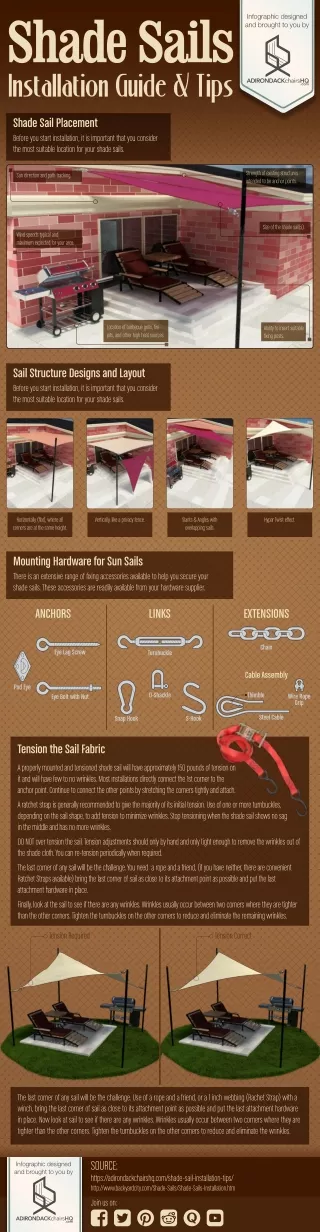
Before you start installation, it is important that you consider this infographic for your shade sails details.

E N D
Shade Sails Installation Guide & Tips Infographic designed and brought to you by Shade Sail Placement Before you start installation, it is important that you consider the most suitable location for your shade sails. Strength of existing structures intended to be anchor points. Sun direction and path tracking. Size of the shade sail(s). Wind speeds typical and maximum expected for your area. Location of barbecue grills, fire pits, and other high heat sources. Ability to insert suitable fixing posts. Sail Structure Designs and Layout Before you start installation, it is important that you consider the most suitable location for your shade sails. Horizontally (flat), where all corners are at the same height. Vertically, like a privacy fence. Slants & Angles with overlapping sails. Hypar Twist effect. Mounting Hardware for Sun Sails There is an extensive range of fixing accessories available to help you secure your shade sails. These accessories are readily available from your hardware supplier. ANCHORS LINKS EXTENSIONS Chain Eye Lag Screw Turnbuckle Cable Assembly Pod Eye D-Shackle Thimble Wire Rope Grip Eye Bolt with Nut Steel Cable Snap Hook S-Hook Tension the Sail Fabric A properly mounted and tensioned shade sail will have approximately 150 pounds of tension on it and will have few to no wrinkles. Most installations directly connect the 1st corner to the anchor point. Continue to connect the other points by stretching the corners tightly and attach. A ratchet strap is generally recommended to give the majority of its initial tension. Use of one or more turnbuckles, depending on the sail shape, to add tension to minimize wrinkles. Stop tensioning when the shade sail shows no sag in the middle and has no more wrinkles. DO NOT over tension the sail. Tension adjustments should only by hand and only tight enough to remove the wrinkles out of the shade cloth. You can re-tension periodically when required. The last corner of any sail will be the challenge. You need a rope and a friend, (if you have neither, there are convenient Ratchet Straps available) bring the last corner of sail as close to its attachment point as possible and put the last attachment hardware in place. Finally, look at the sail to see if there are any wrinkles. Wrinkles usually occur between two corners where they are tighter than the other corners. Tighten the turnbuckles on the other corners to reduce and eliminate the remaining wrinkles. Tension Required Tension Correct The last corner of any sail will be the challenge. Use of a rope and a friend, or a 1 inch webbing (Rachet Strap) with a winch, bring the last corner of sail as close to its attachment point as possible and put the last attachment hardware in place. Now look at sail to see if there are any wrinkles. Wrinkles usually occur between two corners where they are tighter than the other corners. Tighten the turnbuckles on the other corners to reduce and eliminate the wrinkles. SOURCE: https://adirondackchairshq.com/shade-sail-installation-tips/ http://www.backyardcity.com/Shade-Sails/Shade-Sails-Installation.htm Infographic designed and brought to you by Join us on: