Download
1 / 51
510 likes | 539 Vues
Register, login, enter, and submit your EPA Hazardous Waste Report efficiently with step-by-step instructions provided in this user guide. Includes detailed guidance on data entry, site information, waste codes selection, and form completion.

E N D
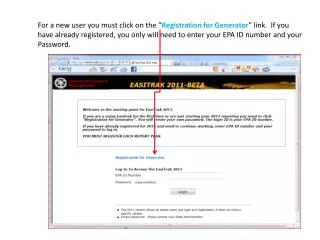
For a new user you must click on the “Registration for Generator” link. If you have already registered, you only will need to enter your EPA ID number and your Password.
The next screen will allow the user to enter their EPA ID number, email address, and password. Also there are 4 security questions you must answer and will be asked for these answers to submit your report to the State.
This screen has numerous links to certain references and services. The user can enter data for the required forms from this screen by selecting the desired form.
This screen has numerous links to certain references and services
The first screen of the SI Form is for the only reason EASITRAK can be utilized, to submit your Hazardous Waste Report.
Next enter your site name and site location. In Easitrak it is important for you to remember that entering ANY address starts with entering the zip code and clicking on the hand symbol A box will pop up and you can select your city. This will auto populate the County, City, State, Country. If you enter this data any other way it will not let you submit your data.
Select the correct Site Land Type. By the way you will notice that you can Select the “Save and Close” button to save your data and exit the form. You Can then come back later and complete or edit your data. You will also see a “Previous Page” and “Next Page”. When you click on the “Next Page” it saves your data.
Enter your primary NAICS codes using the “hand symbol” to open the list of available options. You can select more than one but the primary code should be used first. Your state may request you only select one code. To select the EPA Waste Codes click on the “hand symbol” to see the available choices.
Select the NAICS category by choosing a number from 1 to 9. This will display a category listing of NAICS codes.
To select the EPA Waste Codes click on the “hand symbol” to see the available choices.
Select the EPA Waste Code category and use the “Add >” key at the bottom to move the waste code to the right. If you accidentally add the wrong waste code use the “<Remove” key. IMPORTANT to Save your data select the “Done” button at bottom of the screen.
In this example I selected “D001” then clicked on the “Add >” button to move to the right and clicked on “Done” to save my choices.
This screen shows the EPA waste codes you have selected in the data box and this information is saved in the database. You can edit this box by clicking on the “hand” symbol.
The next screen is the Site Mailing Address. Remember click on the “hand” symbol after you enter the zip code, and select the City. For all addressed you will have an option to click on “hand” symbol to use the site location address.
If you select the option that the mailing address is the same as the site location, this box will pop up to verify that you do indeed want to import that information into this current screen.
The address is imported into the screen, select “next page” which remember saves your data and takes you to the next screen.
Enter the Site contact person information then either select the “hand” symbol that imports the site location data or you can select the “hand” symbol to select a location after you have entered a zip code.
Enter the owner information, again same instructions for address data. At the bottom of the screen enter the operator name, select or enter the date and choose the Operator Type.
Select the items that apply for Section 10 (the next 6 screens). If none apply, do not select any, there is not a yes or no on the screen. If you select one it means yes.
Enter any comments for the regulator to be able to have with your forms.
Once you have completed all of your additional forms such as GM, WR, or OI (depends on your state requirements) you need to certify your report by completing this screen. To enter your information you need to click on the icon that will open up text boxes for data entry.
The pencil icon is for editing, the X icon is for deleting the information. Selecting “Close” saves the information.
If your Form SI screen has all green check marks then you have completed this form.
Once the SI form is complete you can initiate the GM forms. Select Form GM.
The GM Waste Characterization part of the data entry screen is displayed. Enter the waste description ensuring you do not use an illegal characters such as <, >, etc.
To select waste codes you click on the standard icon used in Easitrak to show a pick list or selection screen.
Select the EPA Waste Code category and use the “Add >” key at the bottom to move the waste code to the right. If you accidentally add the wrong waste code use the “<Remove” key. IMPORTANT to Save your data select the “Done” button at bottom of the screen.
In this example I selected “D001” then clicked on the “Add >” button to move to the right and clicked on “Done” to save my choices.
Most states do not have state waste codes and this will depend on your EPA ID number. Next select the Source Code, Form Code, Waste Minimization Code selecting the hand and selecting the correct code from the list.
Enter the quantity of waste generated in 2011 and select the Unit of Measure if available for your state (some states default to pounds) . You can enter any comments as well on this screen. Once you have completed the data entry for the waste description, select the “Create GM1” button.
Once you select the “Create GM” button, the waste characterization information is saved and now you can select the Waste Shipped Off Site or On Site Management by Selecting the sheet of with the gold star.
When you select the “Waste Shipped Off Site” the box below is displayed. enter the EPA ID Number of the Off Site Facility (TSDF), the quantity shipped, and select the off-site management method code, then select the “Save and Close Button”.
In the bottom right corner of the data entry screen you will see the row that was added for Waste Shipped Off Site. You can edit this line or delete this line using the icons on the row.
Once you have added all the Waste Shipped Off Site lines, click on the “Save” button to save your data.
The GM Form you just added is now displayed in this grid table. You can repeat this for all GM forms that need to be added.
Once you have completed the data entry, you need to submit your report. Select the “Submit” tab.
On the Submit Screen you click on the “Data Checker” button and if the data Passes the error check, you get a message “Data was passed by Checker”
Since the data passed the data checker you are now ready to submit your data by Selecting the “Submit” button.
A question box will pop up asking you 1 of the 4 questions you answered when you registered your EPA ID and obtained access to Easitrak. Click on “OK”. If you do not get this box, see our support page at www.arminc.net
The message tells you that your data has been submitted to the state. You will need to click on the “Reports” page to print documents to mail to the State. This varies for each State but based on your EPA ID Number, the software tells you for your state.
From this page you can print copies of your reports at any time, forever. Based on what Information is listed for your State on the StateInfo page, you will need to send the State Certain forms. Typically the “Declaration of Electronic Filing of the Annual HW Report.