Developing and Presenting a Design Plan
Developing and Presenting a Design Plan. Just FACS. Good Design Requires Planning. A good design plan is the starting point of designing the interior of a home. Steps in the Design Process. Step 1: Identify the project Step 2: Assess the client characteristics

Developing and Presenting a Design Plan
E N D
Presentation Transcript
Developing and Presenting a Design Plan Just FACS
Good Design Requires Planning • A good design plan is the starting point of designing the interior of a home.
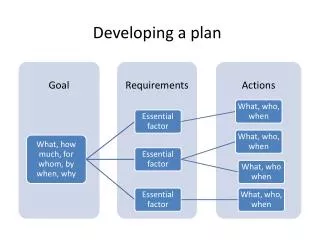
Steps in the Design Process • Step 1: Identify the project • Step 2: Assess the client characteristics • Step 3: Analyze the environment • Step 4: Develop a preliminary budget • Step 5: Compile a design resource file • Step 6: Plan use of space • Step 7: Choose a style and color scheme • Step 8: Select backgrounds, furniture, lighting, and accessories • Step 9: Present the design • Step 10: Implement the design.
Step 1: Identify the Project • What is the change that needs to be made? • How much will you charge the client? This includes labor, costs of items in the rooms and the house cost of $225,000 (standard for all clients). • How much time do you have to complete it? • What is the goal of the project?
Step 2: Assess Client Characteristics • Match possibilities for room design with the habits, likes, needs and wants of the people who will use it. • Complete a family inventory- This is your client sheet) • Lifestyles • Activities, entertaining preferences, hobbies and study and work • Preferred Atmosphere • Future Considerations (what are their future plans?)
Step 3: Analyze the Environment • The Environment Inventory • Number of rooms • Activity Zones (work, private, and social) • Storage Areas • Furniture and Accessories • Find out the furniture style that would match with your family • Condition of Backgrounds • Electrical and Lighting • Safety • Traffic Flow • Consider Furniture Needs • Establish Priorities • Budget restrictions • Measure Space & Furniture • Check out locale builder websites to see ex. floor plans • Creating scale drawings • ¼ in. =1 ft.
Step 4: Develop a Preliminary Budget • Write down everything that needs to be purchased- this will help client know how much to expect and will help prevent you from overspending • Remember that those this is not the final cost- going well over is unprofessional and is frowned on • Create price estimates based on the size of the room (paint, flooring, etc.)
Step 5: Compile a Design Resource File • Take before photos of the area to be redesigned. • Find sources of ideas: • magazines • Furniture and accessory catalogs • Websites • Sunday newspapers • How to books • Organize by separating into categories: • Furnishings • Window treatments • Floor coverings • General for pictures • Product brochures • Wallpaper samples • Paint samples • Fabric samples
Step 6: Plan Use of Space • A functional room arrangement is one in which the space meets the needs of its occupants. • Arranging space: • Review the purposes the room serves • Consider the features of the room itself • On your plan, outline the path people would use to walk through the room(traffic patterns).
Step 6 continued • A thoughtfully arranged room is functional and pleasing to look at. • Keep these factors in mind when designing: • Don’t overcrowd a room • Attempt to balance the room • Create a focal point by highlighting an interesting feature. • Use your imagination
Room by Room • Living Rooms and Family rooms • Seating • Provide convenient surface for reading materials and refreshments. • Might include entertainment • Dining Areas • Allow room for chairs to move and people if there is a dining room
Drawing Plans • Floor plans give a view from above • Elevations show a side view • Interior elevations show one wall as seen from the center of the room
Step 7: Choose a Style &Color Scheme • Style-refers to the overall characteristics of design. • It might reflect a specific period of time, a region, or a designer. • It might also evoke a feeling such as formal, informal, or cozy.
Types of Style • Colonial-very simplistic style. • Queen Anne-very formal style; often large with high ceilings. Use very luxurious fabrics. • Victoria-flamboyant and elaborate style; generally have carved wooden panels. • Modern-simple and unify technology with art; the focus is on horizontal line and monochromatic color schemes There are many quizzes online to help pick furniture styles- try one but remember to answer as the client would
Step 8: Select Backgrounds, Furniture, Lighting and Accessories • Backgrounds-floors, walls, ceilings and windows. • Deciding which materials, colors, patterns and textures to use is part of the design process. • The goal is to make sure that backgrounds harmonize with the style.
Step 9: Present the Design • Floor Plans • Elevations • Pictorial designs (which are pictures as if you were actually looking at the room) • One point perspective is looking at one wall • Two point perspective is looking at where two walls meet
Types of Visual Representations • Sample Boards • Contains mounted samples of proposed wall coverings, floor coverings, fabrics, and window treatments. • Separate boards for each room • Computer presentations • Models: usually 3-D
A Professional Presenation • Once all designs are complete the presentation must be made. • Oral presentations consist of: • Introduction • Discussion of the design • Summary • Finally presentation of the budget
Step 10: Implement the Design • Developing a time line • Making purchases • Scheduling installations • Make sure to maintain frequent communication with the clients!