EMV 400 Quick Reference Guide
The EMV 400 Quick Reference Guide provides a comprehensive overview of the on-screen configuration menu and playback options. It details how to navigate between the playback and configuration menus, perform various searches (time, G-sensor, GPS speed, bordering, and event searches), and archive video data to USB. Each function is clearly described, including start and end time selection, search formats, and archiving setup. This guide is essential for users to effectively utilize their device's capabilities and features.

EMV 400 Quick Reference Guide
E N D
Presentation Transcript
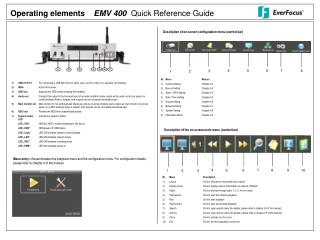
Operating elements EMV 400 Quick Reference Guide Description of on-screen configuration menu (control bar) 4 6 7 5 8 3 2 1 Description of the on-screen main menu (control bar) Menu entry: choose between the playback menu and the configuration menu. For configuration details, please refer to chapter 4 of the manual. 4 6 7 8 9 10 2 5 1 3
Operation EMV 400 Quick Reference Guide PLAYBACK SEARCH Click right to enter the root menu, select “Playback” and click to enter the Search Menu. 1. Time Search: Play From: Select the start time by choosing date and time. Click the “Play” button to start the search. The DVR will automatically begin to play the selected video. If there is no data at the selected point of time, playback will start at the nearest point of time. In search playback mode, clicking the “Stop” button will return to the search menu. Record Time (Start): Displays the start time of recorded data on the harddisk.Record Time (End): Displays the end time of recorded data on the harddisk. 2. G Sensor Search: Click the G Sensor button to start G Sensor search. From: Select start date and time To: Select end date and time. Select the search format from Less Than, More Than, Inside Range and Outside Range. Value: Set the G-sensor value to be searched. If search format is a range, set the values for both ends of range. Click SEARCH button to start search action. 3. GPS Speed Search: Click the GPS button to enter GPS search menu. From: Select start date and time. To: Select end date and time. Display Unit: If the speed is being recorded from the GPS receiver, the desired speed display units have to be selected. Select either “KPH” or “MPH” as GPS speed unit. Selecting “MPH” converts the GPS signal to display the speed in miles per hour. Select the search format from Less Than, More Than, Inside Range and Outside Range. Speed Limit: Set the GPS speed limit to be searched. If search format is a range, set the values for both ends of range. Click SEARCH button to start search action. 4. GPS Bordering Search:Click the GPS Bordering button to enter GPS bordering search menu. From: Select start date and time To: Select end date and time. GPS Border Type: Set GPS border type, select either circle or rectangle. Search Mode: Select if searching inside or outside the border. Center Lat.: Set the latitude if border type is a circle. Center Lon.: Set the longitude if border type is a circle. Radius: If GPS border type is a circle, this option defines the radius. Select “Km” or “Mi” as radius unit. Upper Left Lat.: Set Upper Left Latitude if border type is rectangle. Upper Left Lon.: Set Upper Left Longitude if border type is rectangle. Lower Right Lat.: Set Lower Right Latitude if border type is rectangle. Lower Right Long.: Set Lower Right Longitude if border type is rectangle. Click SEARCH button to start search action. 5. Event Search: Click the Event button to enter Event search menu. From: Select start date and time. To: Select end date and time. Select which event type(s) to search for. Choose from alarm, video loss or power on. Click on the Apply To button to select which cameras to include in the search. Click on the Search button to start searching. The search results will be shown as a list of events. Prev Page: Go to previous page. Next Page: Go to next page. Play: Playback selected item. Delete: Delete selected item. Click the Back button to return to the previous level of menu. COPY / ARCHIVING VIDEO DATA Click right to enter the root menu, select “Playback” and click to enter the Archive Menu. Archive to USB: Camera: Select the cameras to be archived. Choose “Select All” to select all cameras. Player: Check the box to include the ePlayer program as part of the export (recommended). Start Date/Time: Select the start date/time to be archived. End Date/Time: Select the end date/time to be archived. Data Size: Shows the estimated total size for the time period. Copy Now: Press “Copy” button to start archiving data to USB. Click the Live View button to return to live view.