Google Earth in the Classroom:
Danny Maas Emerging Technology Consultant Edmonton Catholic School District Daniel.Maas@ecsd.net. Google Earth in the Classroom:. Using Google Earth in Math and Science. Rationale for Using Google Earth. Universal Design for Learning

Google Earth in the Classroom:
E N D
Presentation Transcript
Danny Maas Emerging Technology Consultant Edmonton Catholic School District Daniel.Maas@ecsd.net Google Earth in the Classroom: Using Google Earth in Math and Science
Rationale for Using Google Earth • Universal Design for Learning • Presenting information and content in different ways (the "what" of learning) • Differentiating the ways that students can express what they know (the "how" of learning) • Stimulating interest and motivation for learning (the "why" of learning) • http://www.cast.org/research/faq/index.html#q1
Rationale for Using Google Earth • Skill & Attitude Development • Visual literacy • Global awareness • Geographic thinking • Inquiry • http://www.cast.org/research/faq/index.html#q1
Hands On With Google Earth • Measuring Distances • Directions • Drawing Paths & Polygons • Adding Web 2.0 Elements onto Google Earth • Exporting Items to a .KMZ file
Measuring Distances • Open “Ruler” tool • For a single line, choose ‘Line’ tab • For a path, choose ‘Path’ tab • Choose appropriate units • Click once to begin path • Click again at key points tokeep path going • Toward the end, click a pointnear to your start point (youwon’t be able to click on theexact starting point)
Getting Directions • In the search area, choose the ‘Directions’ tab • Enter a start and end point • Click the ‘Search’ button(magnifying glass) • Scroll down for the totaldistance • Push the ‘Play Tour’button to view the directionsas a Google Earth Tour
Drawing Polygons • Click the Polygon tool button • Click once for the first point of your polygon • Click again at key points around the shape • Click on your starting point to finish the shape • Name your shape • On the ‘Style, Color’ tab choose the color and opacity of your shape • If your shape is unusually-shaped, you can click and drag the entire path (versus clicking at key points only)
Drawing Paths • Click the Path tool button • Click once for the first point of your path • Click again at key points around the path • Name your path • On the ‘Style, Color’ tab choose the color and thickness of your path • If your path is unusually-shaped, you can click and drag the entire path (versus clicking at key points only)
Adding Web 2.0 Elements • Many web 2.0 tools offer an ‘embed’ feature to embed the multimedia onto other websites, blogs, etc. (E.g. YouTube, Animoto, Voki, etc.) • To embed on Googe Earth, first add a placemark • Copy the ‘embed’ HTML code from the web 2.0 website • Paste the embed code into the description area of the placemark • The next time you click on the placemark your web 2.0 element should display
Exporting Items to a .KMZ file • Any group of placemarks, polygons, paths, and tours can be grouped together and saved as a single .KMZ file • Right-click on My Places and choose “AddFolder” and name that folder • Click/Drag all the items you want into the new folder • Right-click the folder and choose “Save Place As” • Name the .KMZ file and choose a save location
Math • Estimate and measure the distance, area, and perimeter of real locations • What is the area of our school grounds? • What is the perimeter of our school? • How far is it from Edmonton to Saskatoon? • What directions would you give to someone traveling from our school to the nearest grocery store?
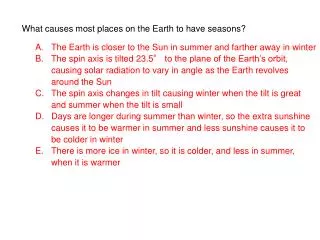
Science • Access weather overlays to gather environmental data • Access National Geographic information layer • Use the Date and Time (sunlight) tool to show where sunlight is shining at any place any time and explain time zones and seasons (good for math as well)
Science • Use the Sky view to investigate and view our solar system, constellations, and stars http://earth.google.com/userguide/v4/ug_sky.html • Visit environmental locations related to a topic of study • E.g. Native Forest Council http://www.forestcouncil.org/googleearth/ • E.g. Ducks Unlimited 70th Anniversary Project Tour http://maps.ducks.ca/google.html
Other Uses • Visit a field trip location on Google Earth before you travel • Download pre-made Google Earth tours and information layers • http://www.google.com/gadgets/directory?synd=earth&sort-order=desc&cat=featured • http://realworldmath.org/Real_World_Math/RealWorldMath.org.html • http://serc.carleton.edu/sp/library/google_earth/activities.html • http://www.gelessons.com/lessons/ • http://www.gearthblog.com/
Find .KMZ Files on the Internet • Open Google and choose ‘Advanced Search’ • Enter your search term(s) • Look for ‘File type’ and select “Google Earth KMZ or KML”
http://maasd.wordpress.com/google-earth • Daniel.Maas@ecsd.net