4.9 Articulator setting
4.9 Articulator setting. 가천의대 길병원 보철과 송승헌. Introduction. Semi-adjustable individual articulator ; posterior condylar 와 anterior dental guidance 조정을 위해 사용 Adjustable or replaceable individualized guide elements 1. condyle inclination 2. bennet movement.

4.9 Articulator setting
E N D
Presentation Transcript
4.9 Articulator setting 가천의대 길병원 보철과 송승헌
Introduction • Semi-adjustable individual articulator ; posterior condylar와 anterior dental guidance 조정을 위해 사용 • Adjustable or replaceable individualized guide elements 1. condyle inclination 2. bennet movement Posterior guidance
Introduction • Precondition for individual adjustment of posterior guide element - 다양한 eccentric 위치에서의 wax records - 이때 adjustment settings은 condyle inclination과 Bennett movement를 하는 개개 angle value들에 의해 제한된다.
Introduction For Anterior dental guidance - adjustable incisal guide block (angle 값들을 기초로 해서 각각의 guidance factor setting ) - individual incisal guide block (the path of motion of the incisal pin)
Introduction • Difference Posterior determining setting attempt simulation of the natural situation Anterior determining setting combine diagnosis aspect with thetherapeutic concept
4.9.1 Posterior Guidance Setting in the Arcon Articulator • Glenoid fossa insert setting의 원칙 환자 인기 술식에 따라 얻은 위치 기록값들을 기본으로 하고 있다.
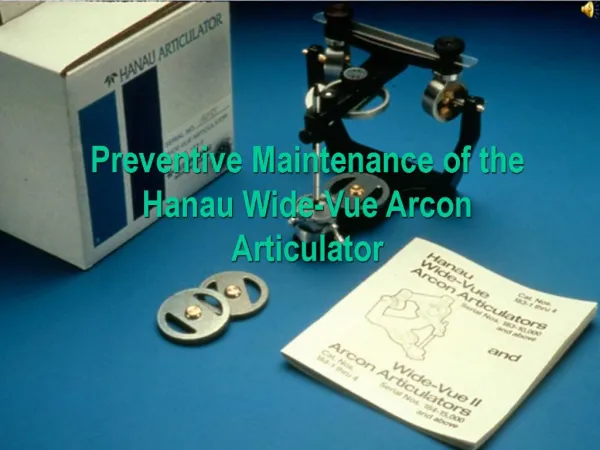
Artex AN과 AL articulator one-piece curvilinear glenoid fossa inserts : 반지름이 12.5mm인 saggital orbit을 따라 condyle ball의 표면을 guide한다. Design of standard condyle Housing inserts
Artex AN과 AL articulator Bennet movement를 위해 거의 직선 경로로 경유한다 Design of the standard condyle housing insert for arcon Articulators Artex AL and AN (“glenoid fossa insert”with Bennett angle guidance and without immediate side sift) ;schematic drawing at the left, Artex AL on the right
Artex AR and AP articulator • condyle guide elements의 two part는 측방 운동의 마지막에서 laterotrusion을 한다는 것을 제외하고는 기능상으로 동일하다. Left condyle housing of an Artex AL or AN as viewed from mesio-disto-occipital : The condyle ball of the lower bow of the articulator describes a course to the upper right in protrusion; in a lateral movement In “retrusive laterotrusion” the path is to the outside left, upward, posterior. The shift angle is set to a neutral value, Simulating latero-transtrusive guidance (to the outer left, broken line)
For Posterior articulator guidance settings (centric orginal position and two eccentric functional positions) canine-supported occlusion로 유도되는 정상적인 functional masticatory organ을 재현하기에 충분하다 • Original position is determined Mandibular cast is articulated in habitual or centric occlusion
Preparation phase 1. Magnet이 metal Splitex carrier plate of the upper bow of the articulator로 확실히 위치되도록 한다. 2. 상악 모델을 교합기의 upper bow에 고정하고, centric record를 제거한다.
Preparation phase 3. 교합기의 centric lock과 condyle inclination을 풀어 놓는다. 4. 예외적으로Artex AN에서 centric lock을 condyle inclination을 고정하는 screw를 느슨하게 하기 전에 풀어 놓아야 한다.
Preparation phase 5. Artex AN 과 AR 교합기를 사용할 때, 측면에 있는 Allen screw를 사용하여 protrusion 상태를 임시 제거한다.
Preparation phase 6. Bennet angle setting은 wax position record를 위치시킬 때 풀어 놓는다.( 양쪽 조절 장치는 10도의 각도에서 시작하도록 한다.) 8. incisal pin은 임시로 고정시켜 놓거나 올려 놓는다.
Condyle inclination setting Protrusion record를 하악 치열위에 올려 놓은 후, bite 상부 부위로 상악 모델를 주의깊게 가이드한다
Condyle inclination setting 이때 Mediotrusion side로 bending over the record로 명확한 인상이 orbiting condyle 쪽에서 wax 기록이 남겨져 있어 확실이 인기하도록 한다. (하악 모델상의 기록에 상악 모델을 맞추는 것이 좀더 쉬울 것이다.)
Condyle inclination setting 교합기 상악 부위의 ‘fork grip’은 정확한 기록을 체크할 때, 왼손으로 연속해서 장착하도록 하는 충분한 공간을 제공해 준다.
Condyle inclination setting • Condyle ball은 condyle housing에 어떠한 접촉도 하고 있지 않으며, former(centric) position의 anterior and inferior에 위치하고 있다. Setting the condyle inclination angle by lowering the condyle housing / glenoid fossa insert until initial contact with the upper surface of the condyle ball(right)
Condyle inclination setting • Condyle inclination의 실질적인 조정은 condyle ball이 housing의 상부 외형을 따라 가볍게 접촉할 때가지 anterior end에서 condyle houing을 아래로 움직이면서 시행한다.
Condyle inclination setting • 교합기의 upper bow는 checkbite 상의 위치에서 움직이지 말아야 한다. • 한손으론 control목적으로 upper bow을 잡고 있어야 한다.
Condyle inclination setting • 그런 후 교합기 뒤쪽에 있는 Allen screw를 통해서 고정시킨다.
Condyle inclination setting • condyle inclination angle은 condyle houing 의 앞쪽에 있는 눈금을 읽는다.
Condyle inclination setting • 기록지에 수치를 적는다.
Bennett angle setting • 원칙적으로 Bennet angle은 같은 방법으로 알아낸다. Articulator의 upper bow를 상악 cast와 임시 분리시키고, protrusion record를 2개의 laterotrusion records들 중 하나로 대체한다. Repalce the protrusion record with the left laterotrusion record
Bennett angle setting • Mediotrusion쪽에 있는 Bennet angle를 위한 고정 screw는 느슨하게 한다. (Left laterotrusion record를 가지고, 우측 condyle housing 상의 Bennett angle를 위한 조정 screw를 의미한다.)
Bennett angle setting • 이 부위의 glenoid fossa를 outer knurled adjustment screw를 돌려서 최대 수치에다 setting을 한다.
Bennett angle setting • 이전에 설정된 condyle inclination은 그대로 놔둔다. • 이와 같이 해서 교합기의 upper bow는 laterotrusion record로 위치시킬 준비를 마췄다.
Bennett angle setting • Original condyle ball 위치와 비교해서, mediotrusion side에 있는 “orbiting” condyle은 forward, downward and inward로 움직인다. • 이때 housing은 orbiting condyle과 접촉하지 않는다. • 측방운동에서 condylar guidance의 실질적인 설정(bennet angel)은 condyle ball의 medial wall을 따라 upright guidance surface를 위치시킴으로써 알게된다.
Bennett angle setting • 좌측으로의 측방운동에서, 우측 condyle ball의 medial side가 처음 접촉할 때까지 right glenoid fossa insert를 maximum inward rotation outward로 움직인다.
Bennett angle setting • 느슨한 screw들을 재고정시킨다. • Bennet angle은 condyle housing 위에 있는 ring-shaped scale이다 • Artex System 기록지에 기록한다.
Bennett angle setting • 실질적인 운동 방향으로 glenid fossa insert의 cylindrical curve는 변화하는 Bennett angle를 고려해야 한다. • Artex arcon 교합기의 glenoid fossa가 원추형 커브라는 사실은 condylar guidance에서 bennet angle의 변화에 따른 결과이다.
4.9.3 anterior Guidance Settings with the Individual Incisal Guide Block • Anterior guidance는 주로 dental morphology에 의해 결정되기 때문에, 교합기에 transfer해야 한다. • 이러한 시술을 위해 individual incisal guide block을 사용하는데, 이것은 자가 중합레진에 incisal pin의 functional motion을 기록함으로써 제작한다. • harmonic occlusion과 전치부 수복을 위해 필요하다. • Anatomical anterior guidance는 sturdy cast상에 기록하고, 수복물에 적용시킨다. • Crown and bridge상에서, incisal 길이와 전치부 기능적인 pattern은 이러한 individualized anterior 설정을 하지 않고서는 실제적으로 재현시킬 수 없다.
Incisal block을 제작하기 전에, 어떠한 mediotrusive나 balance contact을 제거해야 한다. • Harmonic canine-guided occlusion을 수복하기 위해 우선 진단 모델상에서 test wax-up을 시행해야 한다. • 그런 후 incisal block을 제작한다.
제작 1. 우선 incisal pin을 약 1mm정도 들어 올려 자가 중합 레진이 들어갈 공간을 만들어준다. 그런 후 교합기를 open한다.
3. 제조업체의 지시에 따라 자가 중합레진을 혼합한다. 4. block 형태로 만들고 교합기를 close한다. 그리고 incisal pin을 아직 경화되지 않는 레진 속에 넣는다.
5. 자가 중합레진이 완전히 경화될 때까지 치아가 접촉되면서 모든 운동을 시행한다. Protrusive-retrusive movement Laterotrusive movement After wax-up
4.9.4 anterior Guidance Setting with the Adjustable Incisal Guide Block • Special pin을 지닌 adjustable incisal guide block은 individual guide block을 얻는 대체적인 방법이다.
Radial rouned tip을 지닌 special incisal pin을 stop이 도달할 때까지, lower bow상의 corresponding guide element속으로 누른다. 그런 후 zero position에서 screw를 조인다. • 단지 두개의 Allen screws를 느슨하게 풀어둔다.
초기 기본 설정은 좌측 바닥부위에 있는 빨간 knurled screw를 사용하여 0도로 incisal guide block의 시상면을 조정함으로 시작한다. • 측면의 guide surface는 앞쪽에 있는 두개의 knurled screw를 사용하여 약 30도 정도로 세워야 한다. • 유도면들은 서로 마주보게 된다.
siver-colored metal cylinder를 조정을 위해 최 후방부위에 놓는다.
처음 오리엔테이션을 위해, 손으로 incisal pin을 metal adjustment cylinder 전방에 위치시켜 두면에서 균일한 접촉하도록 한다. (fig 4.9-39) • 이렇게 함으로써, 시상면에서 incisal pin의 초기 조정을 완성했다. • Transversal adjustment는 수평적으로 pin을 움직임으로써 한다. • 이것의 둥근 tip은 두 개의 경사진 유도면과 균일하게 접촉하도록 중심부에 위치시킨다. • 이 위치에서 두개의 Allen screw를 조인다.(fig 4.9-40)
Incisal guide block이 올바르게 위치되었다면, 교합기의 upper bow는 sagittal setting이 변할지라도 움직이지 말아야 한다.
Metal cylinder는 sagittal plane상에서 adjustable guide block과 incisal pin의 정확한 위치를 체크하는데 사용된다. • Splitex Standard Control Base는 교합기 자체의 setting으르 검사하는데 사용한다. • 이러한 초기 설정 후에, 앞에서 언급된 세개의 knurled screw들은 individualized therapeutic setting을 위해 사용한다. • 다음의 방법들은 모든 three knurled adjustment screw의 0점 조절에 기초하고 있다.
Sagittal inclination setting을 이해하기 위해, end-to-end bite position에 도달할 때까지 upper bow posterior를 protrusive registration 설정함으로써 시작된다.
이 위치에서, 아랫부위의 외측에 있는 knurled screw는 우선 느슨하게 한다. 그리고 incisal guide block을 radical incisal pin이 표면에 도달하여 처음 접촉할 때까지 후방 끝부위를 들어올린다.
inclination setting을 찾는 첫번째 단계는, 우측으로 laterotrusion이다. • 대부분의 경우, radial-tipped incisal pin은 좌측 guide surface위를 움직인다. 그리고 다른 표면에서 멀어지면서 들어올려진다.
장치의 앞부분에서, 좌측 guide surface의 knurled adjustment screw는 느슨해지고, 표면은 incisal pin에 접촉할 때까지 들어올려 진다.
이 지점에서 kurled screw를 다시 조임으로써, 우측 laterotrusion 위한 incisal guide block의 조정을 완성한다.