Download
1 / 8
130 likes | 483 Vues
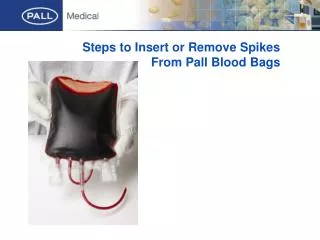
Steps to Insert or Remove Spikes From Pall Blood Bags. Port Protector. Spike Receptor. Septum. 1. Remove Port Protector. Grasp tabs of the port protector and tear away to remove the hood from the port. 2. Insert Spike. Support the septum of the blood bag port with thumb and index fingers.

E N D
Port Protector Spike Receptor Septum
1. Remove Port Protector • Grasp tabs of the port protector and tear away to remove the hood from the port.
2. Insert Spike • Support the septum of the blood bag port with thumb and index fingers. • Ensure the sides of the blood bag are parallel to the port and the spike being inserted. • The port and spike should be parallel during spike insertion to prevent inadvertent piercing of the side of the blood bag.
There are three methods to position the bag when spiking the port: • A) Lay blood bag on the counter with port facing out. • B) Hold blood bag parallel to spike. • C) Hang blood bag with port parallel to spike.
Insert the blood bag administration set spike into the blood bag port. • With a clockwise twisting motion, pierce the septum of the port. Use of ¼ turns facilitates insertion and removal of the spike from the bag. • Do not over-spike.
3. Remove Spike • Grasp port between thumb and index fingers. • Grasp spike and twist in ¼ turns in a counter-clockwise direction while pulling the spike outwards. • Once spike is loosened from port, remove by pulling spike straight out of the port.


![To [insert name] Happy holidays! From [insert name]](https://cdn1.slideserve.com/2530405/slide1-dt.jpg)