Download
1 / 23
230 likes | 485 Vues
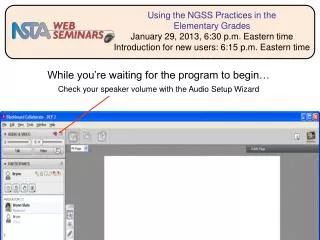
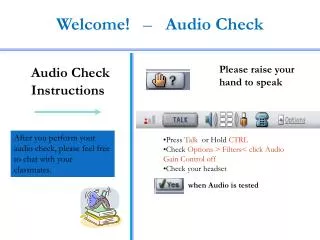
Welcome! – Audio Check. Audio Check Instructions. Please raise your hand to speak. After you perform your audio check, please feel free to chat with your classmates. Press Talk or Hold CTRL Check Options > Filters< click Audio Gain Control off Check your headset.

E N D
Welcome! – Audio Check Audio Check Instructions • Please raise your hand to speak After you perform your audio check, please feel free to chat with your classmates. • Press Talk orHold CTRL • Check Options > Filters< click Audio Gain Control off • Check your headset when Audio is tested
Computer Quick Tips and Tricks Week 1: Web Email, Attachments, & Printing
Agenda • Wimba Refresher • Learning Objectives • Web Email • Attachments • Printing • Practice Exercises
Let’s Review Our Wimba Tools: The Pointer tool helps to “claim your real estate on the screen” lets everyone know where someone is about to type. Click on the big “T” tool to type on the screen. Make sure to hit the enter button to make the text appear. These buttons indicate “Yes” or “No” Click this icon to “raise your hand” Type your message in the chat box and press enter. You can send message to everyone in the “Main Room” or your can use the drop down box to send to an individual.
Ground Norms • Turn off email, phones, instant messaging tools and clear other distractions away from your training area. • Participate and prepare to be called on by name. • Raise your hand if you have an immediate question or comment. • Be patient waiting for a response to your chat messages. • If you need to leave the program, please send us a chat message and exit to the lobby.
Learning Objectives • List 4 popular web mail providers and show patrons how to access them and set-up an account • Be able to • Develop a story for your library based on a 3-act model
What is Web Email? • Webmail (or Web-based e-mail) is an e-mail service intended to be primarily accessed via a web browser, as opposed to through a desktop e-mail client (such as Microsoft Outlook). • With web-based email, users can access their account from anywhere they have Internet access.
Chat Exercise What web email services are you familiar with and/or which ones do patrons ask you about? Please answer in the chat. 1 minute exercise
The Big 4 Introduced in 1997 http://www.hotmail.com Launched in 1997 http://mail.yahoo.com Introduced in 2004 http://mail.google.com You’ve Got Mail! http://www.aol.com
Others • Atlantic Broadband • Verizon • Comcast
Practice Exercises Please refer to your hand-out. • Go to one of the big 4 web mail services and create an account • Note any extra features, for example: instant messaging service • Practice attaching a file to an email and send to yourself and wmdlearning@gmail.com
Email Attachments • An email attachment is a computer file that is sent along with an email message. • Mail services have a limit on the size of messages which may be sent and received; this limit may restrict the size of files to be attached. Messages of excessive size will usually be returned to the sender as undeliverable. This usually happens to attachments with a total size of over 30 MB.
What can you attach? • Word documents • Excel files • PDF files • Photos (remember size restrictions!) • Power Point presentations? (remember size restrictions!)
What if your file is too big? • File-sharing sites • Photo-sharing sites • Flickr, Picasa, Shutterfly, Snapfish, etc. • Power Point presentations • SlideShare
Practice Exercises Please refer to your hand-out. • Photo Sharing Site - Snapfish • File Sharing Site – Slide Share
Printing from the Web What problems have you run into or encountered with patrons trying to print from the web? Please answer in chat.
Printing Web Pages • Sometimes a Web page will print on multiple pages because the page does not fit on one piece of paper. However, you can specify the information you want to print. • Tip: Before you print, you should view the page in Print Preview to determine if you want to print the entire page or only a selection. If you do not need to print the entire page, you can choose to print only part of the Web page.
To Print An Entire Web Page • Locate a page on the national Geographic Web site (http://www.nationalgeographic.com) that has information you want to print. • Click File, and select Print Preview. The Print Preview window appears. • Look at the number of pages that will print. If you want to print these pages, click Print. Otherwise, click Close.
Practice Exercises • Please complete practice exercises in hand-out for Printing Web Pages.