Download
1 / 23
260 likes | 765 Vues
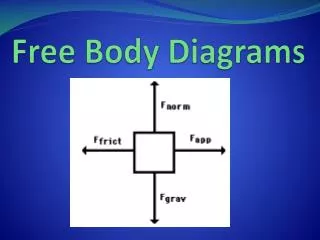
Free Body Diagrams. Chapter 1 in Text. Free-body diagram. An essential tool for evaluating every situation in biomechanics. The critical first step in analyzing any biomechanical event. Isolates the “body” (leg, arm, shoe, ball, block etc.) from all other objects.

E N D
Free Body Diagrams Chapter 1 in Text Dr. Sasho MacKenzie - HK 376
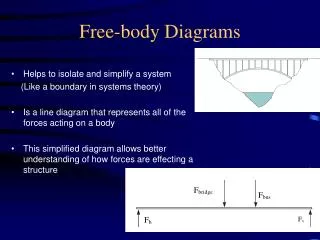
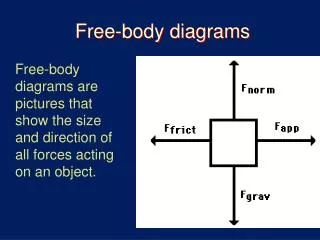
Free-body diagram • An essential tool for evaluating every situation in biomechanics. • The critical first step in analyzing any biomechanical event. • Isolates the “body” (leg, arm, shoe, ball, block etc.) from all other objects. • Only shows external forces acting on an object. Dr. Sasho MacKenzie - HK 376
Internal Forces • Forces that act within the object or system whose motion is being investigated. • Newton’s 3rd Law states that forces come in equal and opposite pairs. • With internal forces, the forces act on different parts of the same system. • These forces cancel each other out, and therefore don’t affect the motion of the system. • Forces at the knee if you are looking at the motion of the entire leg. Dr. Sasho MacKenzie - HK 376
External Forces • Only external forces can change the motion of an object or system. • External forces are those forces that act on an object as a result of its interaction with the environment. • These include friction, air resistance, gravity, pushing or pulling… Dr. Sasho MacKenzie - HK 376
Static Equilibrium • The state of an system when all the external forces on that system sum to zero and the system is not moving. • In other words, the system is at rest, and has no net force acting on it. Dr. Sasho MacKenzie - HK 376
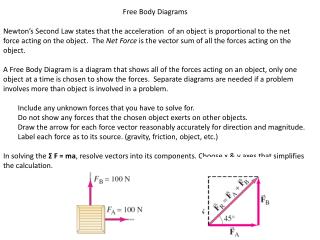
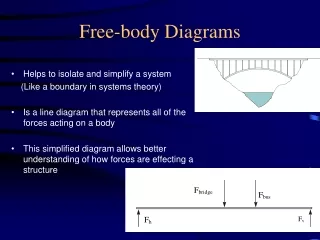
Constructing a Free Body Diagram of a Man pushing a Book on a Desk Step 1 Decide which body or combination of bodies (system) to isolate as the free body diagram Step 2 The body (or system) is isolated by a diagram that represents its complete external boundary Dr. Sasho MacKenzie - HK 376
Step 3 Represent all external forces acting on the isolated body in their proper positions. Known external forces should be represented by vector arrows with their appropriate magnitude and direction indicated. Gravity acts on the CM of an object. Dr. Sasho MacKenzie - HK 376
Step 4 The coordinate axis should be shown on the diagram indicating positive and negative directions. Note The acceleration of the body will always be in the direction of the net force. Friction force will always oppose the direction of motion (velocity). Dr. Sasho MacKenzie - HK 376
y x Fx4 Fy1 Fx3 Fx2 Fy2 Fy3 The Man Fy2 and Fy3 = upward ground reaction forces Fy1 = body weight Fx2 and Fx3 = friction force Fx4 = reaction force of book on subject Dr. Sasho MacKenzie - HK 376
y x Fx4 Fy1 Fx2 Fy2 The Book Fy2 = upward table reaction force Fy1 = book weight Fx2 = friction force Fx4 = push from instructor on book If book + accelerates Fx4 > Fx2 If book - accelerates Fx4 < Fx2 Zero acceleration Fx4 = Fx2 Dr. Sasho MacKenzie - HK 376
Y X The right hand ring Static Equilibrium Gymnast Performing Iron Cross • Show the complete free body diagram for • The right hand ring • The gymnast • The cable • The cable and ring Given ax = 0 ay = 0 Dr. Sasho MacKenzie - HK 376
a) The Right Hand Ring Given ax = 0 ay = 0 Fx = max Fy = may Dr. Sasho MacKenzie - HK 376
Given ax = 0 ay = 0 b) The Gymnast Fx = max Fy = may Dr. Sasho MacKenzie - HK 376
Given ax = 0 ay = 0 c) The Right Hand Cable Fx = max Fy = may Dr. Sasho MacKenzie - HK 376
d) Cable and Ring Given ax = 0 ay = 0 Fx = max Fy = may Dr. Sasho MacKenzie - HK 376
Y X Down Hill Skier Show the complete free body diagram for the skier and skis system Dr. Sasho MacKenzie - HK 376
Y X New Reference Frame Given ax < 0 ay = 0 Fx = max Fy = may Dr. Sasho MacKenzie - HK 376
Y X Pushing Book on Table • Draw the complete FBD of • The book • The table Given ax > 0 ay = 0 Dr. Sasho MacKenzie - HK 376
Y X a) The Book Given ax > 0 ay = 0 Fx2 mg Fx1 Fy1 Fx = max Fx2 – Fx1 = max > 0 Fx2 > Fx1 Fy = may Fy1 – mg = may = 0 Fy1 = mg Dr. Sasho MacKenzie - HK 376
Fy1 Fx1 mg Fx2 Fx3 Y Fy2 Fy3 X b) The Table Given ax = 0 ay = 0 Fx = max Fx1 – Fx2 – Fx3 = max = 0 Fx1 = Fx2 + Fx3 Fy = may Fy2 + Fy3 – Fy1 – mg = may = 0 Fy2 + Fy3 = Fy1 + mg Dr. Sasho MacKenzie - HK 376
Y X Hammer Thrower • Draw the complete FBD of • The athlete • ax < 0 ay = 0 • The hammer • ax > 0 ay < 0 Dr. Sasho MacKenzie - HK 376
Fx1 mg Y Fx2 Fy1 X a) The Athlete Given ax < 0 ay = 0 Fx = max Fx2 – Fx1 = max < 0 Fx2 < Fx1 Fy = may Fy1– mg = may = 0 Fy1 = mg Dr. Sasho MacKenzie - HK 376
Fx1 mg Y X b) The Hammer Given ax >0 ay < 0 Fx = max Fx1 = max > 0 Fx1 > 0 Fy = may – mg = may < 0 0 > mg Dr. Sasho MacKenzie - HK 376