Download

1 / 78
780 likes | 813 Vues
Learn how to operate and maintain your CPAP or bi-level unit effectively to improve your sleep apnea therapy. Follow these detailed instructions for setup, maintenance, and hygiene practices.

E N D
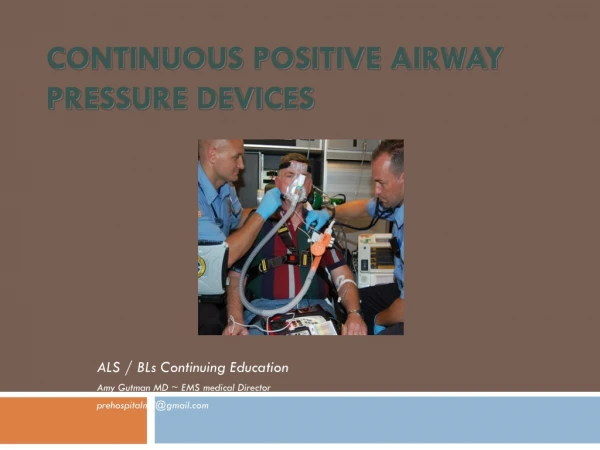
Instructions To Patients Using positive airway pressure and oxygen concentrators BYAHMAD YOUNESPROFESSOR OF THORACIC MEDICINE Mansoura Faculty of Medicine
General instructions • Do not make any adjustment to your CPAP or bi-level unit. • CPAP and bi-level units are available in different models. However, all models have the same basic parts: 1- power switchto turn the unit off and on 2- An air outletto which the tubing is connected 3- An air inletwhere air is pulled into the unit through a filter (s) which removes dust from incoming air.
Ramp Feature • The ramp feature allows you to reduce the air pressure to a very low level as you begin to fall asleep. • Within an adjustable time frame, the pressure will automatically “ramp up” to your prescription pressure at a gentle rate that should not awaken you
Operating Your CPAP/Bi-Level Unit 1-Select a location near the bedside, 2-Place the CPAP/bi- level unit on a sturdy surface. Do not place the unitabove your head. You may pull on the tubing at night and pull the unit onto your head 3-Make certain there is air circulation around the unit and that the air inlet is not blocked by bedclothes, or furniture. 4- Do not place the unit near a heat or cool source. 5- Do not place the unit on a pad or carpet that could obstruct the flow of air around or underneath the unit.
Operating Your CPAP/Bi-Level Unit • If the AC power cord is not permanently attached to your unit, plug its female end into the AC power inlet on the back of the unit. Plug the other end of the cord into an appropriate electrical power outlet. • Do not use an extension cord with your unit. • Do not plug the unit into an outlet that has other major appliances plugged into it
Operating Your CPAP/Bi-Level Unit • Connect your tubing to the air outlet on the CPAP/bi-level or humidifier, • Fill humidifier chamber with STERILE or DISTILLED water. If distilled water is not available, you may boil tap water for 20 minutes. Allow the water to cool before adding to the humidifier. • Please do not fill chamber beyond the fill line, this will prevent water from blowing into the circuit. • Never place medications into your chamber • Always remember to turn off the unit when not in use, or when you are refilling the unit. • A tubing 8 inch is connected directly to the CPAP outlet port, and the other end to the inlet port of the humidifier
ASSEMBLY OF HEADGEAR • There are many types of headgears which are used in conjunction with many types of mask • Place the headgear on your head adjust it to a comfortable fit using the Velcro tabs to hold it in place. • Make sure the mask has a snug fit you do not want it too tight but you also do not want air too leak out the sides • Each strap should be adjusted so that it form a secure fit, do not tighten one strap tighter then the next; all should be pulled to the same extent.
FINAL ASSEMBLY • Connect the tubing to your mask, The other end of the tubing should then be connected to the outlet of your unit. • Washing your face to remove excess facial oils will help to achieve a leak-free fit and prolong the useful life of the mask. • Turn the unit on. Adjust the mask until there are no leaks; again keep in mind all straps should be pulled to the same tension. • Once you have fit your mask or pillows and there are no leaks you may want to mark the straps with a marker to identify the position for future positioning. • Do not block the exhalation port on your mask circuit. The exhalation port may be located at the base of your mask or in a special attachment between your mask and tubing.
OXYGEN AND YOUR CPAP UNIT • Your oxygen may be administered via a port on the mask. • The small tubing from your oxygen system is directly connected to the port on your nasal mask. • Keep the ports closed unless using oxygen.
OXYGEN AND YOUR CPAP UNIT • Your tubing is connected to the large end on the tee adapter and the small tubing from your oxygen system is connected to the small nipple on the tee adapter. • Always turn your CPAP or bi-level unit ON before turning ON the oxygen flow. • Always turn OFF the oxygen before turning OFF the CPAP or bi-level unit
Cleaning Your Humidifier • Note:If you have a heated humidifier, immerse only the water chamber in water or disinfectant. • Never immerse electrical appliances in any liquid. Daily Cleaning Step 1: Check water level everyday. Step 2: Empty any remaining water Out of the reservoir after each use. Step 3: Wash your hands. Step 4: Rinse with clean water and allow to air dry
Cleaning Your Humidifier Twice Weekly Cleaning Step 1: Wash your hands. Step 2: Soak the humidifierin soap and water for 30 minutes. Be sure the mixture completely covers and fills the humidifier. Step 3: Remove the humidifier and shake out the excess solution. Step 4: Rinse with clean water and allow to air dry. NOTE:DO NOT immerse CPAP/bi- level unit in water.
Cleaning Your Equipment Mask Interface and Tubing • To lengthen the life of your equipment and supplies, it is important to inspect and clean all components regularly. • The masks, tubing and headgear should last approximately 6 to 12 months, but the actual life of the equipment can vary greatly. • Inspect all components daily and clean them as necessary. • Daily cleaning is recommended. Caution:DO NOT clean any parts of the system with alcohol, cleaning solutions containing alcohol or any strong household cleaners
Cleaning Your Equipment DAILY Step 1: Wash your hands. • Step 2: With a soft cloth, gently wash the mask or pillows with a solution of warm water and a mild, clear liquid detergent (one-part white vinegar, and two-parts water solution). Step 3: Rinse thoroughly. If the mask still feels oily, repeat Step 2. Step 4: Allow the mask or pillow to air dry.
Cleaning Your Equipment WEEKLY Step 1: Wash your hands. Step 2: Soak tubing and filter (if applicable). Hang tubing over door or shower rod to drain excess water. Step 2: With a soft cloth, gently wash the mask frame, humidifier chamber, and mask headgear with a solution of warm water and a mild, clear liquid detergent Step 3: Rinse thoroughly. Step 4: Allow to air dry.
Cleaning Your Equipment • Note that slight readjustments to your headgear straps may be needed after repeated washings. • Never use bleach when cleaning your headgear or chinstrap. • Never iron your headgear or chinstrap.
Cleaning Your Equipment Clean Your Unit Weekly Step 1: Unplug the unit before cleaning it. Never immerse the unit in water. Step 2: Using a cloth slightly dampened with water and wipe the outside of the unit. Step 3: Use a dry cloth to wipe the unit dry. Step 4: Make sure the unit is thoroughly dry before plugging it in again.
Filter Maintenance There are two types of filters Disposable normally replaced 4 – 6 weeks, and the non-disposable cleaned a minimum of once per week. • Please review the manufacturer’s product literature for specific filter maintenance instructions. Never place a damp filter in your CPAP or bi-level unit.
Information for CPAP Patients • CPAP device should be used every night and anytime that you sleep. • Since your sleep is now deeper and more restful than before, you may not need to sleep as many hours to be rested. • Try to go to bed and get up about the same time everyday. This will help your body to establish a regular sleep/wake cycle. • If you are on blood pressure medication, make sure all of your doctors are aware that you are using a CPAP or bi-level unit. Never change your blood pressure medication without your doctor’s approval.
Information for CPAP Patients • After a week or two of using your CPAP or bi-level unit, you should be less sleepy during the day. • Your snoringshould be reduced or eliminated when you use your CPAP or bi-level unit. If a family member notices that you are beginning to snore loudly again while wearing the unit, You may need an adjustment to your CPAP pressure. • The noise of the machine may initially be bothersome to you and your bed partner. Generally, it is a matter of just getting used to it and usually will become less bothersome over time. If after several weeks it still bothers you, you can place the machine further away from you. (However, you should not use more than two lengths of tubing. The pressure may drop and the machine will become ineffective.)
Information for CPAP Patients • During the first few weeks of treatment you may experience some sneezing and perhaps a sensation of nasal obstruction. This is normal. Nasal congestion is the most common side effect of CPAP therapy. Many times this will resolve itself as you become accustomed to your CPAP unit. It may take up to four weeks. • NOTE: If dryness is occurring, please advise your therapist as you may need your humidity setting adjusted. • weight loss generally will improve your overall health and could allow your doctor to decrease the pressure of air used in your machine. If you gain weight, your doctor may need to increase the pressure of your CPAP unit.
Information for CPAP Patients • If you require surgery or hospitalization for any reason, make sure you inform your physician of your diagnosis and the need to use the CPAP machine with all sleep. You need to take your CPAP unit to the hospital so that you can use it during your hospitalization, especially when you are sedated before and after surgery. • You should be able to use CPAP all night long, every night.
Safety Precautions 1- Never try to clean the unit by placing it in water. The electrical components will be damaged and this can create a shock to the user the next time it is plugged into an electrical outlet. 2- Never plug in the unit if it is wet or damp. Moisture always increases the potential of electrical shock. 3- Never plug your unit into an electrical outlet that is being used to supply power to another major appliance. 4- Never use your unit with an extension cord. 5- Never try to repair your CPAP unit
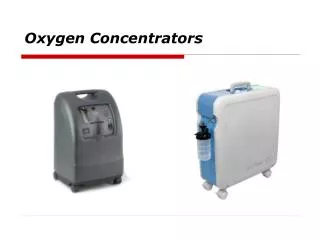
OXYGEN CONCENTRATOR • Your doctor has prescribed your oxygen to be used in the following manner: • ____ liters per minute duringnormal activity. • ____ liters per minute with sleep. • ____ liters per minute when exercising. • ____ liters per minute continuously. • Never increase your oxygen without the approval of your doctor.
YOUR OXYGEN CONCENTRATOR • An oxygen concentrator is an electrically operated device that separates the oxygen from the other gases in the air and delivers the concentrated oxygen to you. • At 2 liters per minute, the air that you receive from your concentrator is more than 90% oxygen. • All Oxygen concentrators models have the same basic parts: 1- Power switch to turn the unit on and off, 2- Flow selector that regulates the amount of oxygen you receive, 3- An alarm system that alerts you if the power is interrupted 4- if recommended, a humidifier bottle. The oxygen is delivered to you through a nasal cannula. The tubing on the cannula is attached to the outlet on the unit. Sometimes, an extra length of tubing may be provided. This will allow you to move a farther distance from your concentrator
OPERATING YOUR OXYGEN CONCENTRATOR • Step 1: Check the number of prongs on the plug of your concentrator. For Two-Prong Plugs: • Do not use an extension cord with the concentrator. • Do not plug the concentrator into an outlet that has other major appliances plugged into it. For Three-Prong Plugs: • Use these instructions ONLY if you are sure that your outlet is grounded. If your outlet is not grounded, or if you are unsure, contact an electrician. Using an ungrounded outlet could result in a fire hazard or shock. • If your outlet is not a 3-prong, you may need to use a plug adapter. • When using a plug adapter, connect the ground screw.
OPERATING YOUR OXYGEN CONCENTRATOR Step 2:Attach nipple adapter or water bottle to the concentrator outlet tube and attach the oxygen tubing to the nipple outlet. Step 3:If a humidifier bottle is recommended, attach a bottle that is filled with distilled water. • Center the threaded cap on the humidifier bottle under the threaded outlet tube on the concentrator. • Turn the cap on the humidifier bottle until it is tightly screwed onto the outlet tube.
OPERATING YOUR OXYGEN CONCENTRATOR Step 4:Turn machine ON. The alarm will sound for a few seconds until the proper pressure is reached. Step 5:Adjust the oxygen flow rate by turning the liter controlknob until the flow is at the prescribed number. FLOWMETER WITH LITER TUBE: • Adjust the liter control knob until the middle of the indicator ball is at the prescribed number. • Never change this liter flow without instructions from your doctor.
OPERATING YOUR OXYGEN CONCENTRATOR Step 6: Fit the nasal cannula to your face so that it is comfortable. • Insert the two prongs of the cannula into your nostrils. Make sure the prongs face upward and curve into your nostrils. • Slide the tubing over and behind each ear. • Adjust the tubing to fit comfortably under your chin by sliding the adjuster upward. Be careful not to adjust it too tightly. Step 7: You should use your concentrator for the number of hours each day that your doctor has prescribed. When you have finished using your oxygen: 1- Remove the nasal cannula. 2-Turn OFF the machine.
CLEANING AND MAINTENANCE PROCEDURES • Oxygen systems require very little cleaning. The only item that requires cleaning on your concentrator is the external filter and the cabinet. The cabinet can be washed with a damp cloth. • To prevent equipment contamination, effective cleaning procedure must be carried out on a routine basis. • Do all cleaning and disinfecting in a clean environment. Avoid doing it after vacuuming, under an open window, or in dusty, dirty ,smoky areas.